
Create a Livestream
Here we describe the required information you need to provide to create a livestream and optional functions that you can choose.
Create a New Livestream
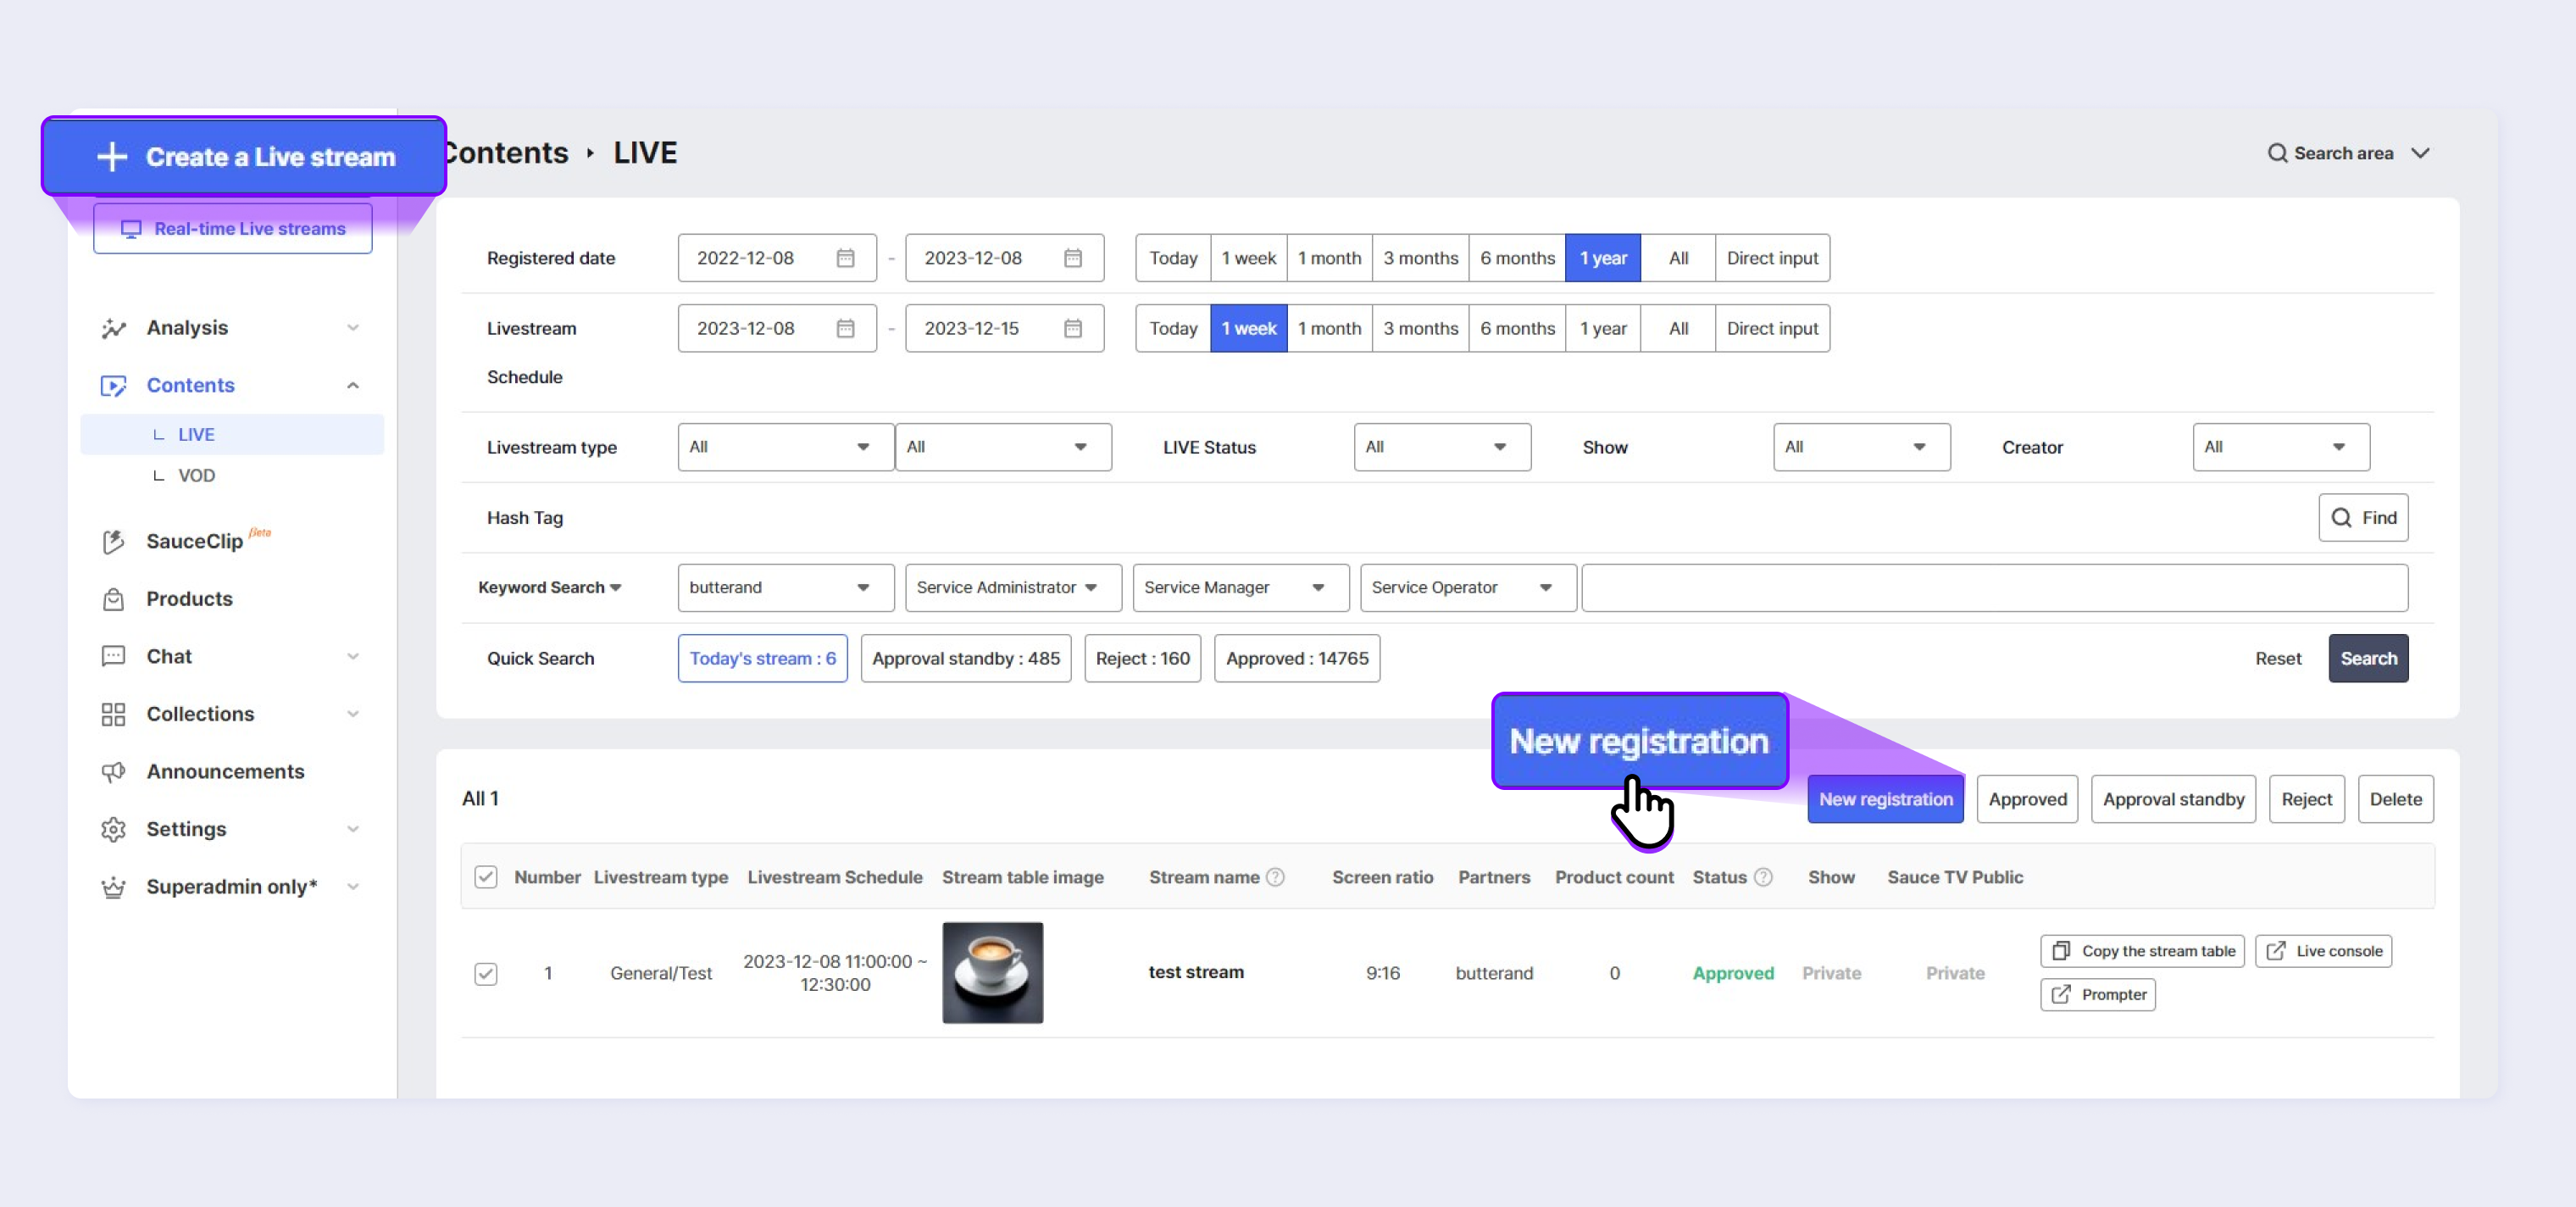
- Click Create a Livestream, a quick menu in Saucelive Admin, to create a livestream.
- Click Contents > LIVE (Livestream) > New registration (Create a Livestream) to go to the information input screen for creating a livestream.
Input Required Information
There are items you have to fill in when creating a livestream. You must fill in every items below to successfully create a livestream.
Division (Classification)
Select whether to create a Real-time Livestream or a VOD Livestream.
A VOD Livestream is not a real-time livestreaming, but uses the VOD of the previously streamed live to stream as live. For more information on VOD Livestreams, see the Creating VOD Livestream chapter.
Registered by
You can view or edit the information of the person who registered the livestream.
Since information and permission of livestream settings may vary by the account of the person who registered the livestream, make sure to create a livestream with the actual account that will operate the livestream.
- Service Administrator: Can view and edit all livestream creation information registered by the Service Administrators, Managers, and Operators.
- Service Manager: Can view and edit all livestream creation information registered by the Service Operator accounts under the relevant Manager. Note that viewing and editing information is limited to the same Service Manager account.
- Service Operator: Can view and edit the livestream schedule information registered by Operators themselves. However, approval of the higher-level Service Manager or Service Administrator is required to stream the livestream after creation.
Stream date (Livestream Schedule)
You can set the livestream schedule. You can schedule the livestream at least 5 minutes from the current time and go live for up to 24 hours.
Note that the system automatically cancels the livestream if you do not stream it within 30 minutes past the scheduled live time, rendering the current livestream information invalid.
Stream name (Title)
Enter the content to be displayed in the livestream title area.
Stream category (Content Category)*
Set category information based on livestream characteristics.
StreamType (Aspect Ratio)*
Set the aspect ratio for the livestream. The default setting is portrait mode at a 9:16 aspect ratio.
Landscape mode is set to a 16:9 aspect ratio. For instructions on how to view in landscape mode, see a [Document] .
However, the same ratio as the livestream type used for scheduling must be used when setting streaming information with an external streaming program.
Stream table thumbnail (Live Preview) *
This is the information shown on a standby screen before livestreaming that can be added in an image or video format. The representative image or video is displayed first on the player screen.
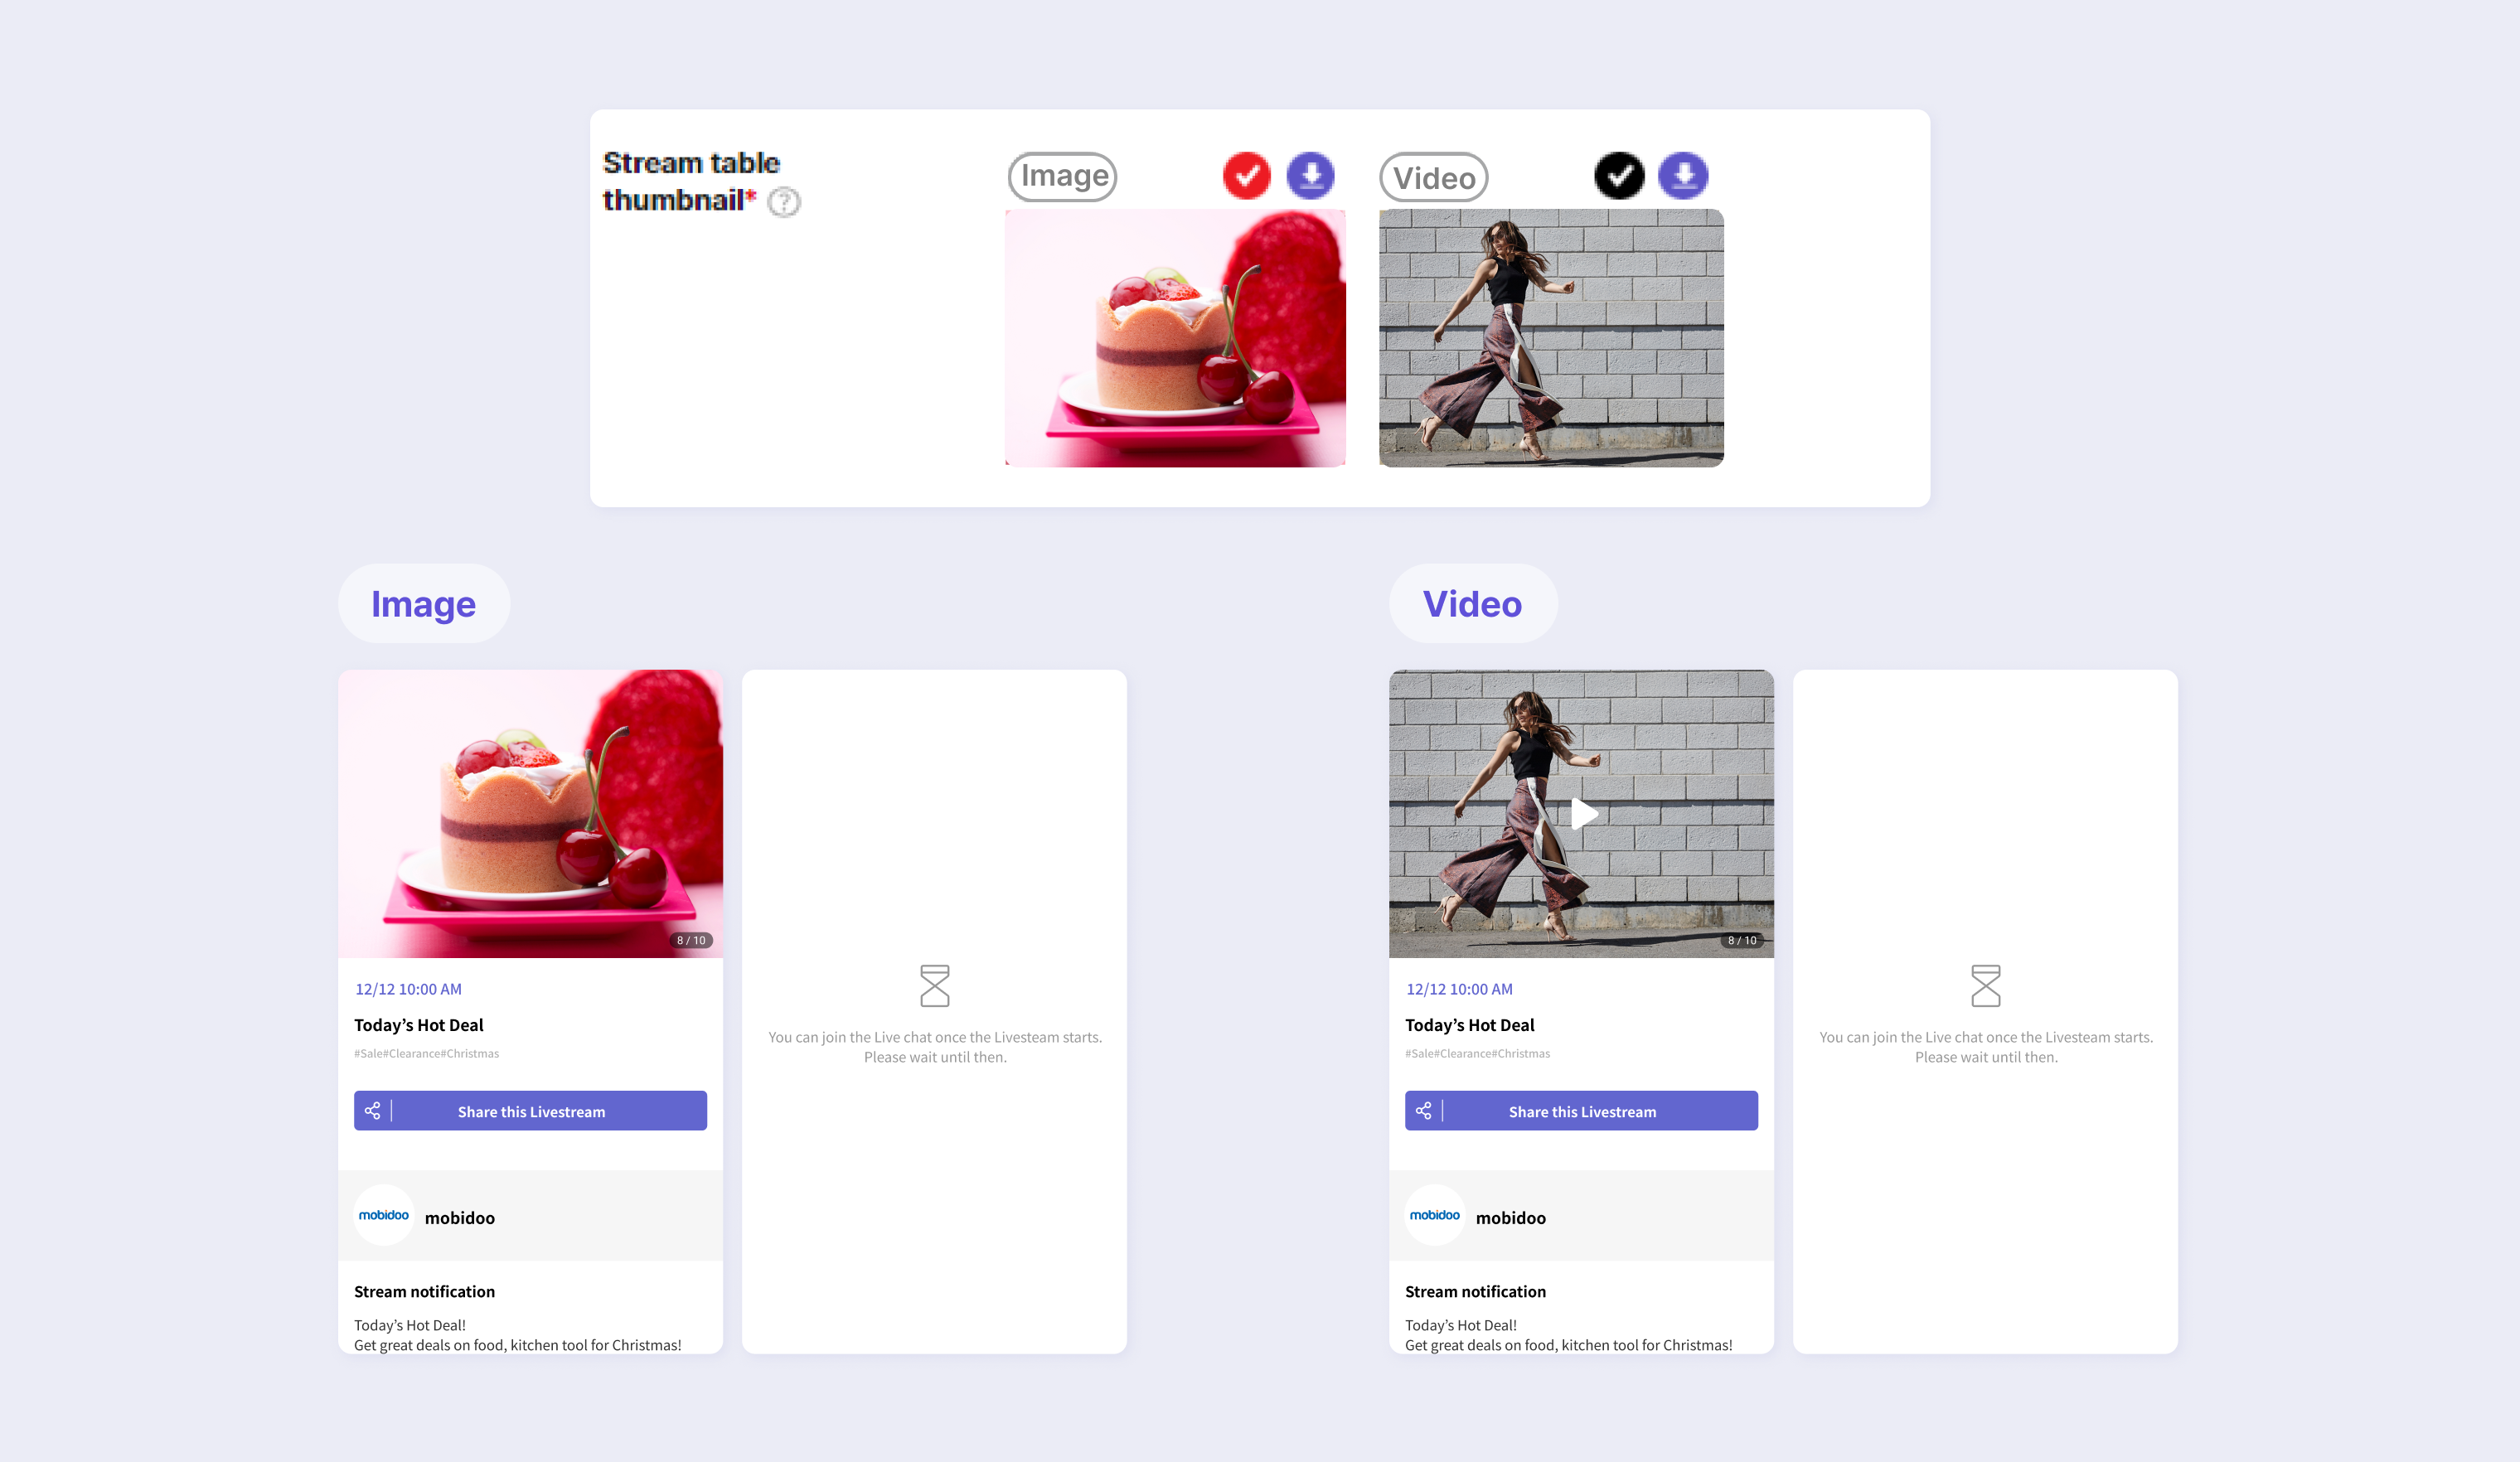
Streaming Screen Example
- You can register up to 5 images.
- The recommended image size is 1080 px wide and 810 px high.
- The recommended image capacity is 1 MB, and JPG, PNG, and GIF file formats can be registered.
- Only one video with a 4:3 ratio can be registered, and the supported file format is MP4.
- You can change the display order by dragging the images with a mouse. However, the representative image or video is displayed first.
Stream thumbnail (Collection Image)*
These are the images shown when a user accesses the livestream from collection and in the low-power mode.
- You can register up to 5 images but only one representative image is displayed on the collection screen.
- The recommended image size is 900 px wide and 1200 px high.
- The recommended image capacity is 1 MB, and JPG, PNG, and GIF file formats can be registered.
Input Optional Information
These are optional but useful functions when operating livestreams. Enter items required for livestreams.
Sharing Function
If you check this function, the Share button is activated on the live screen. Viewers can copy and share the livestream link using this function. The sharing function is checked by default.
Livestream Status
The Service Administrator can set the approval status of the scheduled livestream: Awaiting approval, Approved, and Rejected.
Collection Public
Select whether to display the livestream on the client site after it ends. For Test and Secret livestream types, Collection Public is automatically set to Private.
Type
You can set whether the livestream is public or private and whether the livestream is a test or main livestream.
- General: A public livestream.
- Main Livestream: A livestream that is actually streamed to viewers.
- Test: A livestream conducted as rehearsal before an actual livestream.
- Secret: A private livestream for which you can set a password.
- Main Livestream: A private livestream.
- Test: A livestream conducted as rehearsal before an actual livestream.
- When you select Test and Secret, Collection Public is automatically set to Private.
Multicast Livestream Settings
This function allows streaming livestreams simultaneously to a platform that provides RTMP (Real Time Messaging Protocol) information.
Follow the steps below and set multicast livestream to allow viewers to watch livestreams on various platforms.
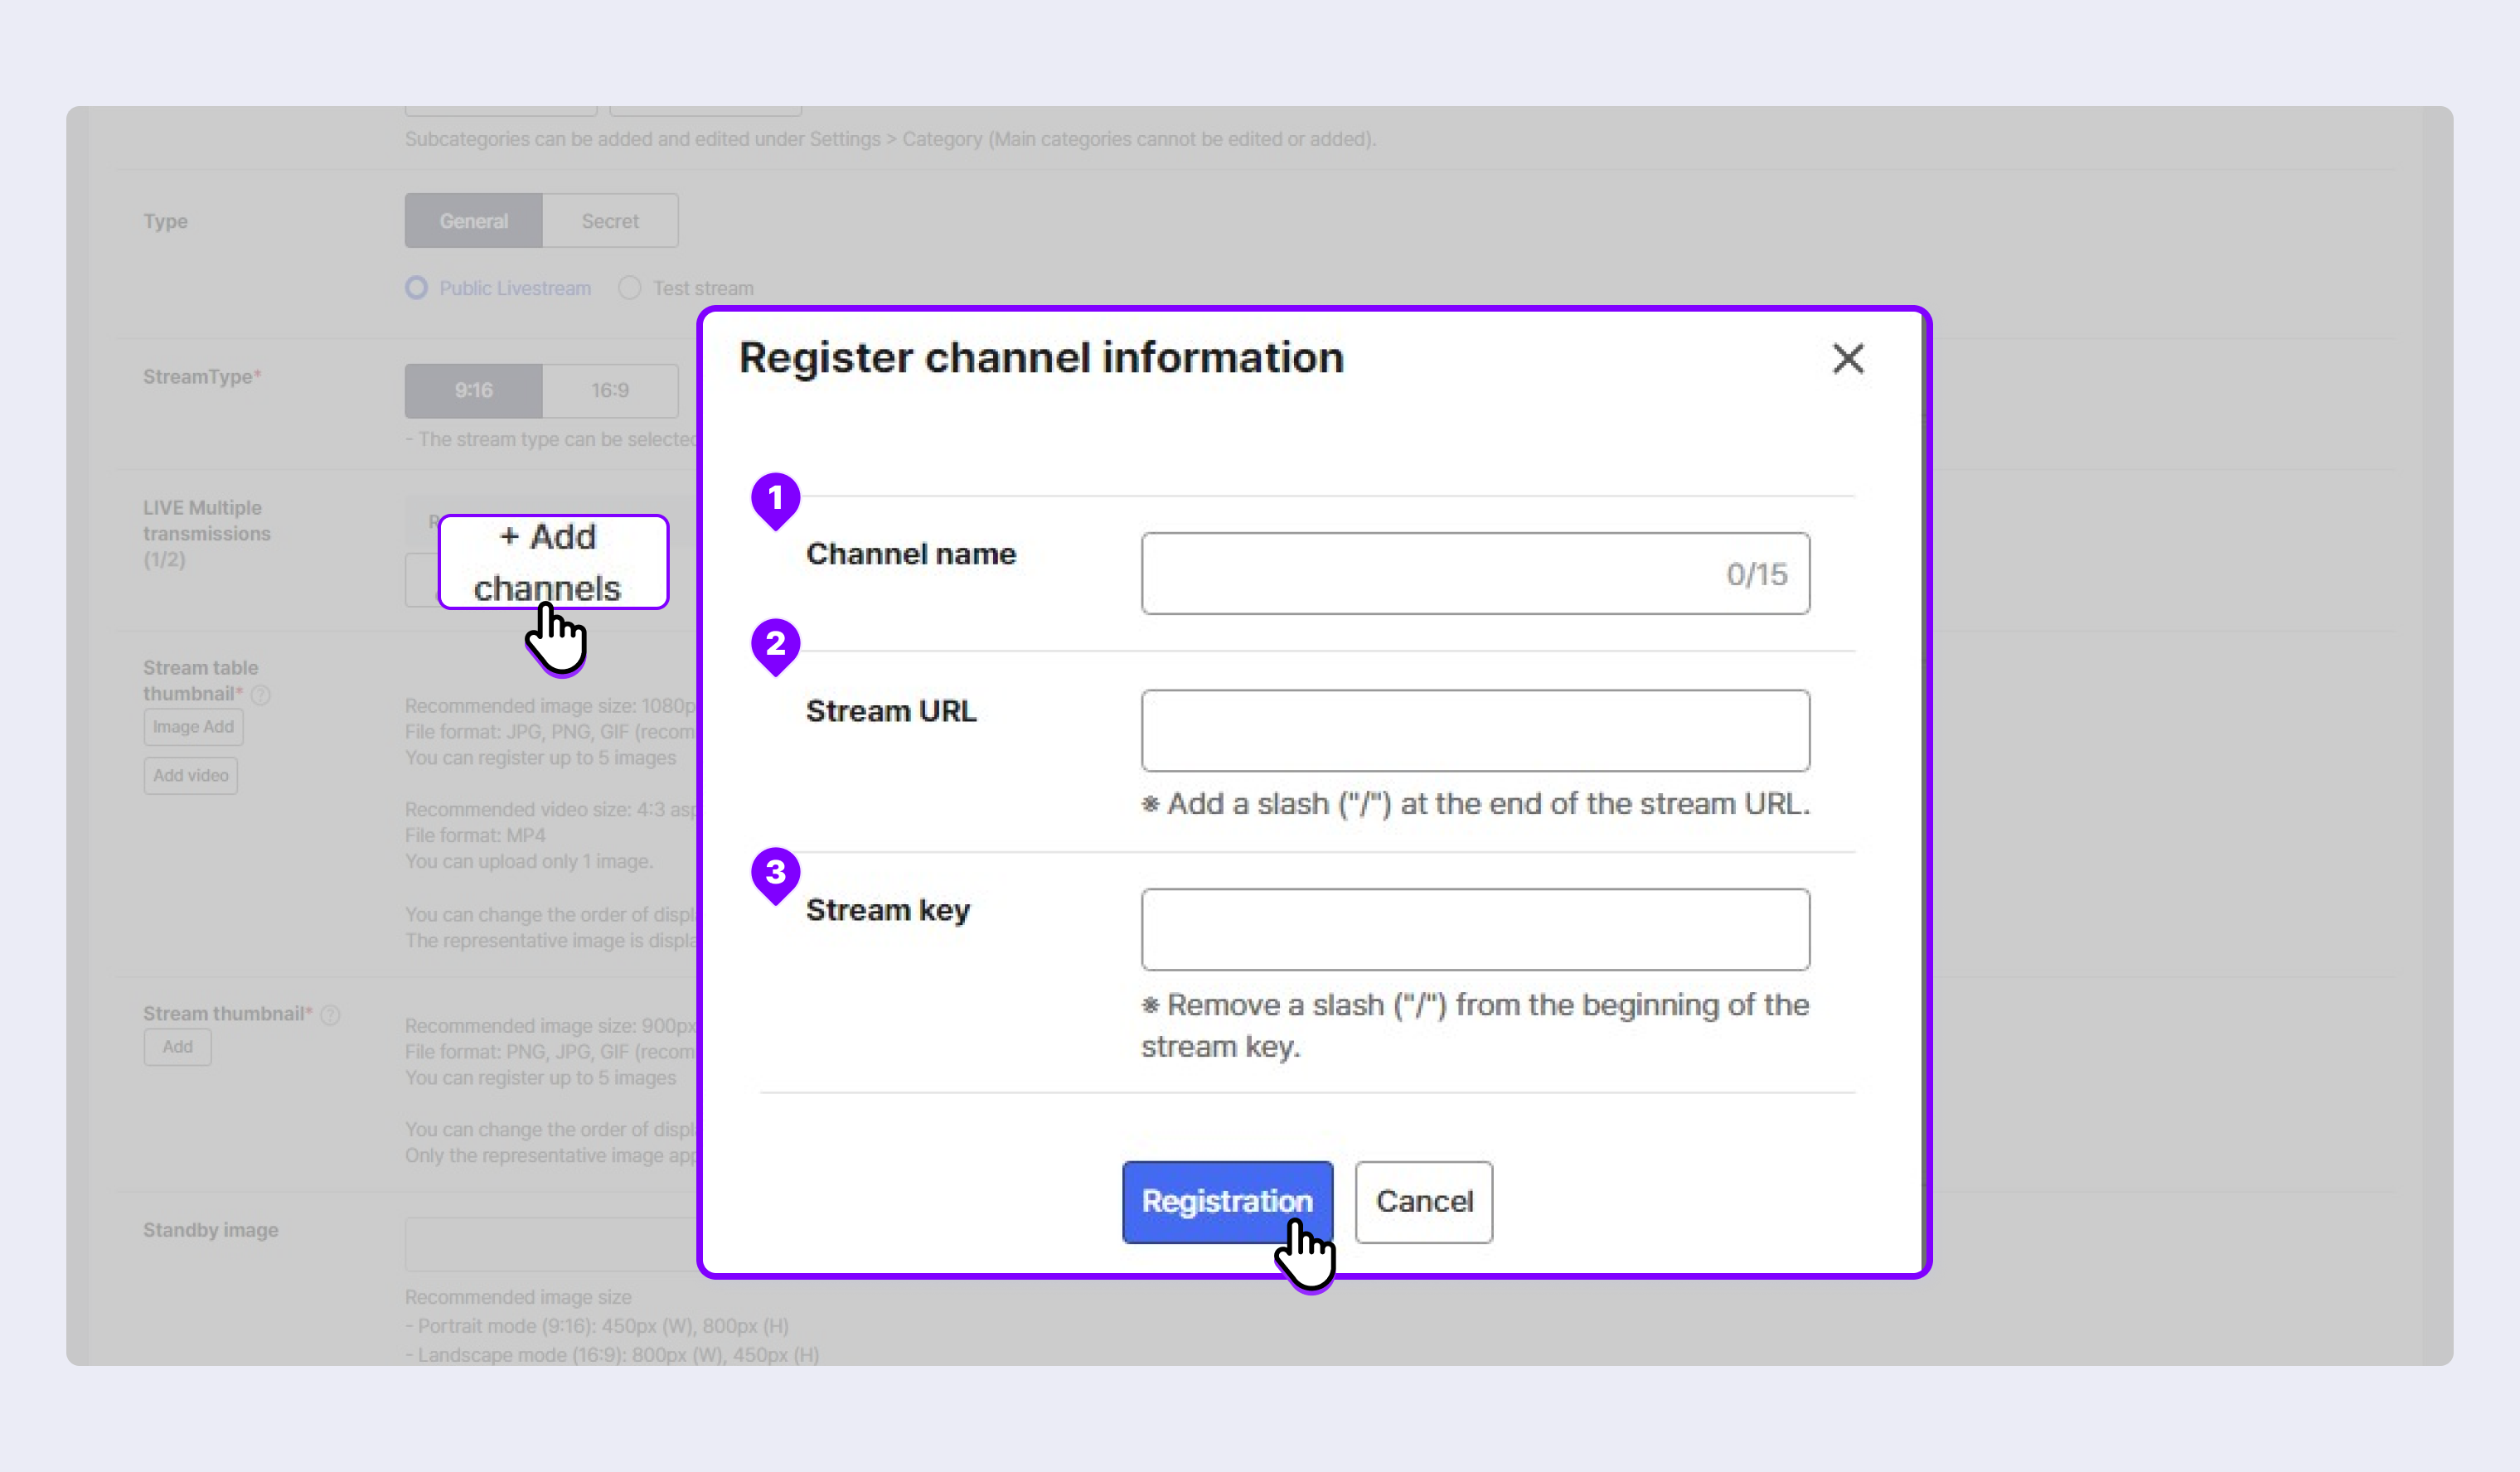
STEP 1. Access a platform (e.g. Facebook, YouTube, etc.) for multicast livestream and set the details of the livestream according to the platform's guide.
STEP 2. When you click Create a Livestream > Multicast Livestream > + Add Platform in Saucelive Admin, a popup screen opens.
STEP 3. Copy the Stream URL and Stream Key provided by the platform, enter ① Platform, ② Stream URL, and ③ Stream Key in corresponding fields, and click Register.
Multicast livestream is allowed on up to 4 platforms. Contact the Mobidoo manager for the number of platforms you want to use for multicast livestream.
Standby Image
This is a background image displayed on the screen when the livestream is interrupted or video streaming is not properly working. If you do not separately add a image, the basic image prepared by Mobidoo is shown.
- The recommended image size is 450 px wide and 800 px high for Portrait Mode (9:16) and 800 px wide and 450 px high for Landscape Mode (16:9).* The recommended image capacity is 1 MB, and JPG, PNG, and GIF file formats can be registered.
Live Curation
Set the curation list to be included in the Collection Page of the client's own store site. You can also select multiple curation areas to which the live will belong.
Replay Curation
Set the Curation Category to include Replay VOD after the live stream ends.
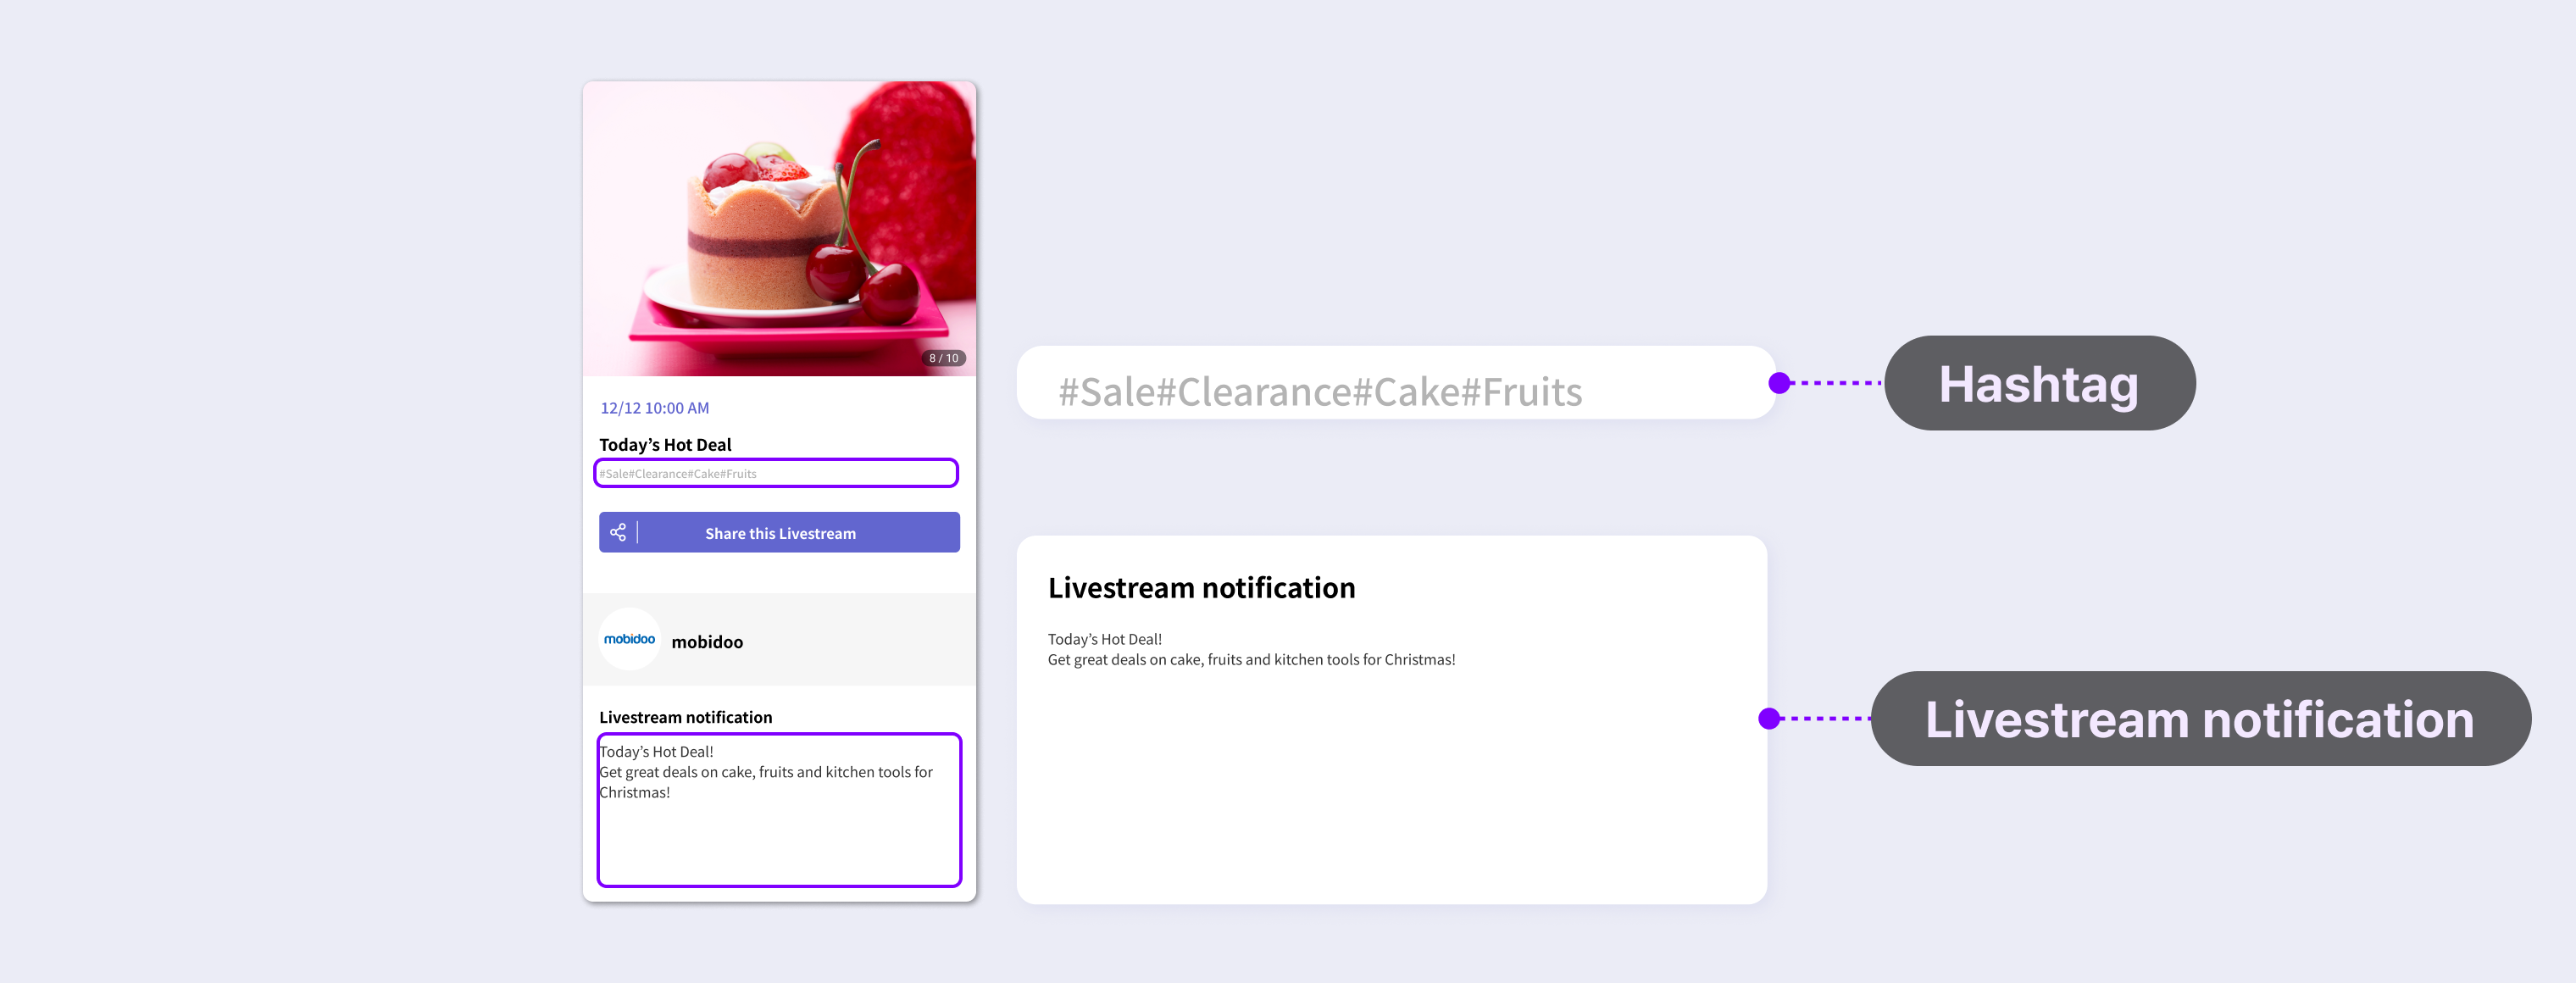
Hashtag
You can set the hashtag information to be shown on the screen before the live.
송출 화면 예시
Live introduction
Enter the content to be shown on the **Live Introduction** tab on the player screen while on air. Before livestreaming, the content is displayed as a livestream announcements on the Stream table screen. See the example screen above.
You can also add an image in addition to the text description, and viewers can zoom in on the image to view it.
- You can register up to 1,000 characters for the text and up to 10 images. The recommended image size is 450 px wide and 800 px high for Portrait Mode (9:16) and 800 px wide and 450 px high for Landscape Mode (16:9). The recommended image capacity is 1 MB, and JPG, PNG, and GIF file formats can be registered.* The image is zoomed in to fit the viewing device size when a viewer touches or clicks it.
Insert
This is a function for setting an image or video to be shown to viewers while on air. The livestream administrator can manually show the added image or video.
Step 1. Click the Add Image or Add Video button.
STEP 2. Add the image or video you want in the popup.
STEP 3. Click the Add button.
STEP 4. You can delete items from the insert image list. You can change the order by dragging.
Click Image Show(Display Image) in Liveconsole to show the image on the viewer's player, and stop showing through Stop Showing (Stop Displaying). 👉 [Go to see the live console insert]

- You can register up to 15 images. The recommended image size is 450 px wide and 800 px high for Portrait Mode (9:16) and 800 px wide and 450 px high for Landscape Mode (16:9). The recommended image capacity is 1 MB, and JPG, PNG, and GIF file formats can be registered. You can change the display order by dragging images with a mouse. However, the representative image is displayed first. You can register up to 1 video. The recommended video aspect ratio is a 9:16 aspect ratio for Portrait Mode and 16:9 aspect ratio for Landscape Mode. The recommended capacity is 20 MB, and the supported file format is MP4.
Stream Banner
You can set a banner to be shown on the player screen while on air and its connection information. You can select one among two items in Link to set the banner.
- URL: Clicking banner redirects to the registered URL.
- Phone number: Clicking banner connects to the registered phone number for a direct call. Phone connection is possible only when viewing on a mobile phone.
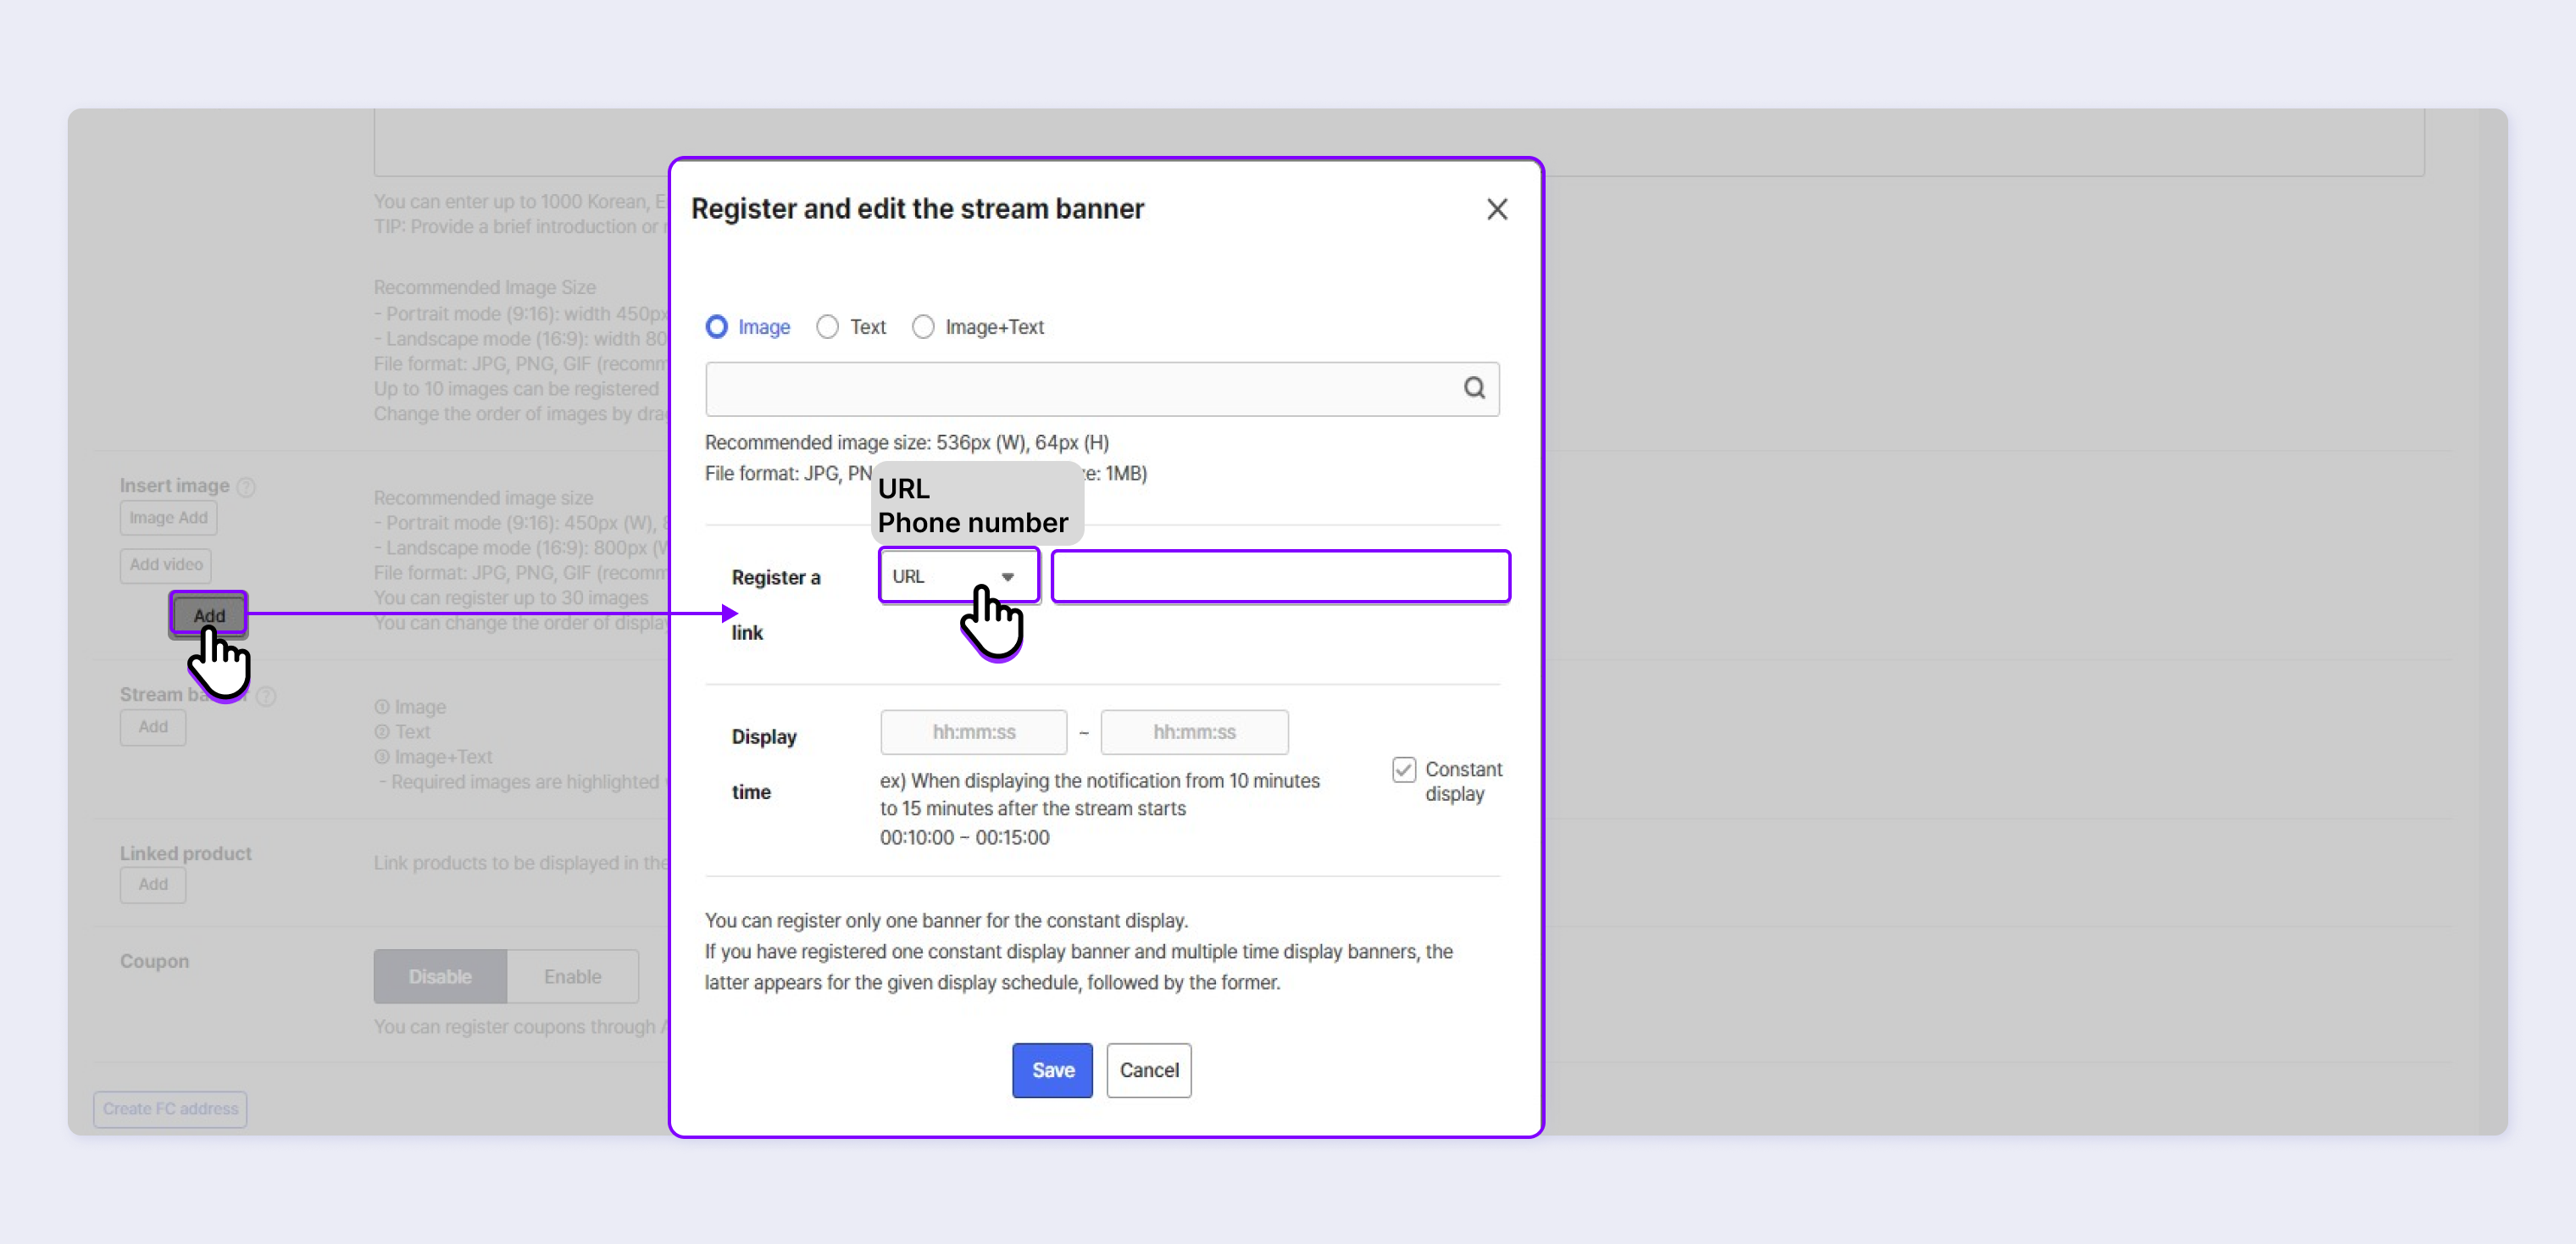

- The recommended image size is 536 px wide and 64 px high. The recommended image capacity is 1 MB, and JPG, PNG, and GIF file formats can be registered. You can register only one banner for the constant display.
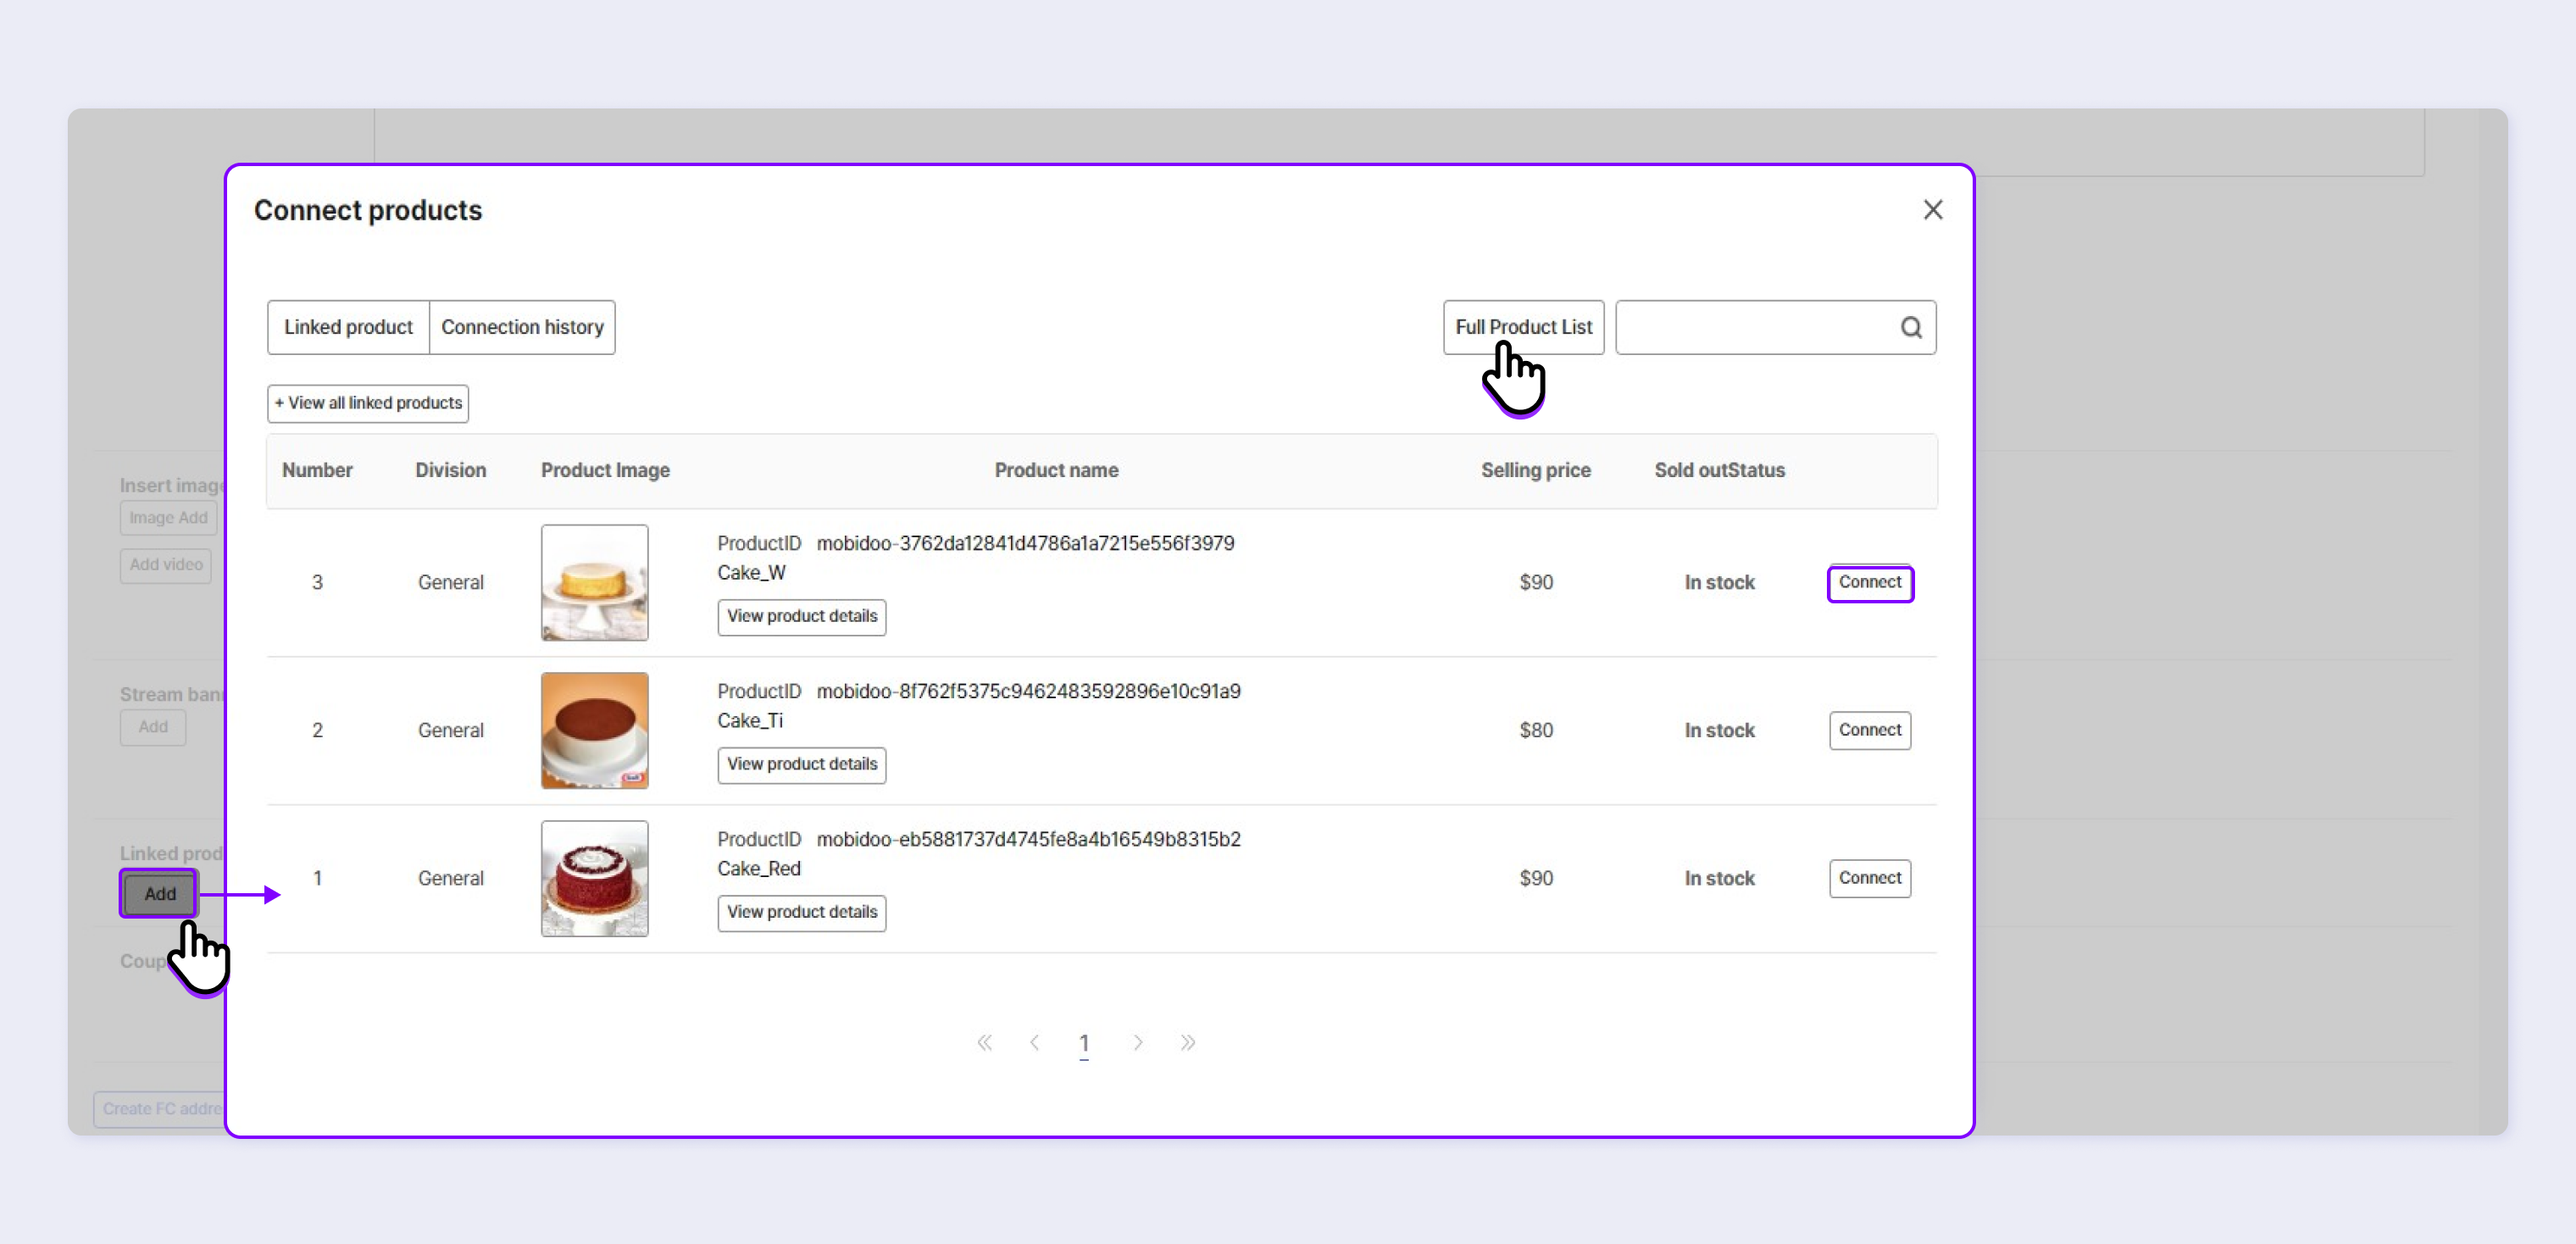
Linked Product
You can add the product to introduce on livestream.
STEP 1. Click the Add button to add a featured product.
STEP 2. You can view the list of registered products in the Full Product List.
You can search the product with the product name and brand name.
STEP 3. When you click the Add button in the shown list, the product is added to the Featured Product List.
STEP 4. You can change the product order by dragging the right marker. Products are shown in the order of list.
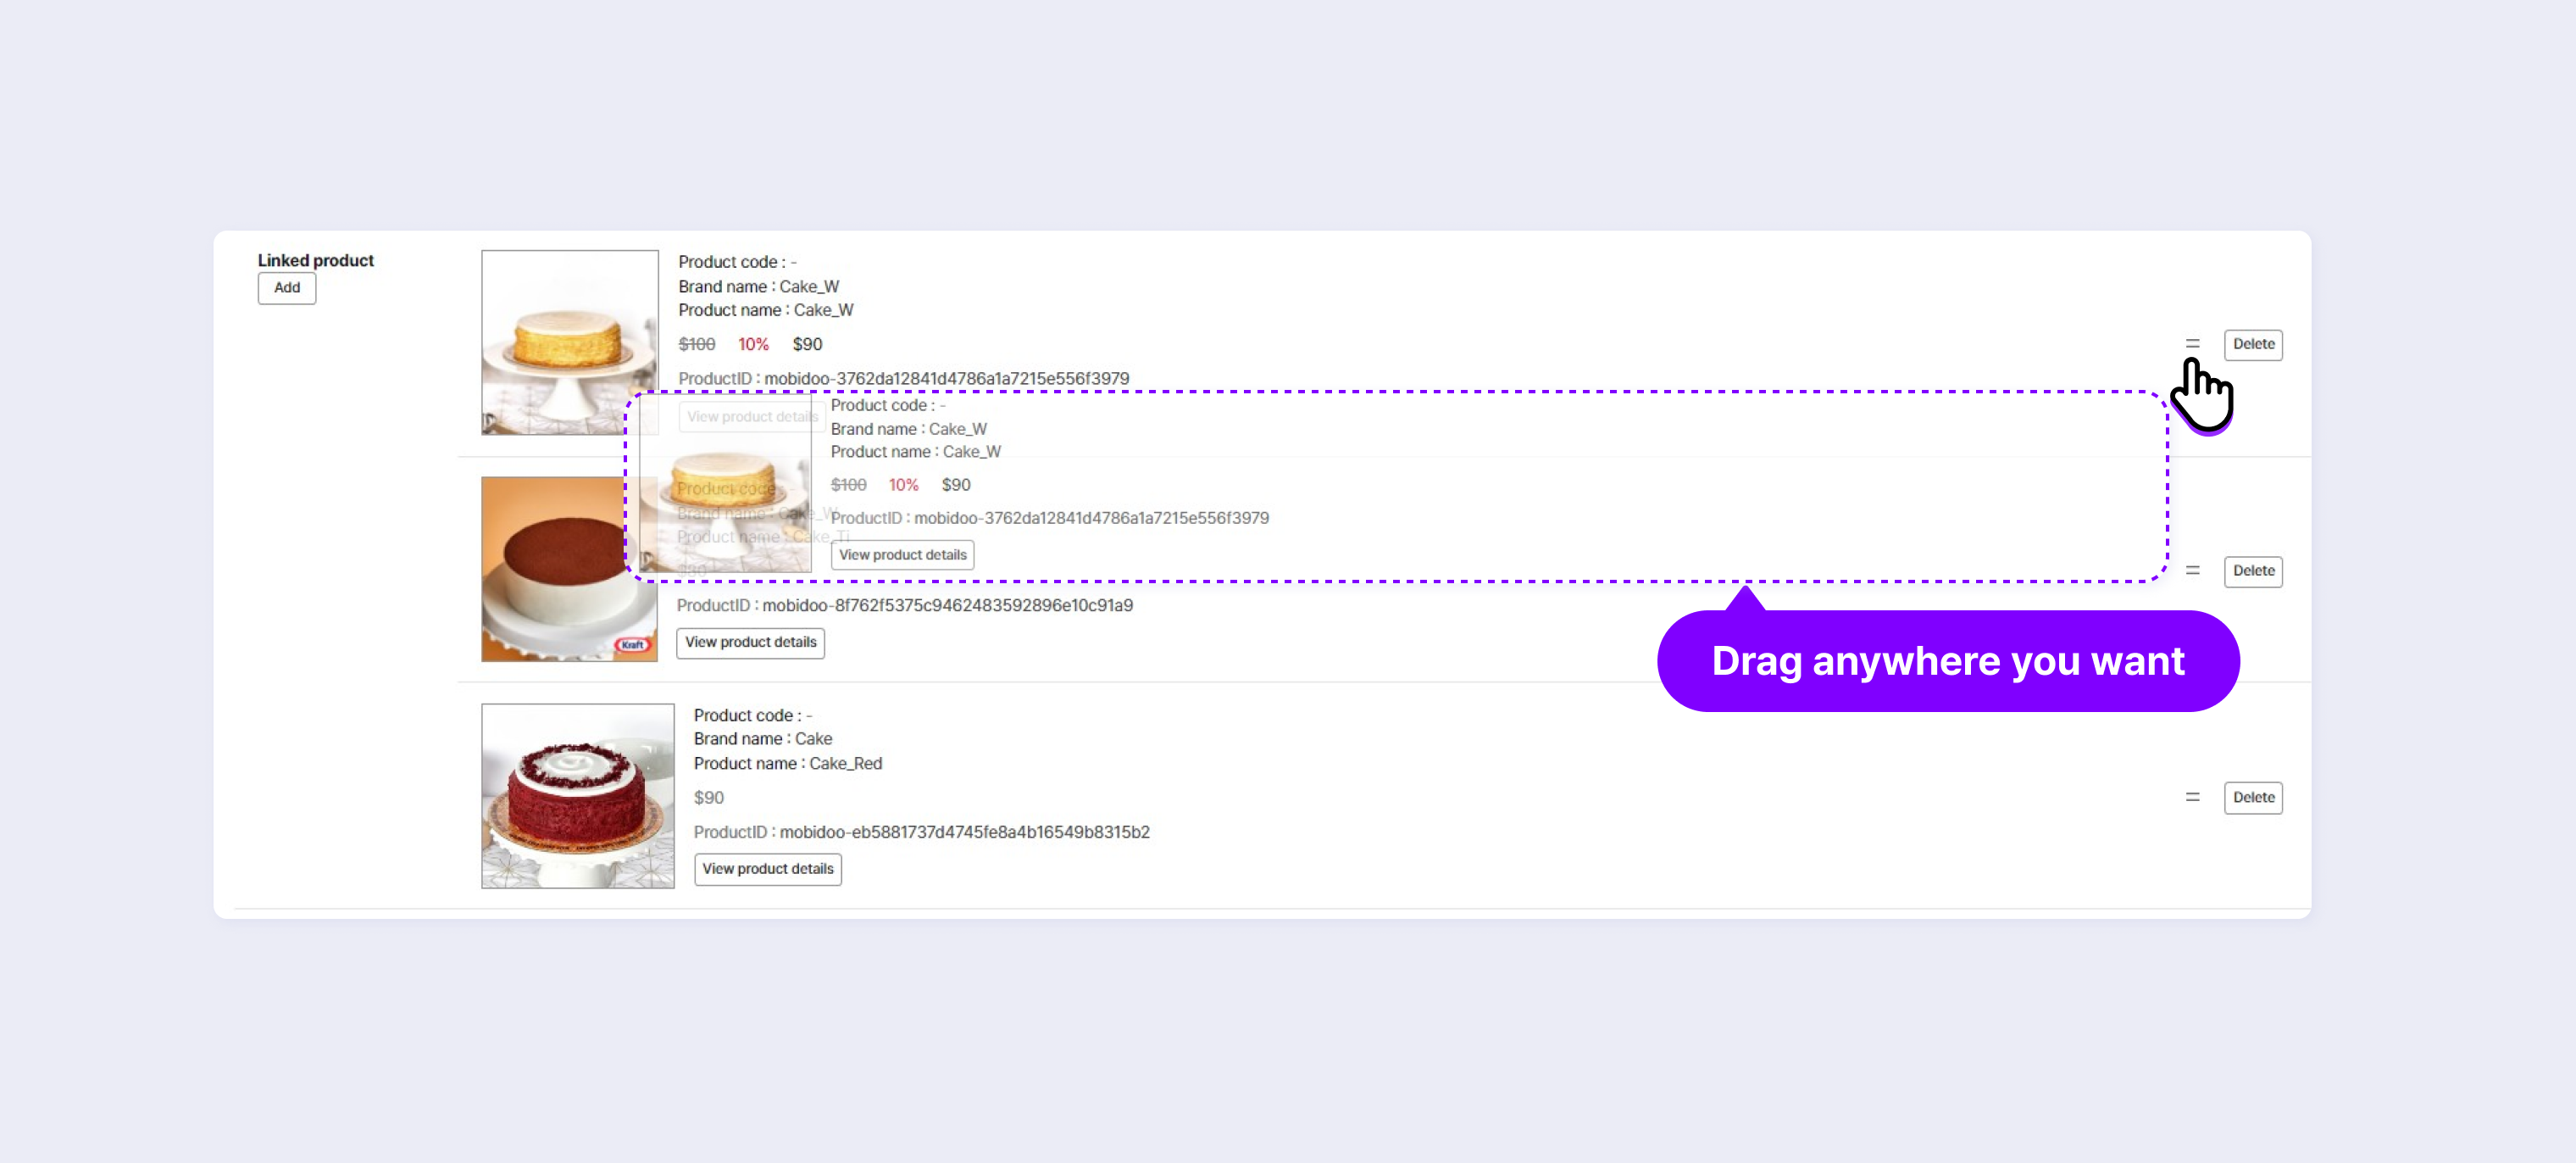
STEP 5. There is no separate Save button. Click X to apply the change.
Live Notification
- Viewers can request pre-live notification in the Collection on the client website and the player (stream table).
You need development integration to use Live Notification. The menu is shown once integrated. If you wish to use the function, contact the Mobidoo manager. We will activate the Get Live Notification button and deliver the viewer's notification request information. See the [Live notification API guide] Please refer to it first.
Pre-live notification methods can be developed freely according to the client's preference.
- Notification request methods vary by the membership integration status.
If the membership is not integrated, a viewer can get the notification after consenting to the collection and use of personal information (name/contact) on the client app/web.
If the membership is integrated, a viewer can get the notification after logging in to the client app/web.
- Notification function can be set only before the livestream begins, and the Get Notification button is not shown during or after live.
- Requesting notification in the player (stream table) for viewers (If membership is not integrated)

STEP 1. Click the Get Notification button in the player (stream table) before the live stream starts to open a Live Notification request popup.
STEP 2. After entering personal information and agreeing to its collection and use, click the Get Notification.
STEP 3. Once the notification request is completed, you can see the popup message "Live notification has been set."
- Requesting notification in the player (stream table) for viewers (If membership is integrated)

STEP 1.Click the Get Notification button in the player (stream table) before the live stream starts.
STEP 2.After checking the viewer's login status, the live notification request popup opens.
STEP 3.Once the live notification request is completed, you can see the message "Live notification has been set" at the bottom.
Coupon
The Coupon function is available only to clients that developed the API integration. See Coupon Integration API guide.
For clients that integrated coupons with API, select **Disable/Enable** depending on whether to use the coupons.
When set as Disabled, the coupon icon is not shown on the player screen. When set as Enabled, the coupon icon is shown.
Purchase Event
The Purchase Event function is available only to clients that integrated the membership.
The Purchase Event function can be used while on air.
- This function is shown only to the clients that integrated the membership. When set as Enabled, the Purchase Event button is activated in Saucelive Admin.
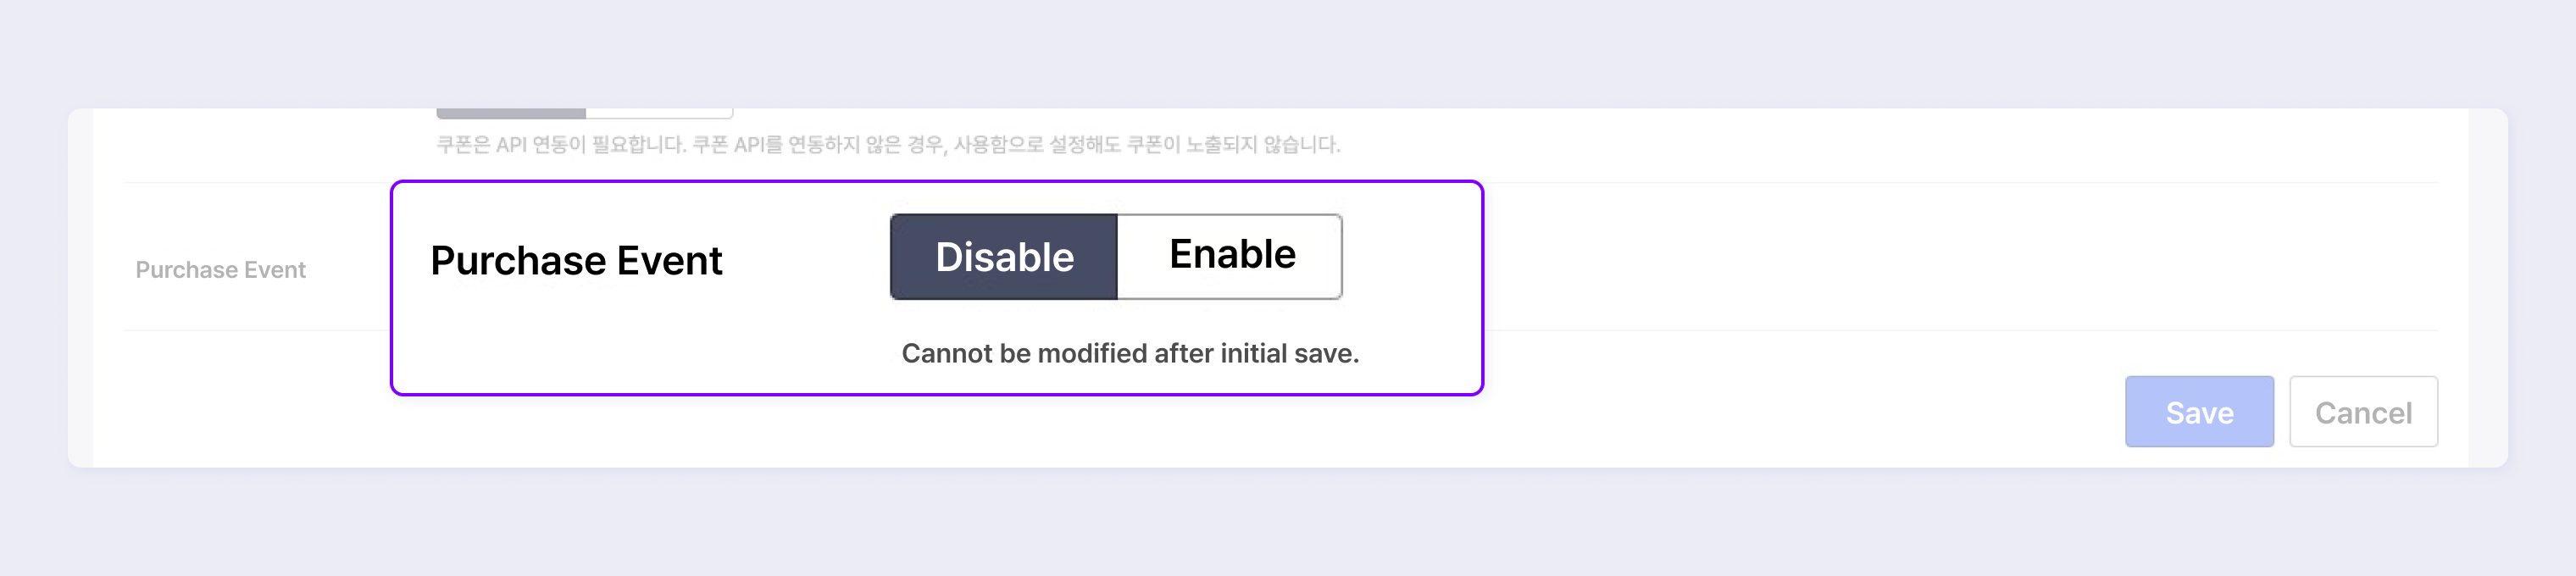
- You cannot edit the use of events while on air.
- You can check the Purchase Event in the Liveconsole screen. In Saucelive Admin > Analysis > Live, click the Liveconsole button.
- Purchase Event Administrator Screen and How to Proceed
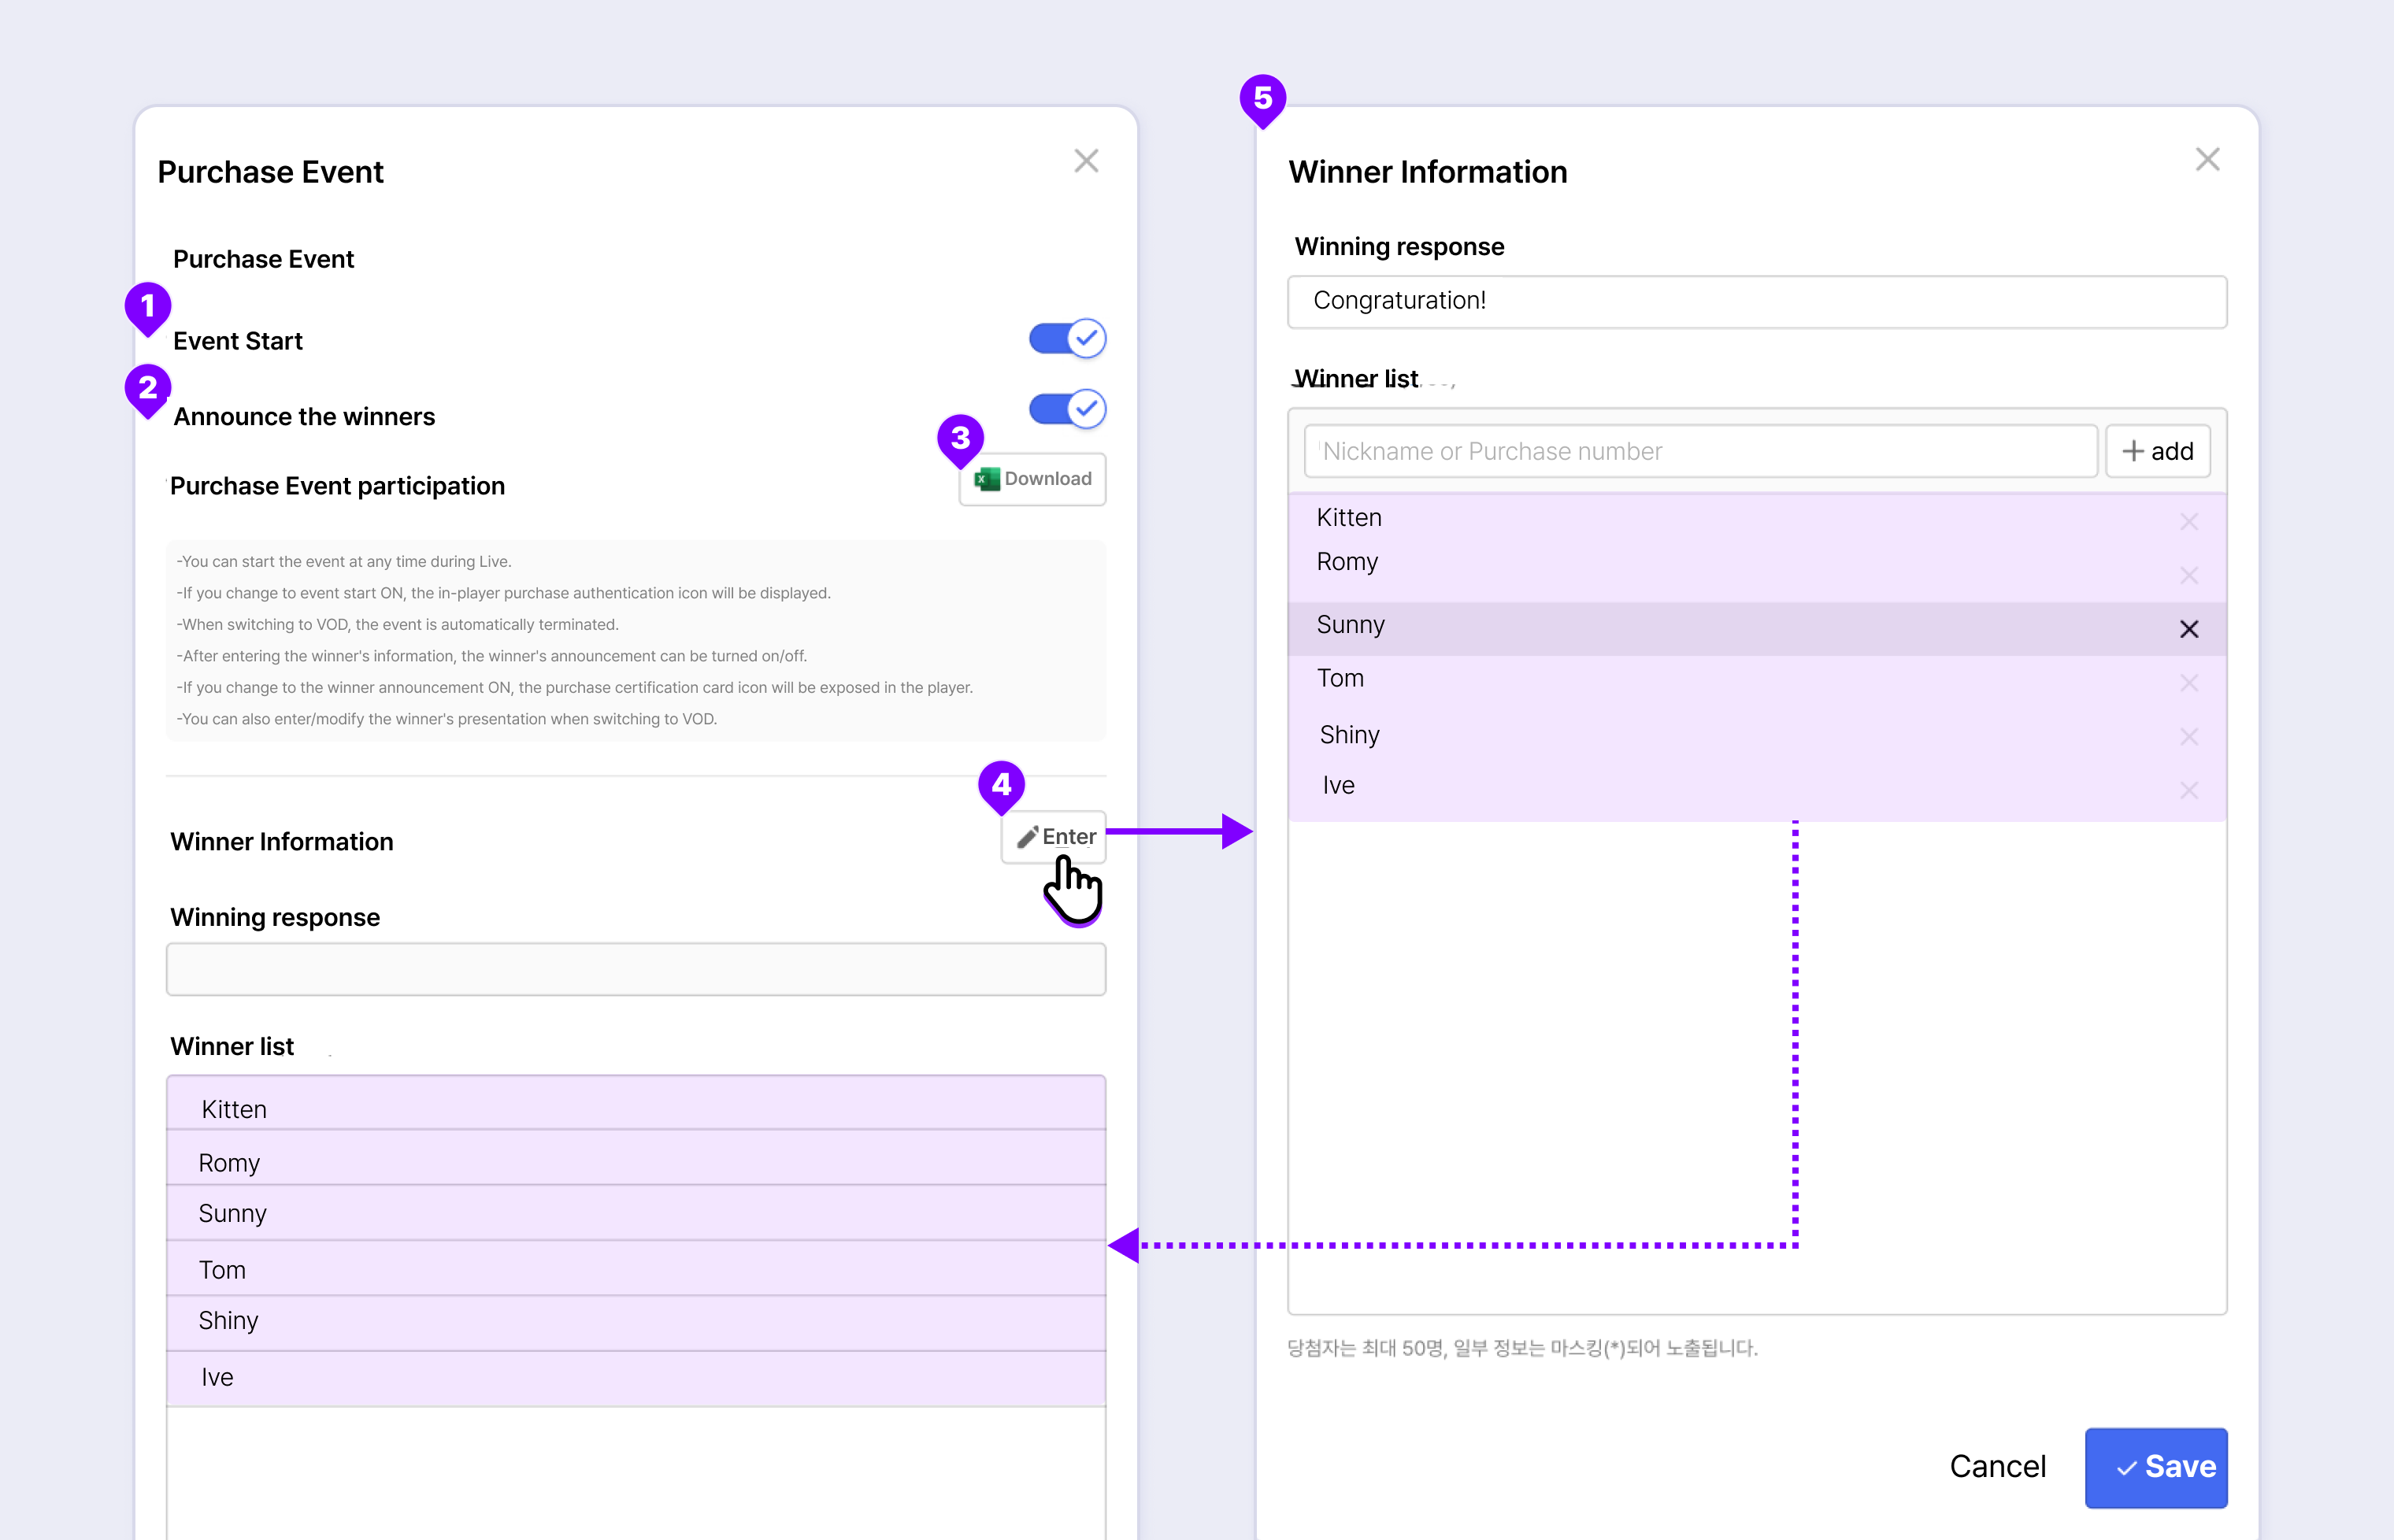
STEP 1. Sidebar>Purchase Event.
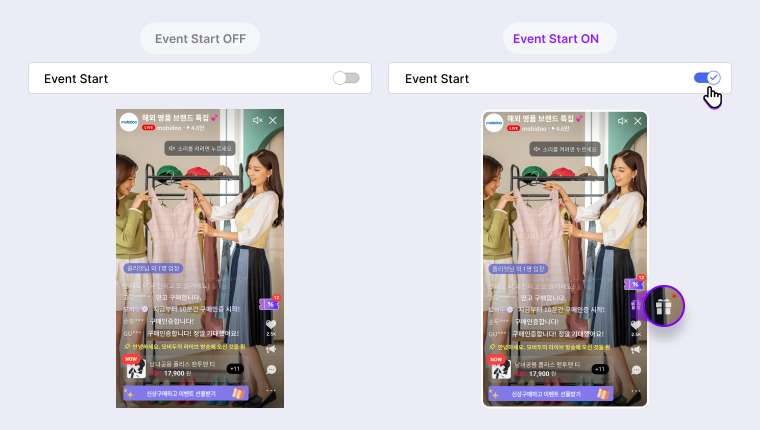
STEP 2. If you turn the Event Start (①) toggle ON, the Purchase Event icon is shown on the player screen.
STEP 3. Encourage Purchase Event participation through words while proceeding.
STEP 4. Click the Download (③) button to download an Excel file and check the Participation Date, Nickname, User ID, and Purchase Number. Copy the winner information.
STEP 5. Enter the text in the Enter Winner Information (④) window. Enter the content to be shown to the user about the winner, such as the nickname, purchase number, or nickname and purchase number. You can also enter a winning response or a message for the winner if you want.
STEP 6. If you turn the Announce the winners (②) toggle ON, the Announce the winners icon is shown on the player screen. Click the icon to check the winner.
The criteria for masking the winner information are as follows.
- 1-5 characters: Last two digits (1**)
- 6-10 characters: Last three digits (123***)
- 11 characters or more: Last four digits (1234567****)
Purchase Events can be carried out multiple times while on air.
However, the Purchase Event participation data is accumulated in the downloaded Excel file. Therefore, use the event time to distinguish and announce the winners.
- Purchase Event Player Screen and How to Participate
STEP 1. For livestreams that have a Purchase Event, the Purchase Event icon is shown on the Collection Image.
STEP 2. Viewers enter the purchase or order number in the Purchase Event popup window (①) and click Validate. Login may be required. Viewers can check the event participation status through the message "Joined the purchase event!" at the bottom of the player.
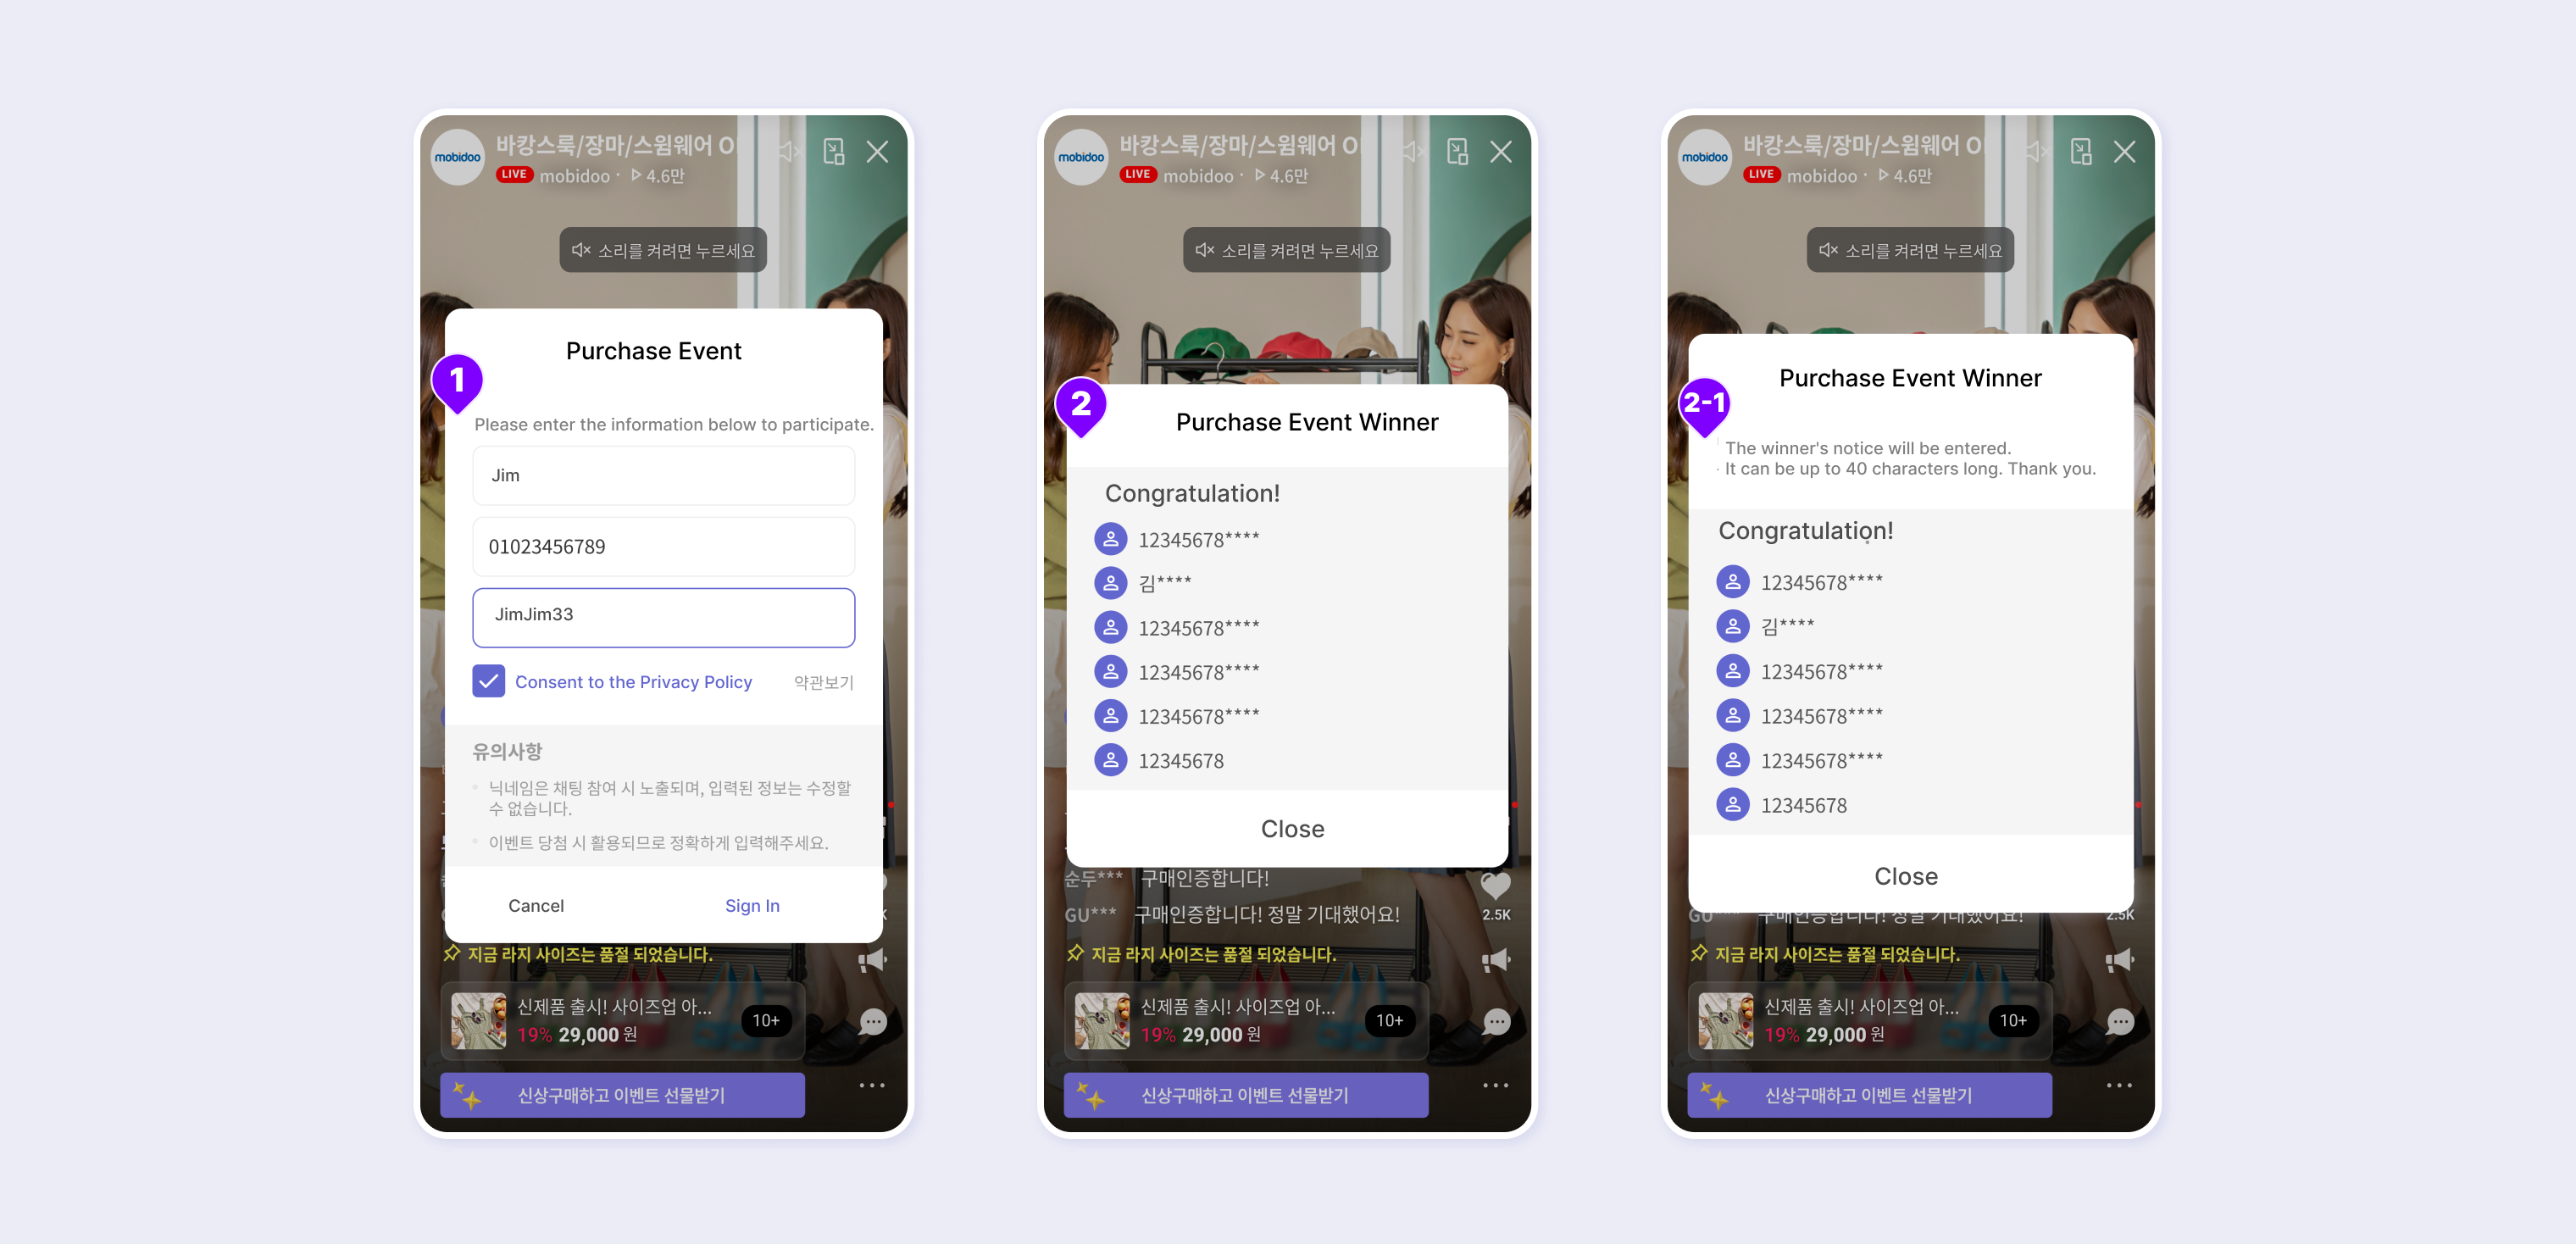
STEP 3. If the administrator turns the Announce the winners toggle ON in the console, the list of winners is opened in a popup. If there is a winner information message, it is displayed as shown in ②or 2-1.