
iOS Integration
This document provides instructions on how to integrate the SauceLive player with iOS WebView.
The live player page can be accessed via a specific URL. If the live broadcast has not started, users will be redirected to the schedule page. Once the live broadcast begins, the player screen will load automatically.
WebView Integration in iOS
- Support for login page URL and redirection back to Saucelive.
- Add the player URL to the WebView.
Login Page URL Format
- <https://player.sauceflex.com/broadcast/{LiveId}?accessToken={Generated accessToken}> format URL.
- After login, you can pass the generated accessToken using a query string (e.g., returnUrl).
Communication with iOS WebView Bridge
Project Setup
STEP 1. Create a new project in Xcode.
STEP 2. Create a WKWebView.
Sample Web Page
Add a simple (index.html)file to your project:
<!DOCTYPE html>
<html lang="en">
<head>
    <meta charset="UTF-8">
    <title>JS Bridge Example</title>
</head>
<body>

<button onclick="sendMessageToiOS('Hello from Web!')">Send Message to iOS</button>

<script>
    function sendMessageToiOS(message) {
        window.webkit.messageHandlers.bridge.postMessage(message);
    }
</script>

</body>
</html>
Configure WKWebView in ViewController
WKWebView in ViewControllerConfigure WKWebView in ViewController.swift to load the web page and enable communication with JavaScript.
import UIKit
import WebKit

class ViewController: UIViewController, WKScriptMessageHandler {

    @IBOutlet weak var webView: WKWebView!

    override func viewDidLoad() {
        super.viewDidLoad()

        let contentController = WKUserContentController()
        contentController.add(self, name: "bridge")

        let config = WKWebViewConfiguration()
        config.userContentController = contentController

        webView.configuration.userContentController = contentController

        if let url = Bundle.main.url(forResource: "index", withExtension: "html") {
            webView.loadFileURL(url, allowingReadAccessTo: url.deletingLastPathComponent())
        }
    }
}

extension ViewController: WKScriptMessageHandler {
    func userContentController(_ userContentController: WKUserContentController,
                                    didReceive message: WKScriptMessage) {
        switch (message.name) {
            case "sauceflexEnter":   // When entering the player for the first time
                print("sauceflexEnter")
                break

            case "sauceflexMoveExit":   // When the close button is pressed to exit the popup
                print("sauceflexMoveExit")
                break

            case "sauceflexMoveLogin":   // When confirming login from the login popup
                print("sauceflexMoveLogin")
                break

            case "sauceflexMoveProduct":   // When a product is clicked
                print("sauceflexMoveProduct")
                print(message.body)
                break

            case "sauceflexOnShare":   // When sharing
                print("sauceflexOnShare")
                print(message.body)
                break

            case "sauceflexPictureInPicture":   //  When the PIP toggle button is clicked: UI components displayed over the player (e.g., Like button) will be automatically hidden

                print("sauceflexPictureInPicture")
                print(message.body)
                break

              // case "sauceflexPictureInPictureNoEvent":  // When the PIP toggle button is clicked: For player components, a manual JavaScript event must be called to hide them
                //print("sauceflexPictureInPictureNoEvent")
                //print(message.body)
                //break

            // *When integrating the PIP button via bridge, use only one: either sauceflexPictureInPicture or sauceflexPictureInPictureNoEvent.

            case "sauceflexMoveBanner":   // When a banner is clicked: bannerId (unique banner ID), linkUrl (URL registered for the banner), broadcastIdx (broadcast identifier)
                print("sauceflexMoveBanner")
                print(message.body)
                break

            default:
                print("message.name \\(message.name) not handled.")
        }
    }
}
iOS Picture-in-Picture (PIP) Integration
PIP Mode Overview
This section explains how to implement Apple's native Picture-in-Picture (PIP) feature and a custom floating view. PIP mode allows a video player to shrink into a smaller window so users can continue watching while performing other tasks. A floating view offers a similar, customizable experience for broader use cases.
Custom Floating View Implementation
- The in-app player runs on a custom floating view that mimics Apple’s native PIP behavior.
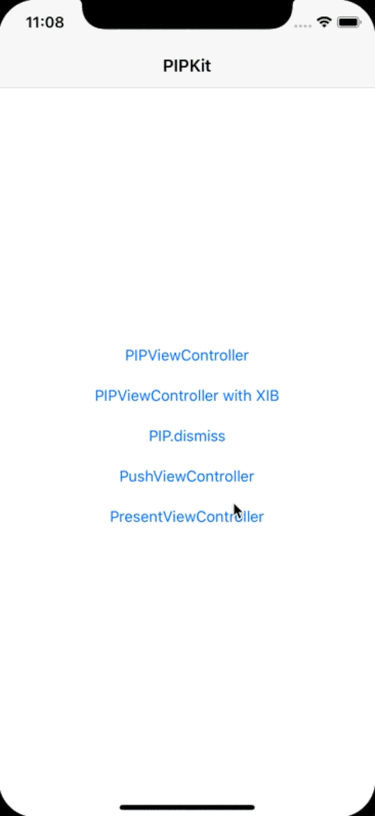
- Mobidoo uses an open-source library called PIPKit to implement floating and PIP features.
https://github.com/Kofktu/PIPKit - Refer to the image below for how PIPKit works.
PIP Button Display Options
There are two ways to display the PIP button in the player:
Config-based Setting
- Mobidoo enables the PIP button according to each partner’s configuration.
- Partners can request this setup when registering configurations such as login URL or close button redirect.
Manual Setting by Partner
- Partners can control the display of the PIP button themselves via JavaScript bridge communication.
- At the time of the sauceflexEnter event, you can inject the following JavaScript:
- If the player takes a while to load in the WebView, calling the JavaScript at the sauceflexEnter event may not work. In such cases, add a delay before invoking the JavaScript to ensure proper execution.
// Show PIP Button
userWebView?.evaluateJavascript( "(function() { window.dispatchEvent(sauceflexPictureInPictureUse(true)); })();") { }
// PIP -false setting, Hide PIP Button
userWebView?.evaluateJavascript( "(function() { window.dispatchEvent(sauceflexPictureInPictureUse(false)); })();") { }
Activating PIP Mode
Requirements:
- iOS 15 +
- Info.plist: Audio, AirPlay and Picture in Picture include:
- PIPKit.isAVPIPKitSupported: Check if PIPKit is support or not by Bool.
PIP mode
- For more detail, refer to the opensource page.
- AVPIPKitRenderer
protocol AVPIPKitRenderer {
  var policy: AVPIPKitRenderPolicy { get }
  var renderPublisher: AnyPublisher\<UIImage, Never> { get }

	func start()
	func stop()
}- AVPIPUIKitUsable Implementation Example
class View: UIView, AVPIPUIKitUsable {
  var pipTargetView: UIView { self }
	var renderPolicy: AVPIPKitRenderPolicy {
    // .once: Render Once
    // .preferredFramesPerSecond: Render at Preferred Frames Per Second
}
view.startPictureInPicture()
view.stopPictureInPicture()- ViewController-PIP Feature Addition
class ViewController: UIViewController, AVPIPUIKitUsable {
    var pipTargetView: UIView { view }
		func start() {
 		   startPictureInPicture()
		}

		func stop() {
  		  stopPictureInPicture()
		}
}
Hiding Player UI in PIP Mode
When entering PIP mode via the sauceflexPictureInPicture bridge, the UI is automatically hidden.
However, if PIP mode is triggered by other means, you must manually call the appropriate JavaScript to hide the UI.
func onPictureInPictureModeChanged(){
    if isActive == true {
        self.playerView.player?.pictureInPictureController?.stopPictureInPicture()
        myWebView?.evaluateJavascript( "(function() { window.dispatchEvent(sauceflexPictureInPictureOff); })();" ) { }
    } else {
        self.playerView.player?.pictureInPictureController?.canStartPictureInPictureAutomaticallyFromInline = true
        myWebView?.evaluateJavascript( "(function() { window.dispatchEvent(sauceflexPictureInPictureOn); })();" ) { }
    }
}
How to Implement the Share Feature
iOS Native Share View Implementation
linkUrl 사용
shortUrl usage
Implement the sharing feature using the sauceflexOnShare bridge.
extension ViewController: WKScriptMessageHandler {
    func userContentController(_ userContentController: WKUserContentController,
                               didReceive message: WKScriptMessage) {
        switch (message.name) {
        case "sauceflexOnShare":
            if let messageBody = message.body as? String,
               let messageData = messageBody.data(using: .utf8) {
                do {
                    if let parsedJSON = try JSONSerialization.jsonObject(with: messageData, options: []) as? [String: Any] {
                        var shareURL: URL?

                        if let linkURLString = parsedJSON["linkUrl"] as? String {  // shortUrl 사용 시 parsedJSON["shortUrl"]으로 대체 가능
                            shareURL = URL(string: linkURLString)
                        }

                        if let url = shareURL {
                            let itemsToShare = [url]
                            let activityViewController = UIActivityViewController(activityItems: itemsToShare, applicationActivities: nil)
                            activityViewController.popoverPresentationController?.sourceView = self.view
                            self.present(activityViewController, animated: true, completion: nil)
                        } else {
                            print("No shareable URL is available.")
                        }
                    }
                } catch {
                    print("JSON parsing error: \(error)")
                }
            }
        default:
            print(message.name)
        }
    }
}
Updated 9 months ago