Using Side Bar
In Side Bar, you can set and view various additional functions, such as Go to Prompter, Streaming Information, Livestream Information, Statistics, Banner, Purchase Event, and Settings.
After editing the item, click Save and click the Reload button on the top of the screen. Changes will be reflected.
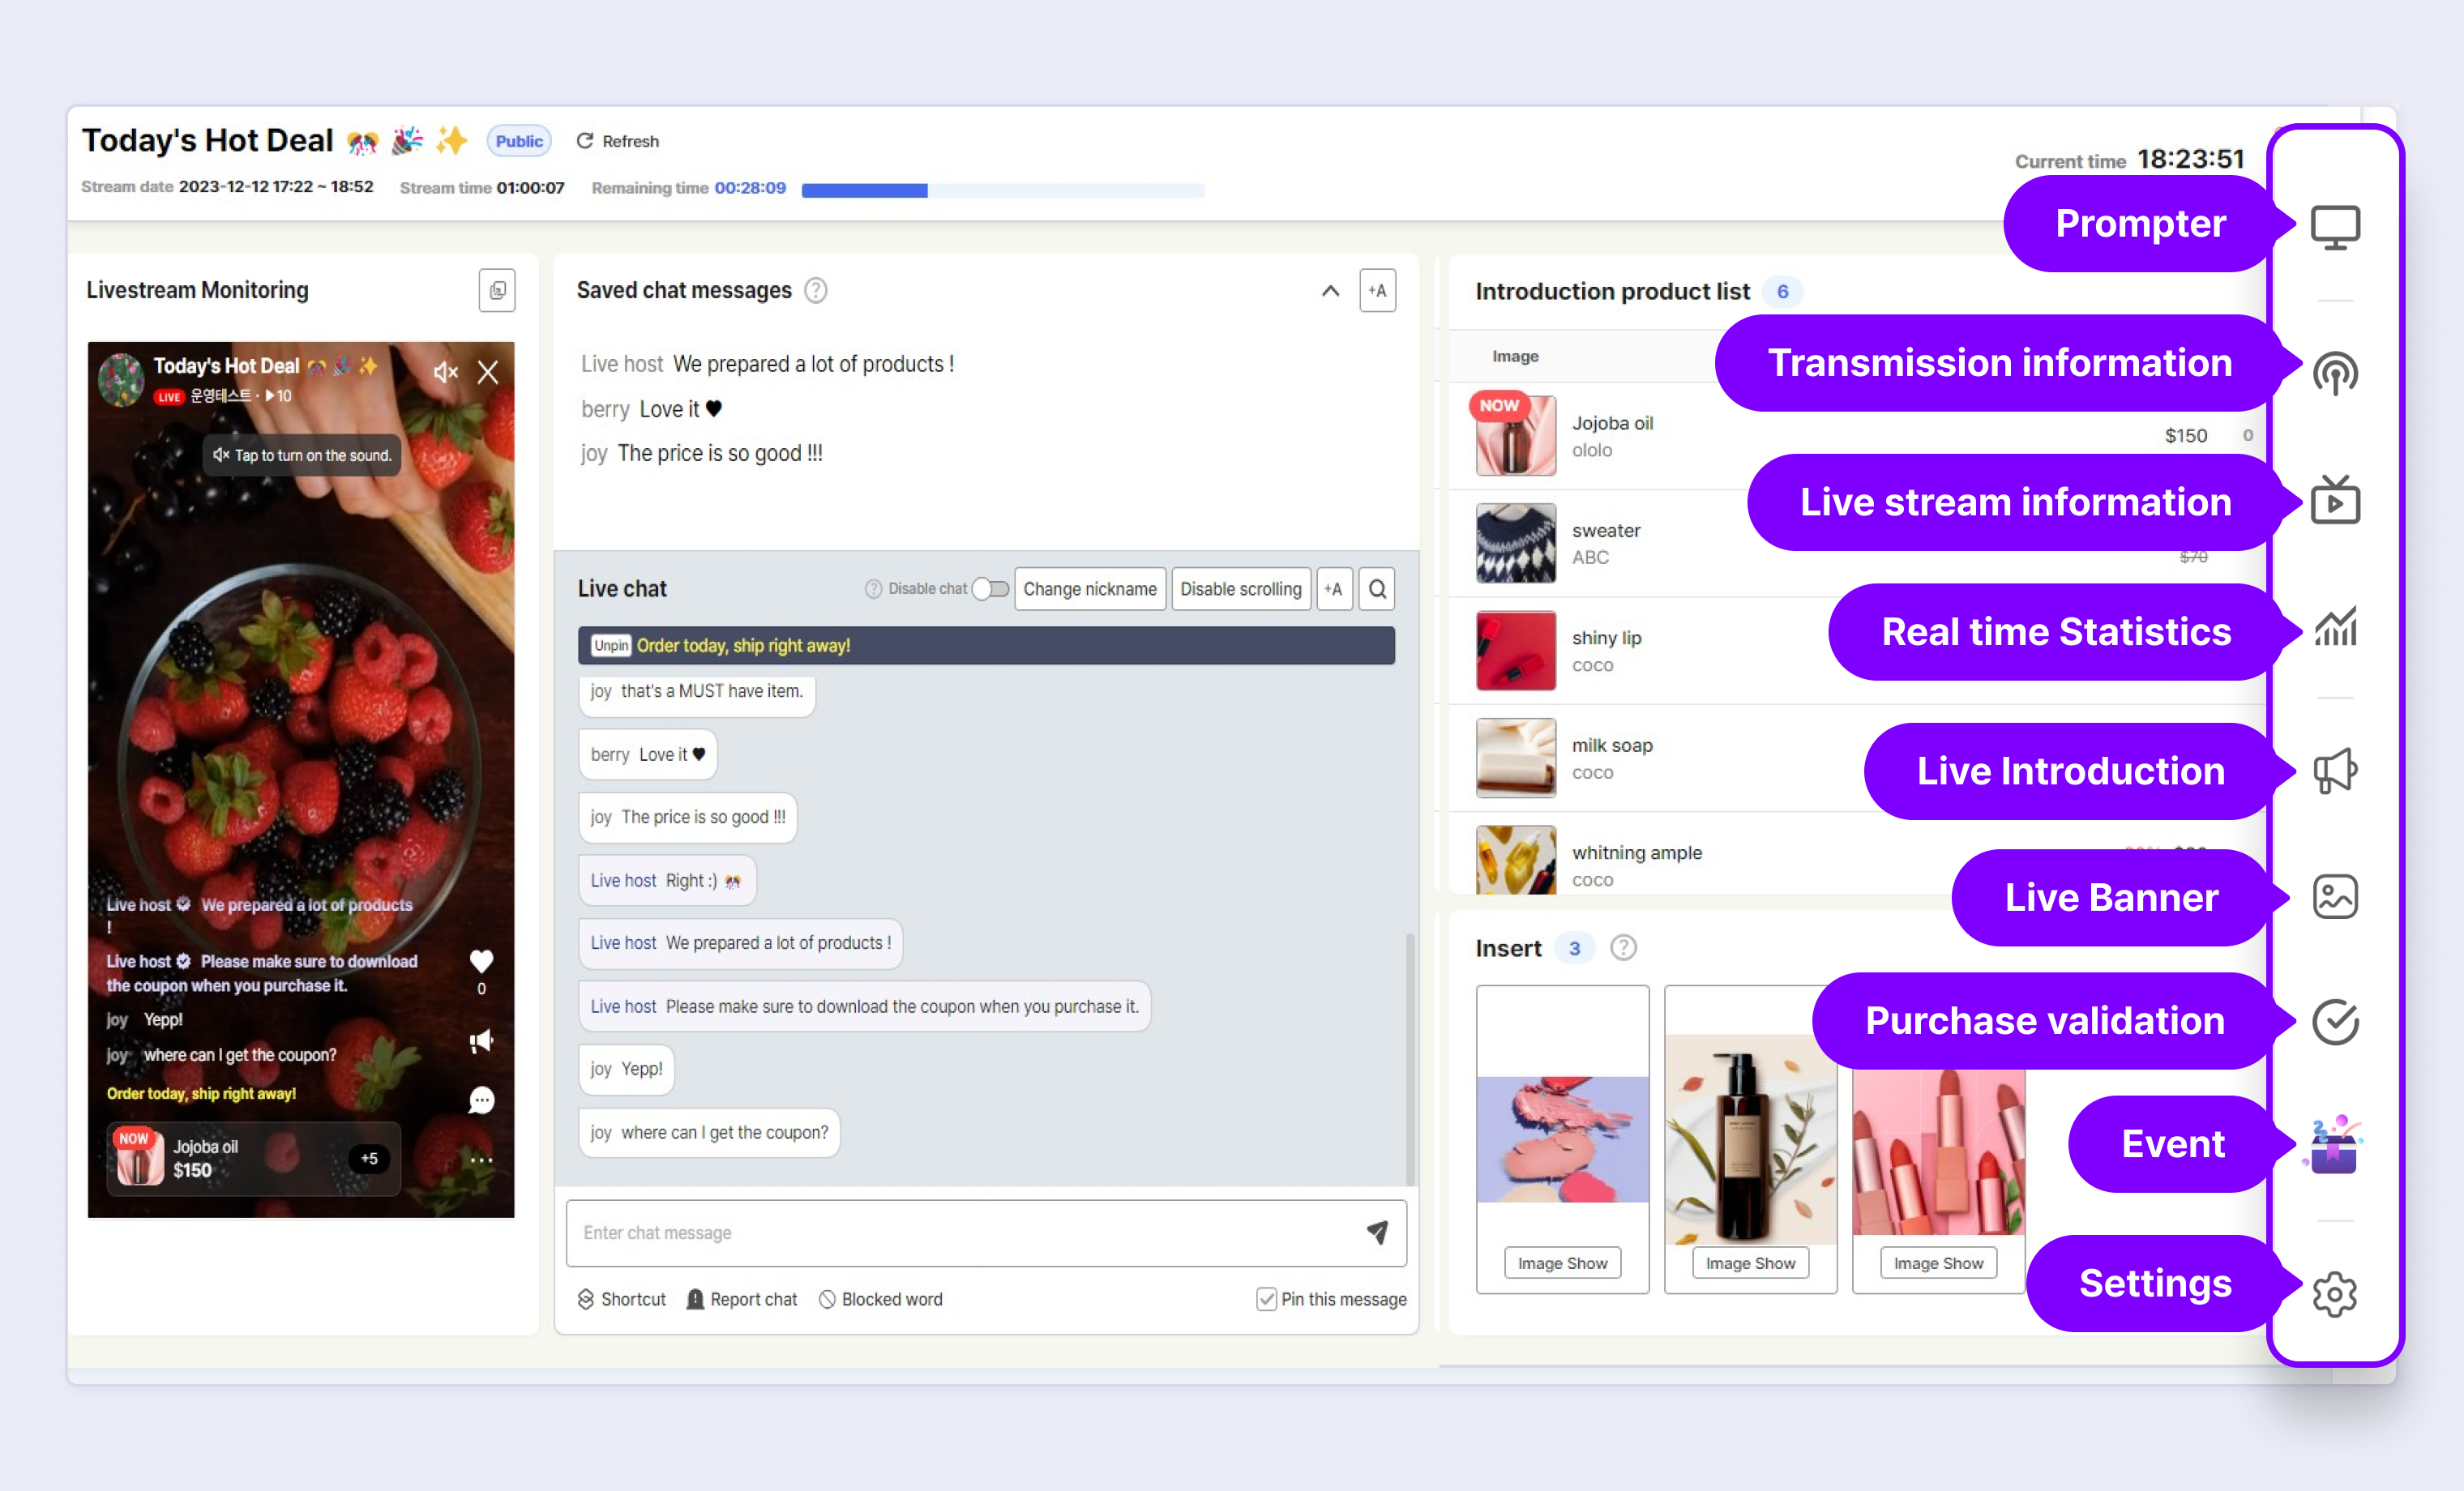
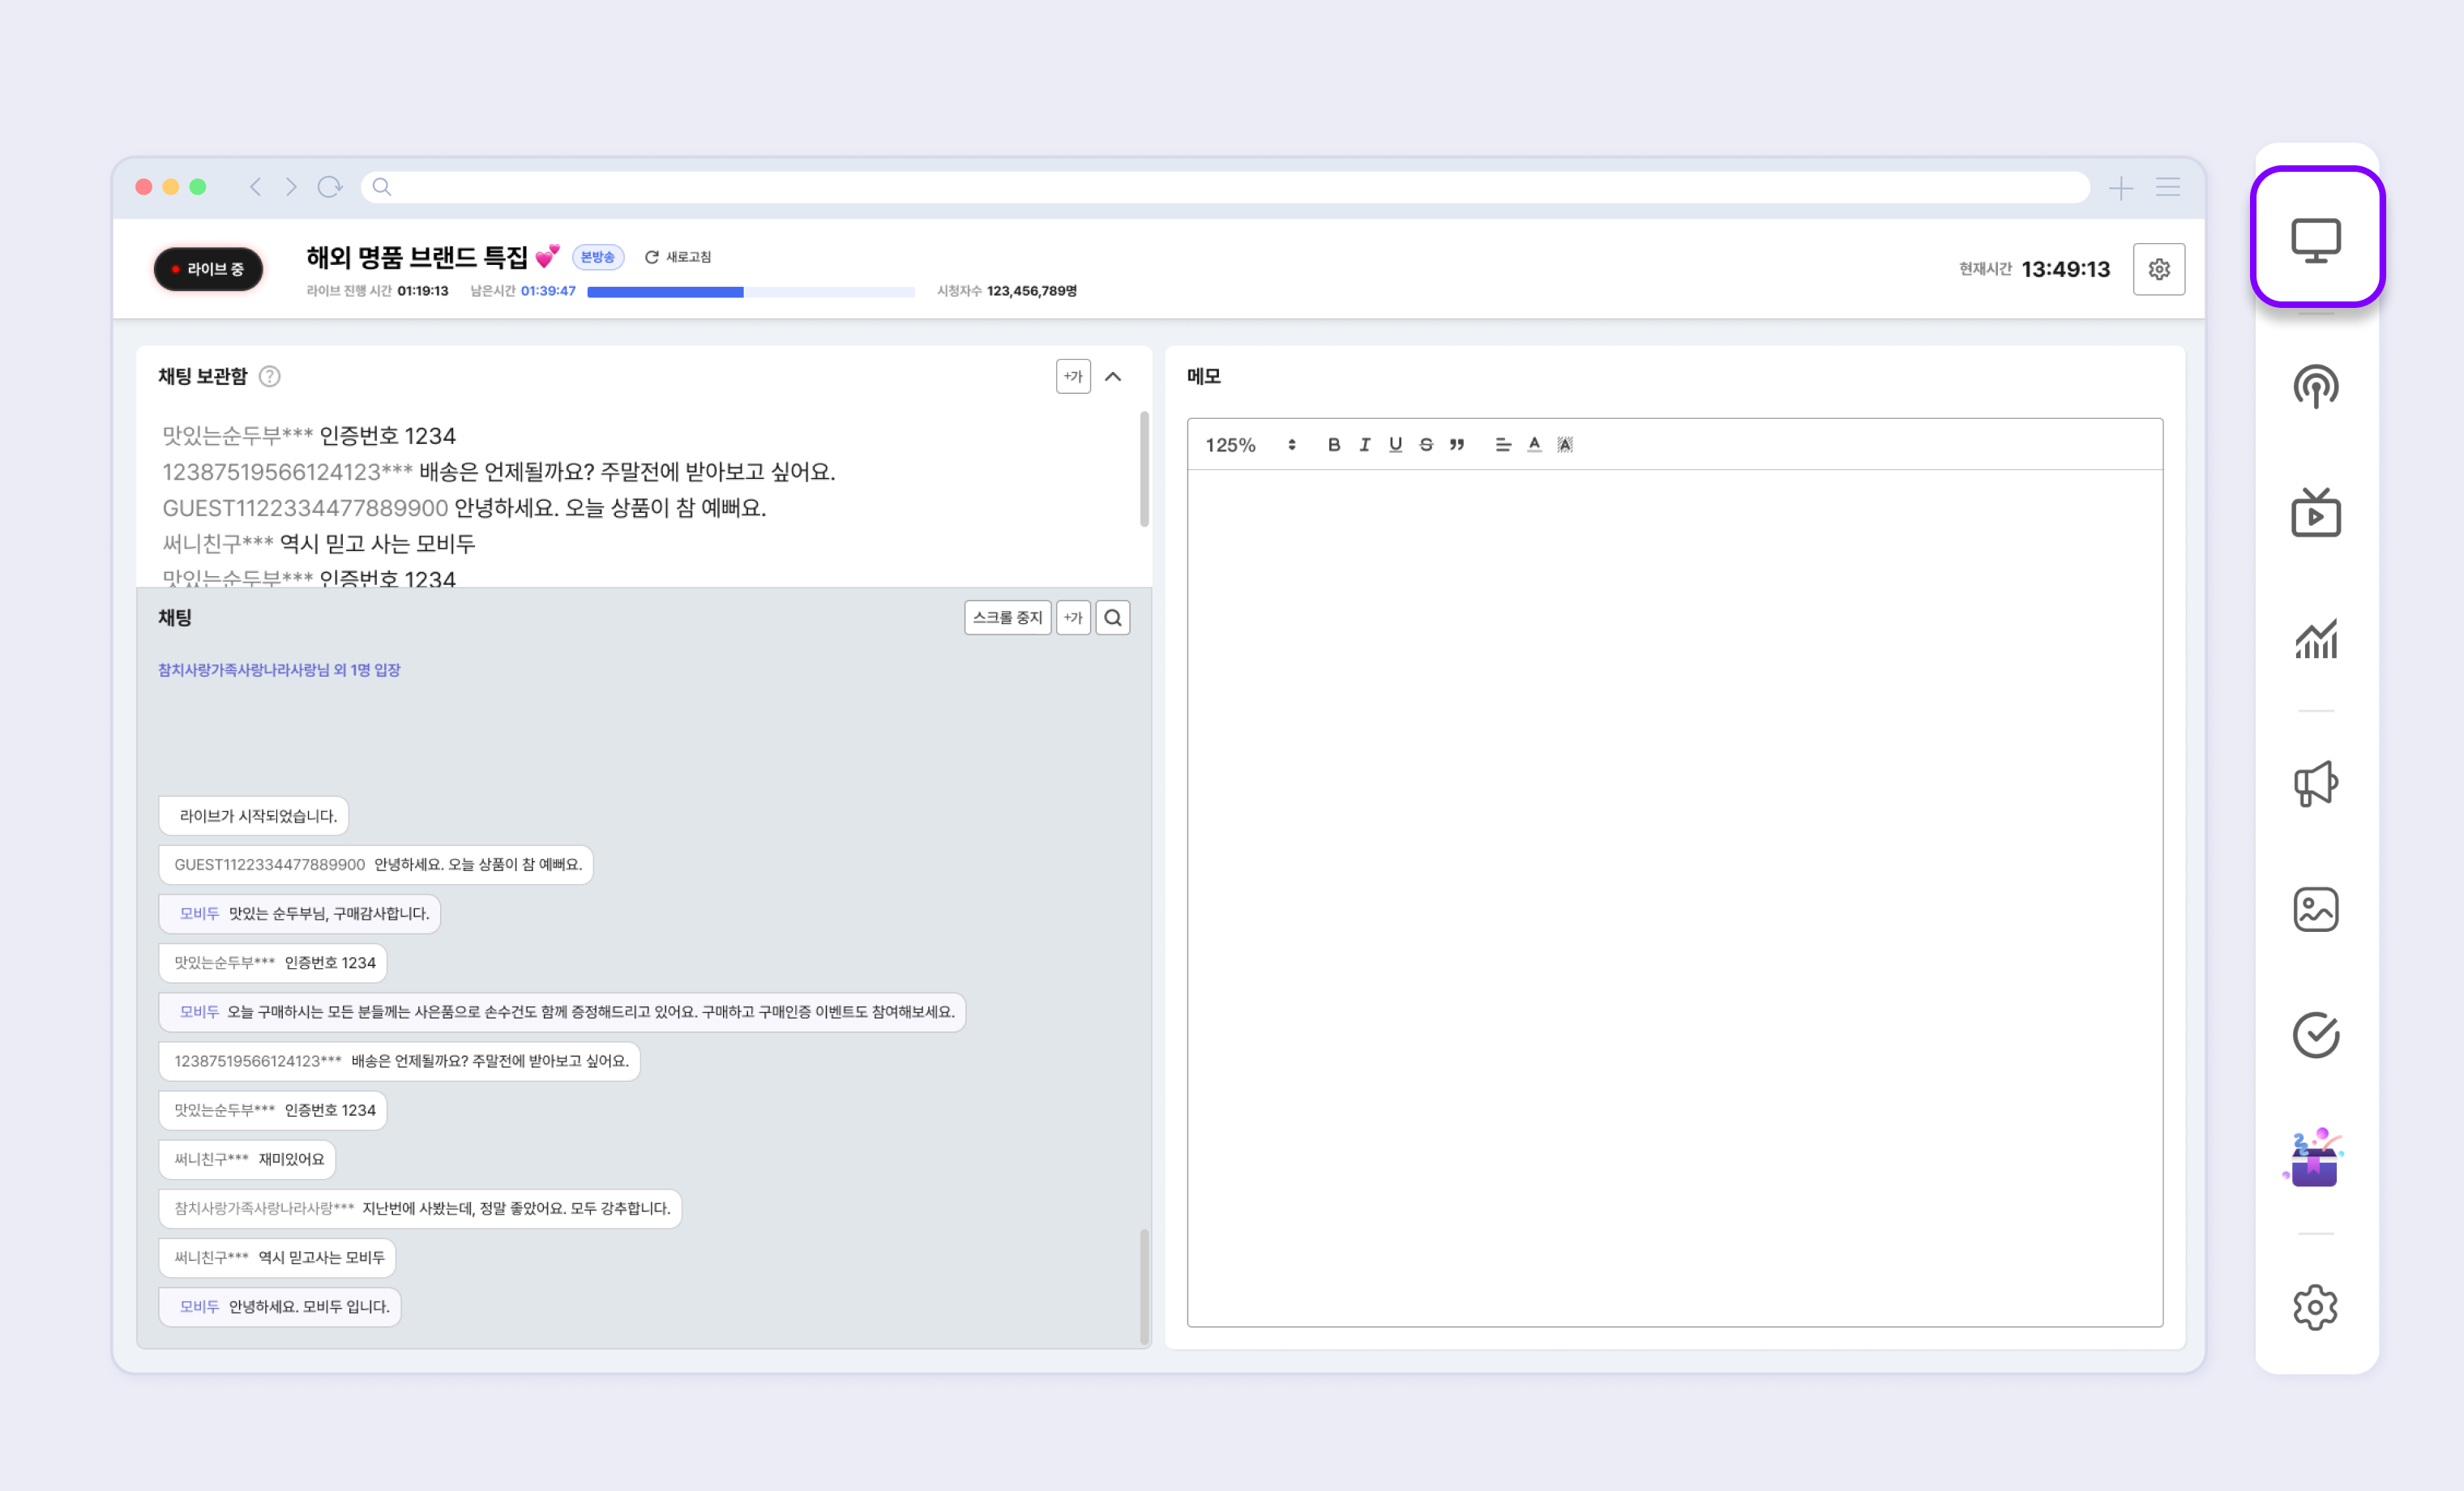
Prompter
You can go to the Prompter opening in a new window. This function enables the smooth communication while hosting livestream. See detailed information about Prompter in the link.
Transmission Information
Displays information related to livestreaming. You can easily copy values using the Copy icon next to each item.
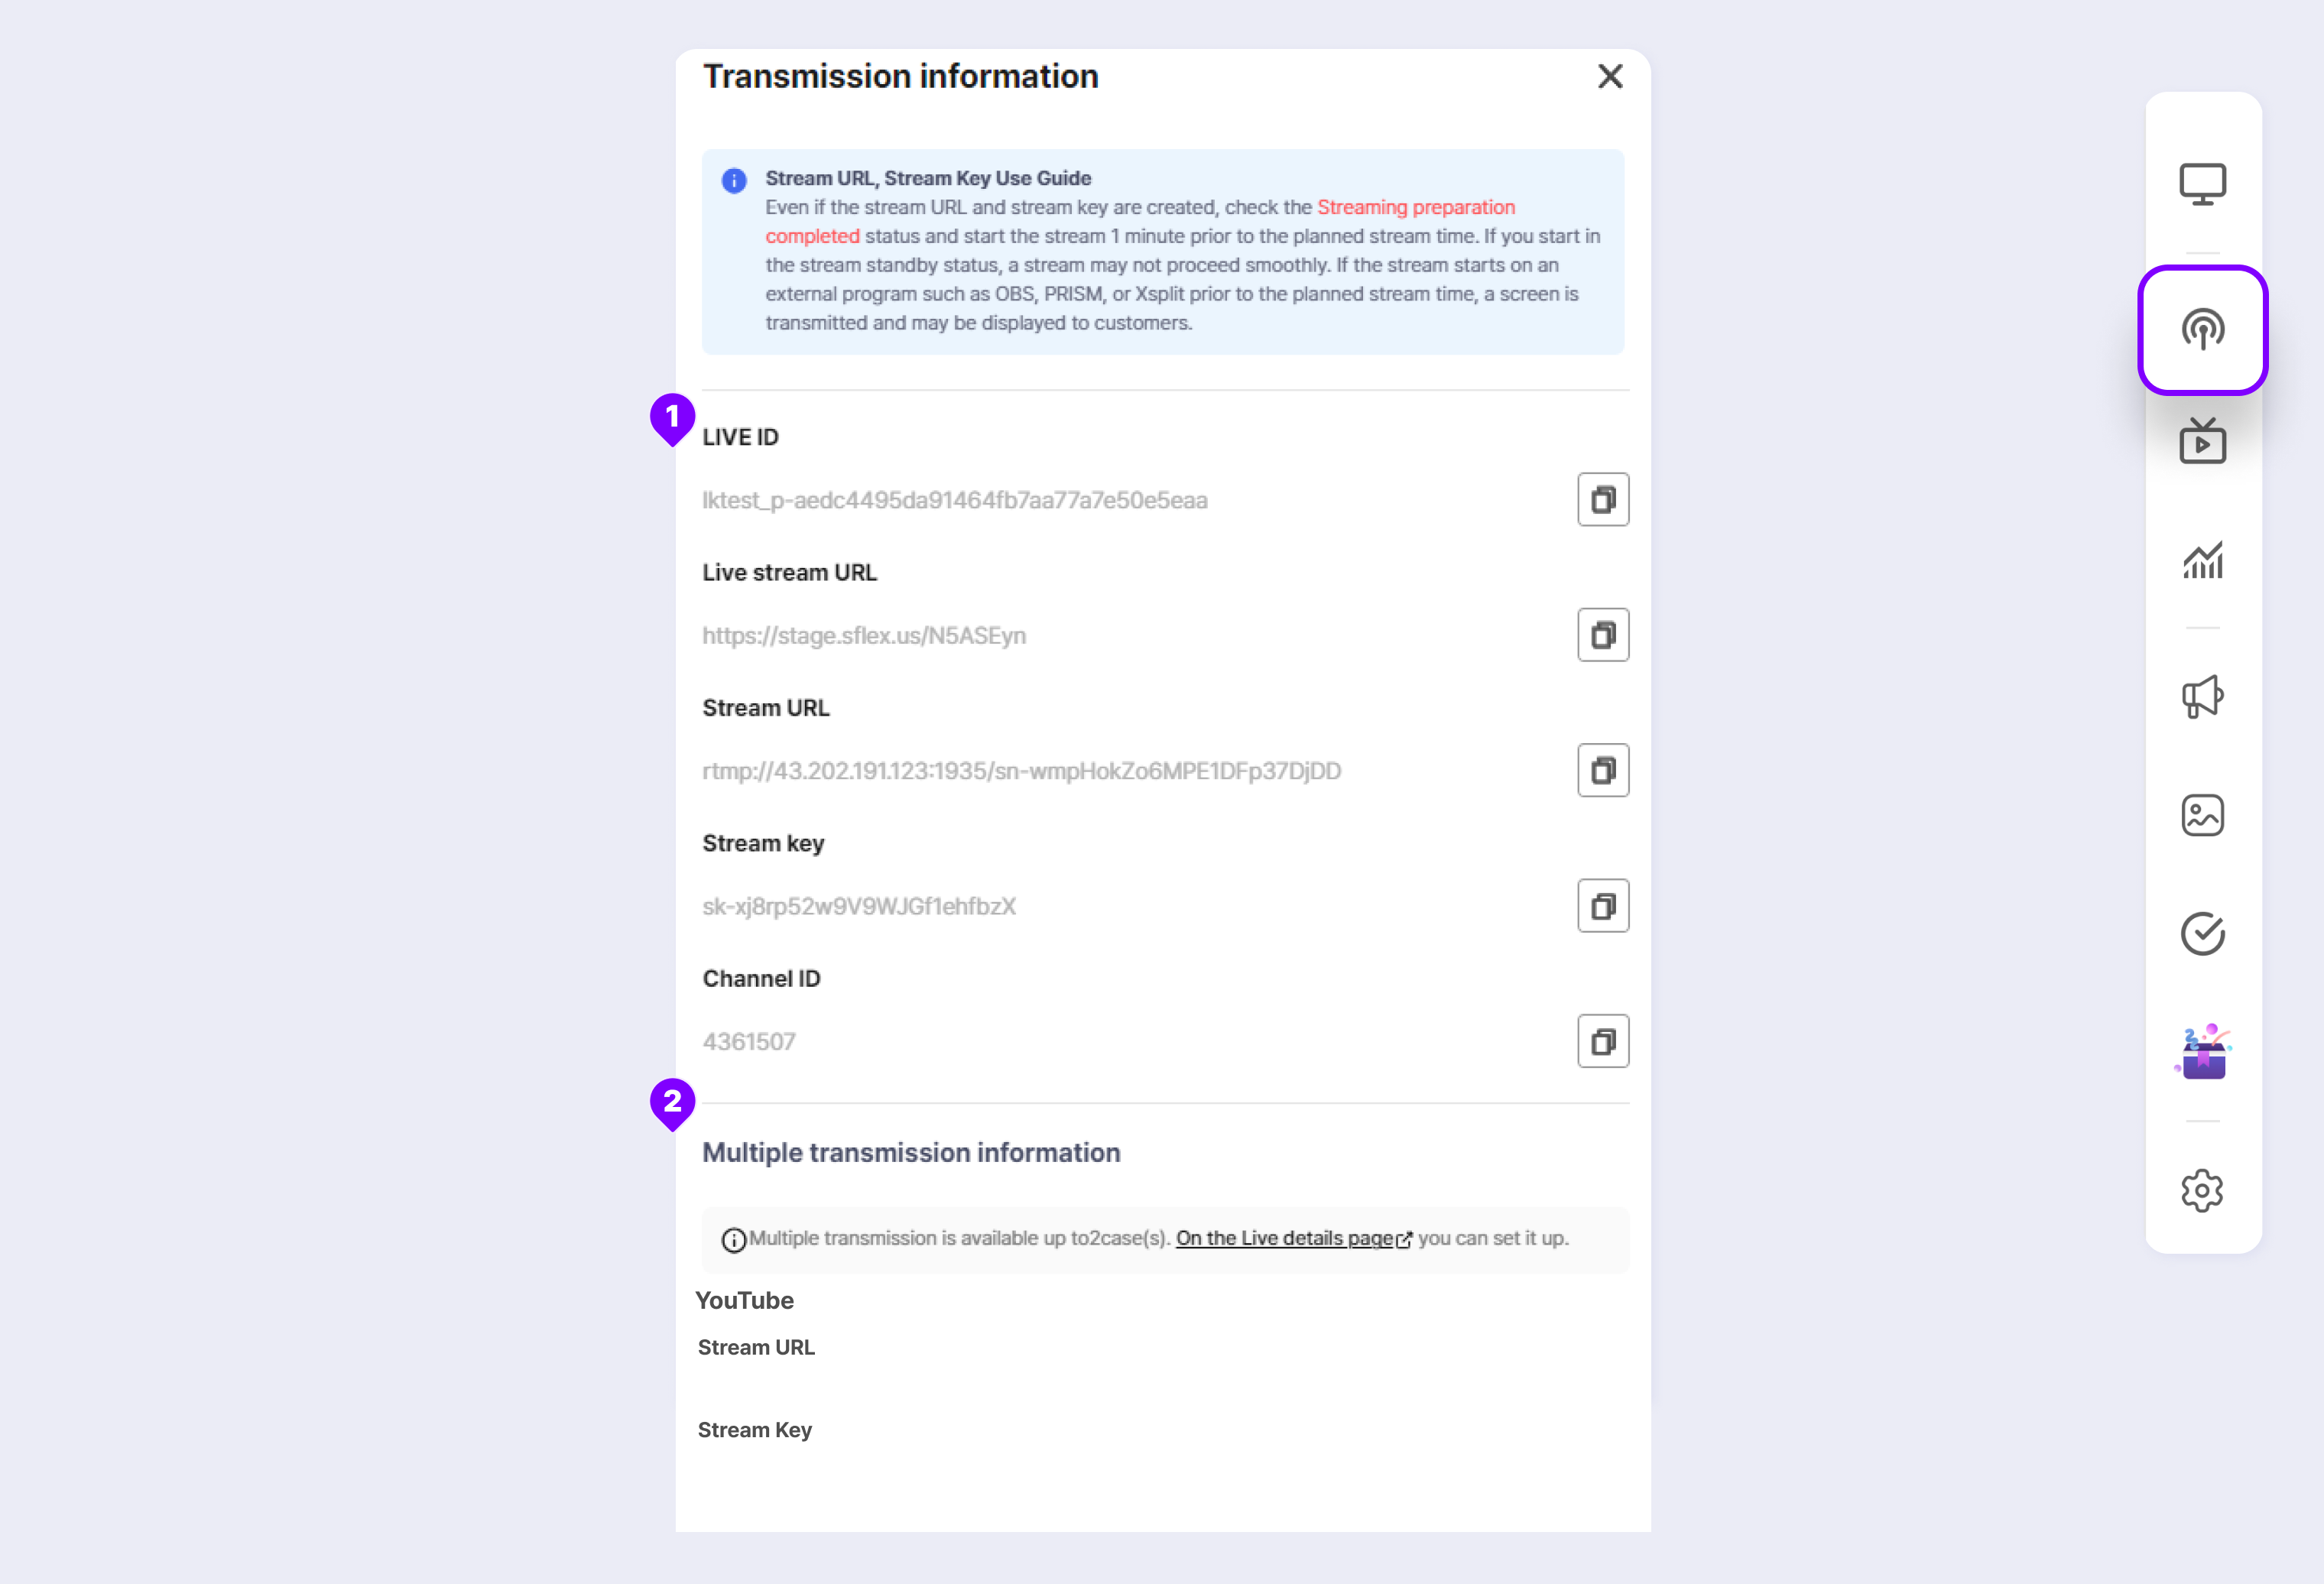
① Transmission Information Item
The public items vary by the approval status of the schedule information. You can check the information after the streaming is approved.
The Stream URL, Stream Key, and Channel ID can be viewed once approved and 30 minutes before the scheduled livestream.
- Live ID
- Livestream URL
- Stream URL
- Stream Key
- Channel ID
② Multicast transmission information
If multicast information has been set when scheduling, you can view the information.
- Platform Name
- Stream URL
- Stream Key
Livestream Details
Click the Side Bar > Livestream Details icon to view and edit the livestream information. (However, some items can be edited in Content > Livestream.)
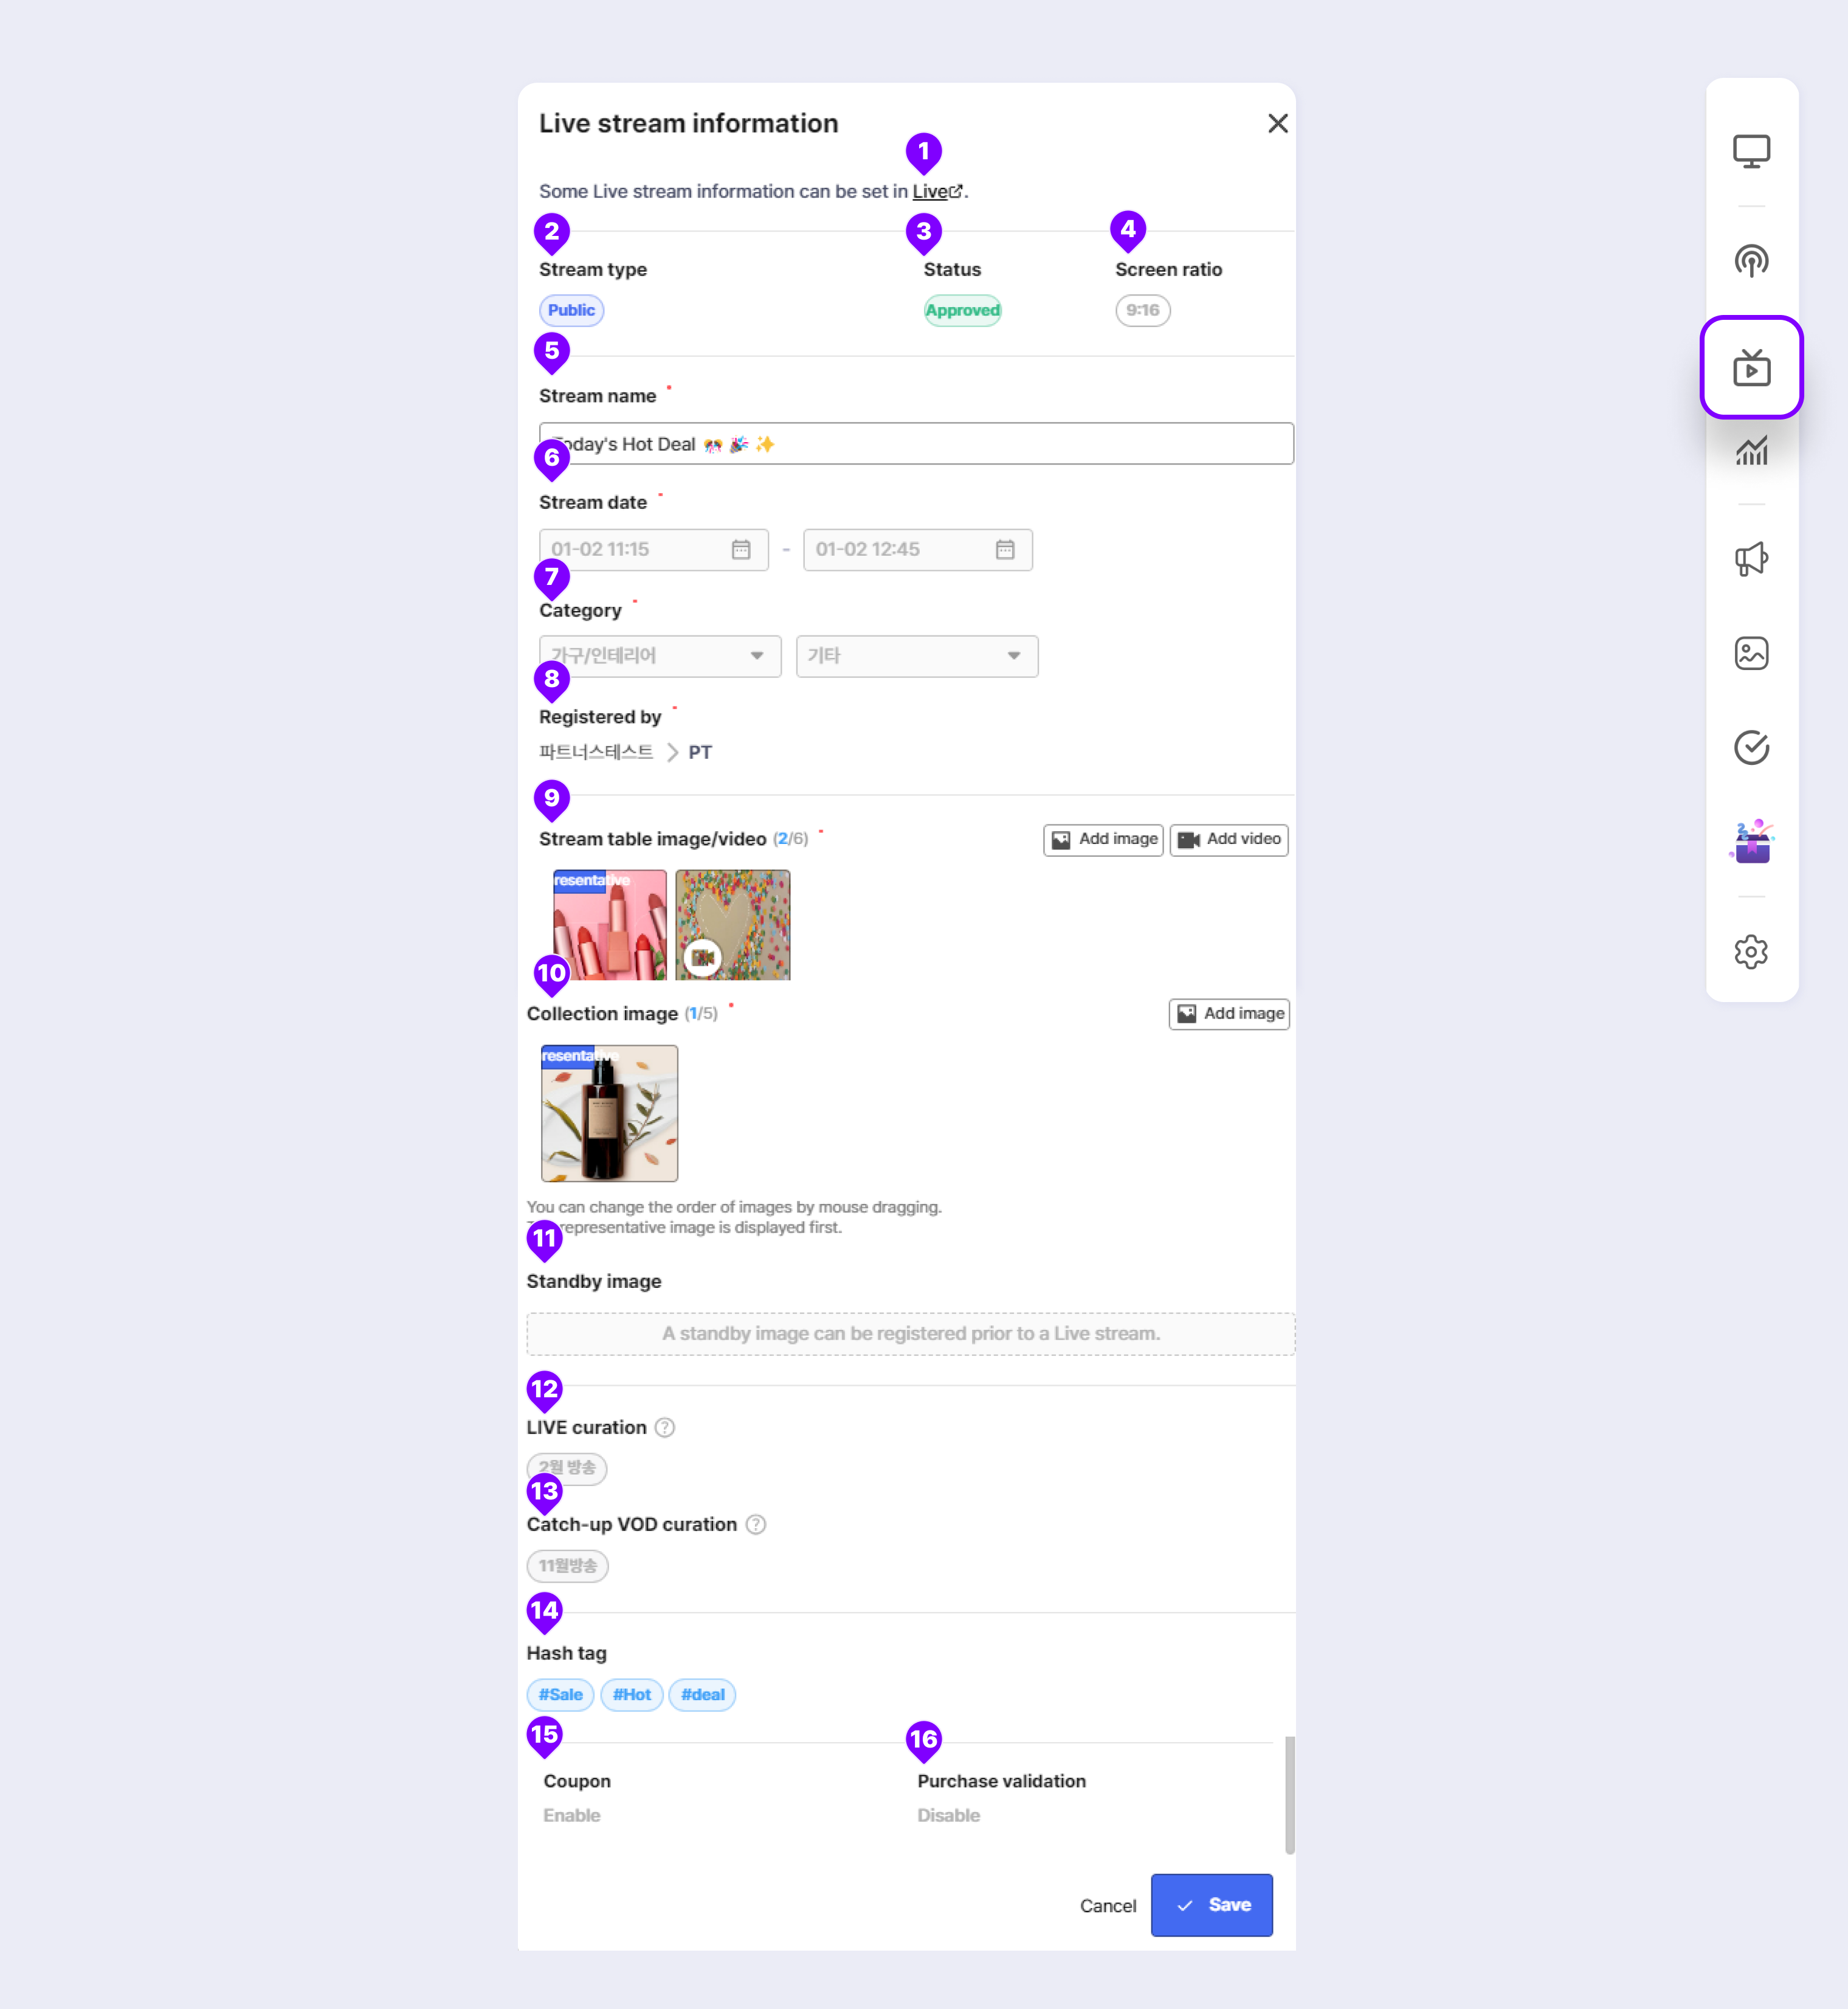
① Livestream: Clicking it displays Content > Livestream > Details of the livestream in a new window.
② Livestream Type: Displays the registered livestream type. You can check whether the livestream is general or secret and main or test. If the livestream is secret, the password is shown.
③ Status: Displays the approval status of the livestream.
④ Aspect Ratio: Displays the aspect ratio (9:16 or 16:9) registered when scheduling.
⑤ Title: Displays the title of the livestream.
⑥ Livestream Schedule: Displays the scheduled live time.
⑦ Category: Displays the registered category.
⑧ Registered by: Displays information of the person who registered the livestream.
⑨ Livestream Preview Image/Video: These are images that are shown on the standby screen before livestreaming, and you can change the representative image/video or delete and add images/videos in Liveconsole.
- The recommended image size is 1080 px wide and 810 px high.
- Up to 5 images in JPG, PNG, and GIF (1 MB recommended) file formats can be registered.
- Up to 1 video in MP4 (20 MB recommended) format can be registered.
⑩ Collection Image: These are the images shown when a user accesses the livestream from the Collection Page and in the low-power mode. You can change the representative image or delete and add images in Liveconsole.
- The recommended image size is 900 px wide and 1200 px high.
- Up to 5 images in JPG, PNG, and GIF (1 MB recommended) file formats can be registered.
⑪ Loading Image: This image is shown when there is an issue with streaming. It can be registered only before the livestream.
⑫ Live Curation: Set in Content > Livestream.
⑬ Replay Curation: Set in Content > Livestream.
⑭ Hashtag: Set in Content > Livestream.
⑮ Coupon: Set in Content > Livestream.
⑯ Purchase Event: Set in Content > Livestream before the livestream.
You cannot set or edit the purchase event while on air.
Real-time Statistics
You can check statistical data in real-time while hosting the livestream. The real-time statistics reference time is displayed on the top, and is updated periodically.
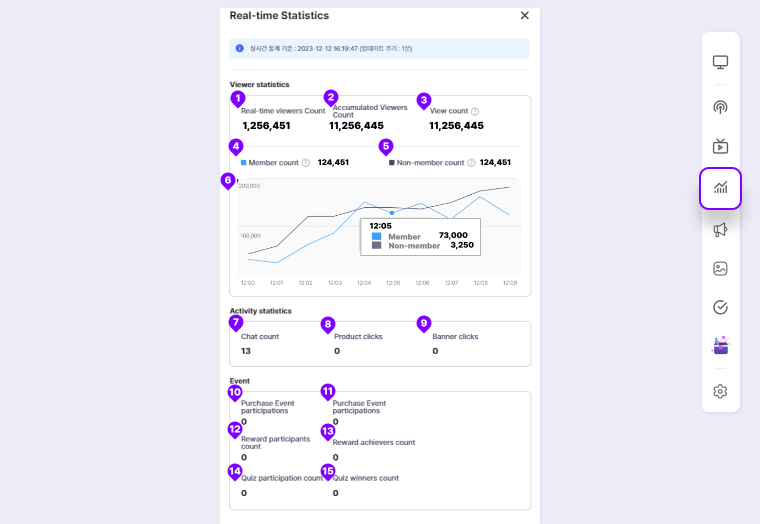
① Real-time Viewers Count: Displays the number of viewers who are watching the livestream in real-time.
② Accumulated Viewers Count: Displays the cumulative number of viewers who have watched the livestream since it started.
③ View Count: The number of views for the current livestream. If a viewer reloads, the count is accumulated repeatedly.
④ **Member Viewers Count**: Displays the number of logged-in members among viewers.
⑤ Non-member Viewers Count: Displays the number of non-members or viewers who did not log in.
⑥ Real-time Viewership Chart: A 1-minute interval chart that displays the number of members/non-members of the time period when you move your mouse over the graph of the desired time.
⑦ Chat Count: Displays the number of chats after the livestream started.
⑧ Product Clicks: Displays the number of product clicks after the livestream started.
⑨ Banner Clicks: Displays the number of banner clicks after the livestream started.
⑩ Purchase Event Participants: Displays the number of viewers who participated in the purchase event.
⑪ Purchase Event Participation Count: Displays the number of participations in the purchase event (simple sum).
⑫ Reward Participants Count: The number of viewers who clicked the "Join" button in the player while the event was in progress.
⑬ Reward Achievers Count: The number of viewers among participants who met the reward achievement criteria.
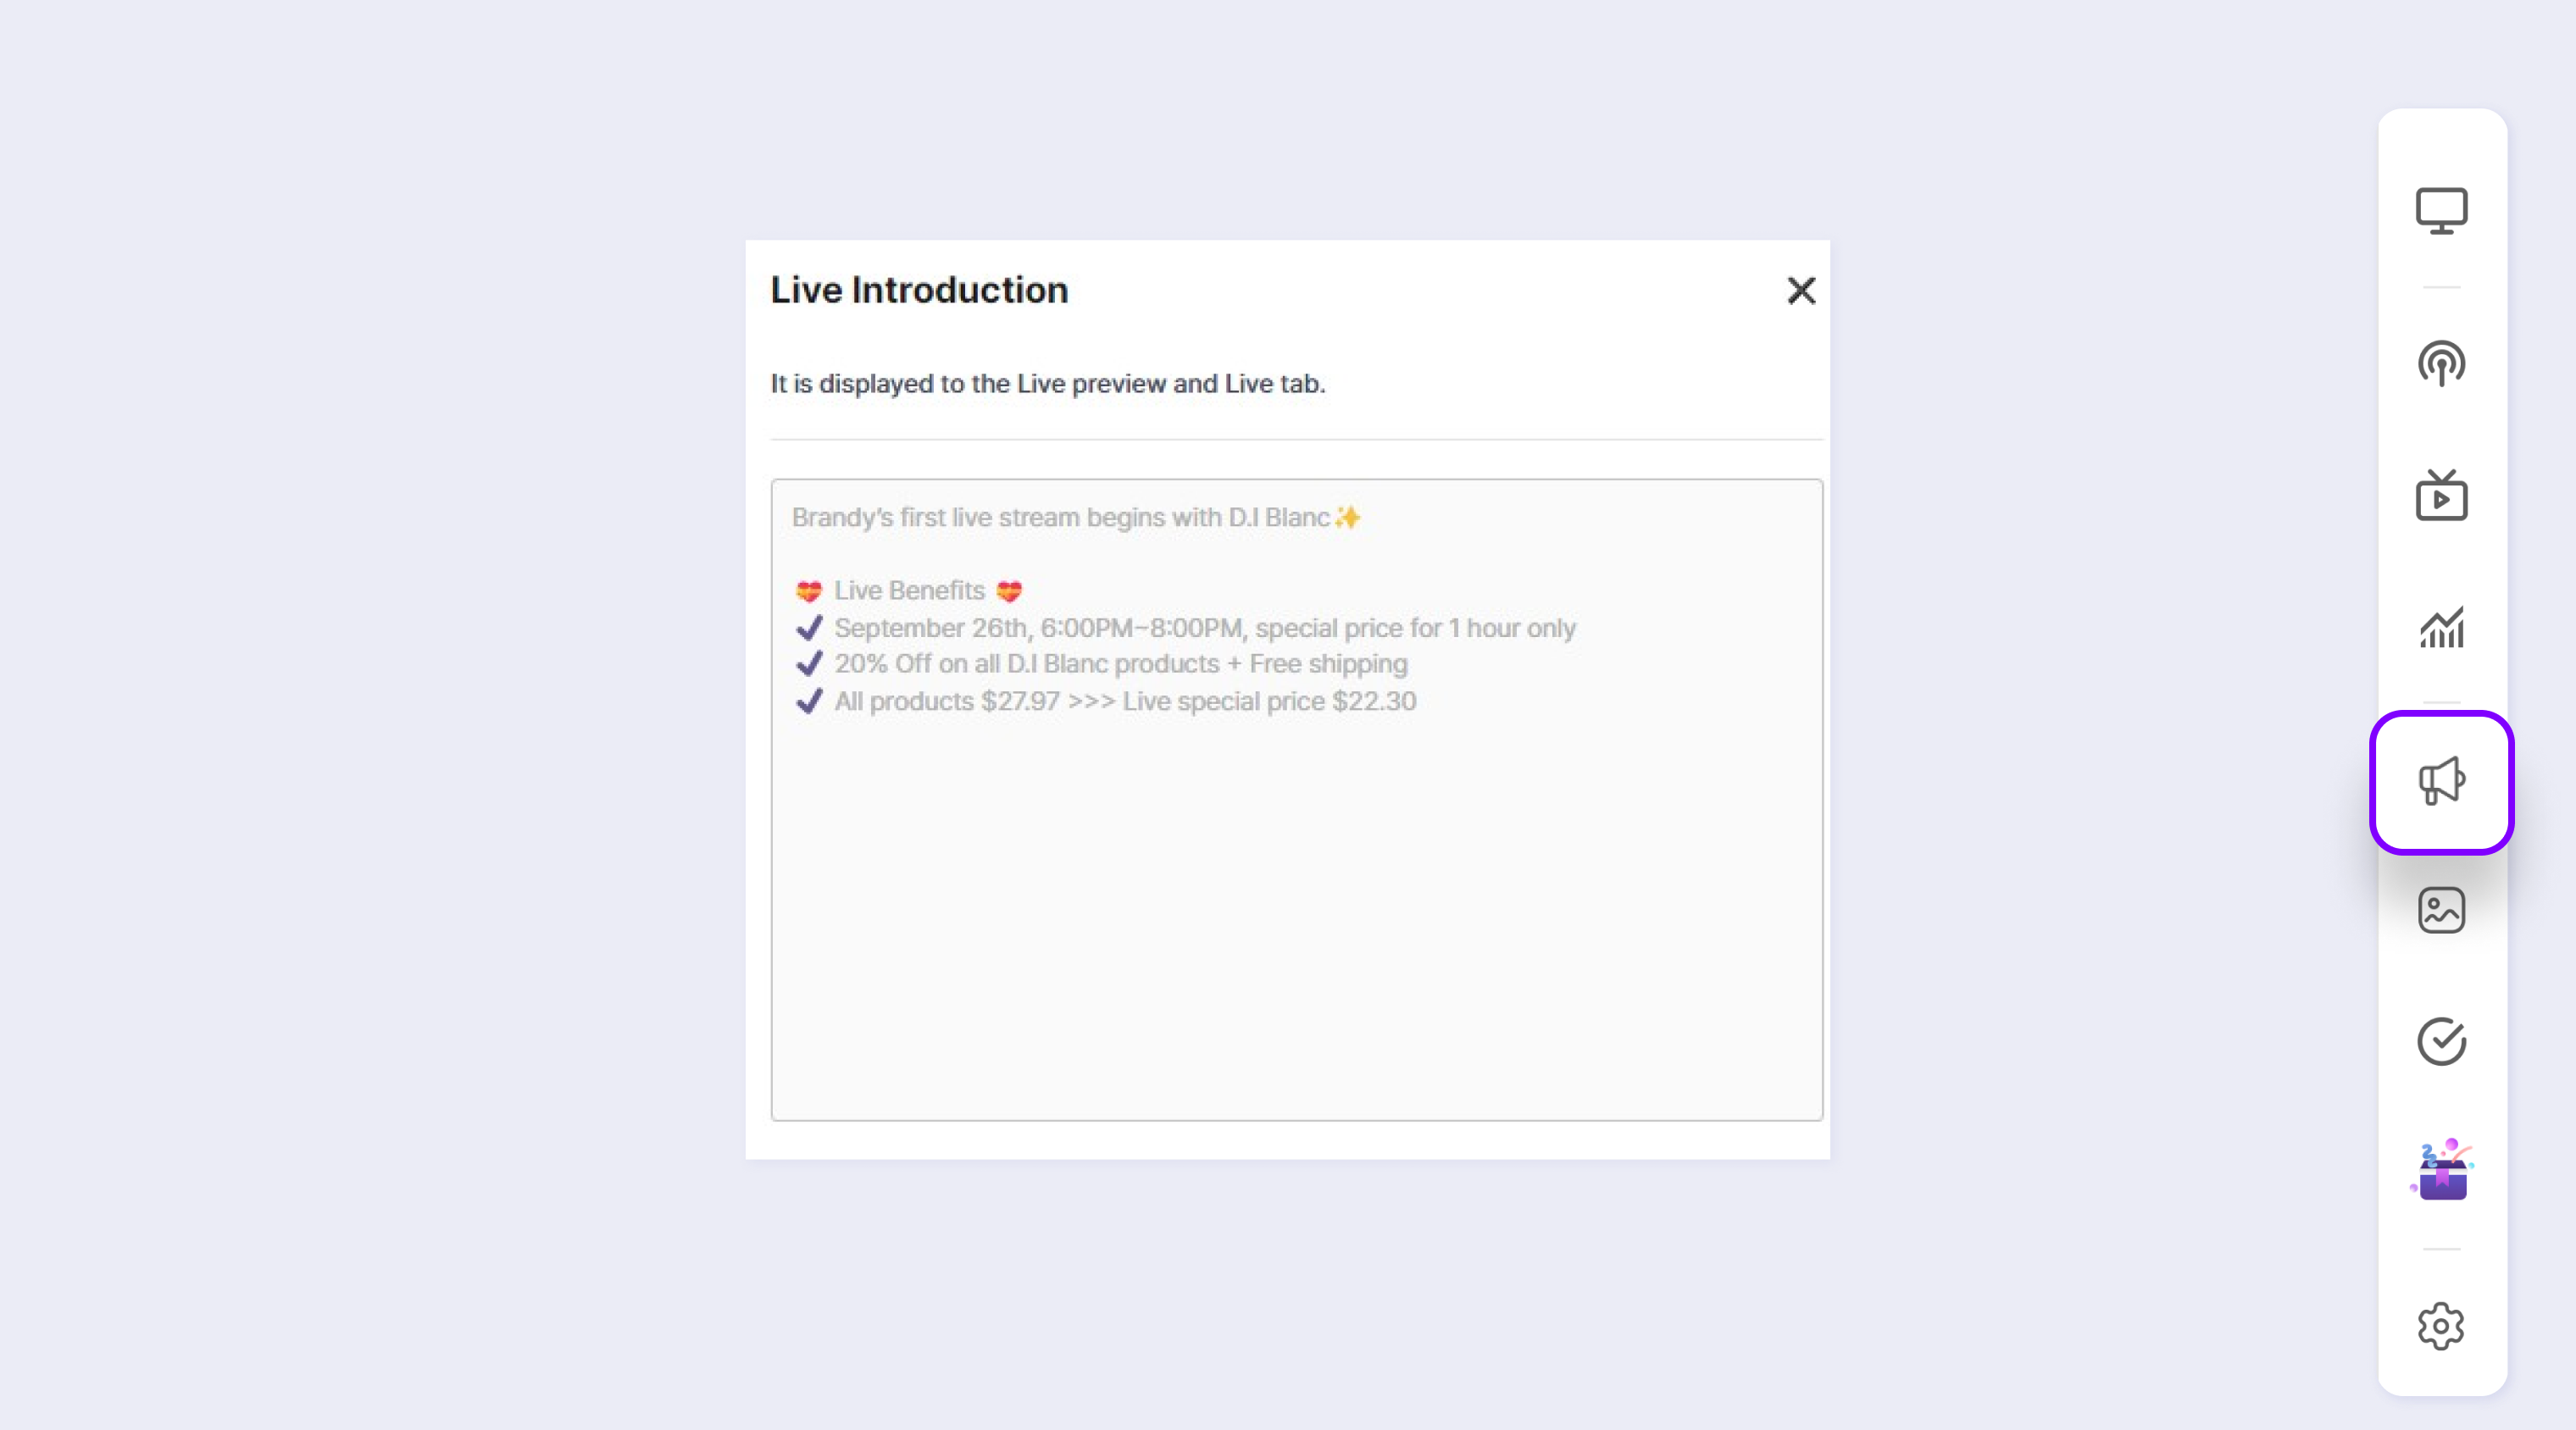
Live Introduction
You can view and edit the content to be displayed on the Live Introduction tab while on air. Edit the content as needed and click Save.
Live Banner
You can view, edit, or add a banner to use while on air.
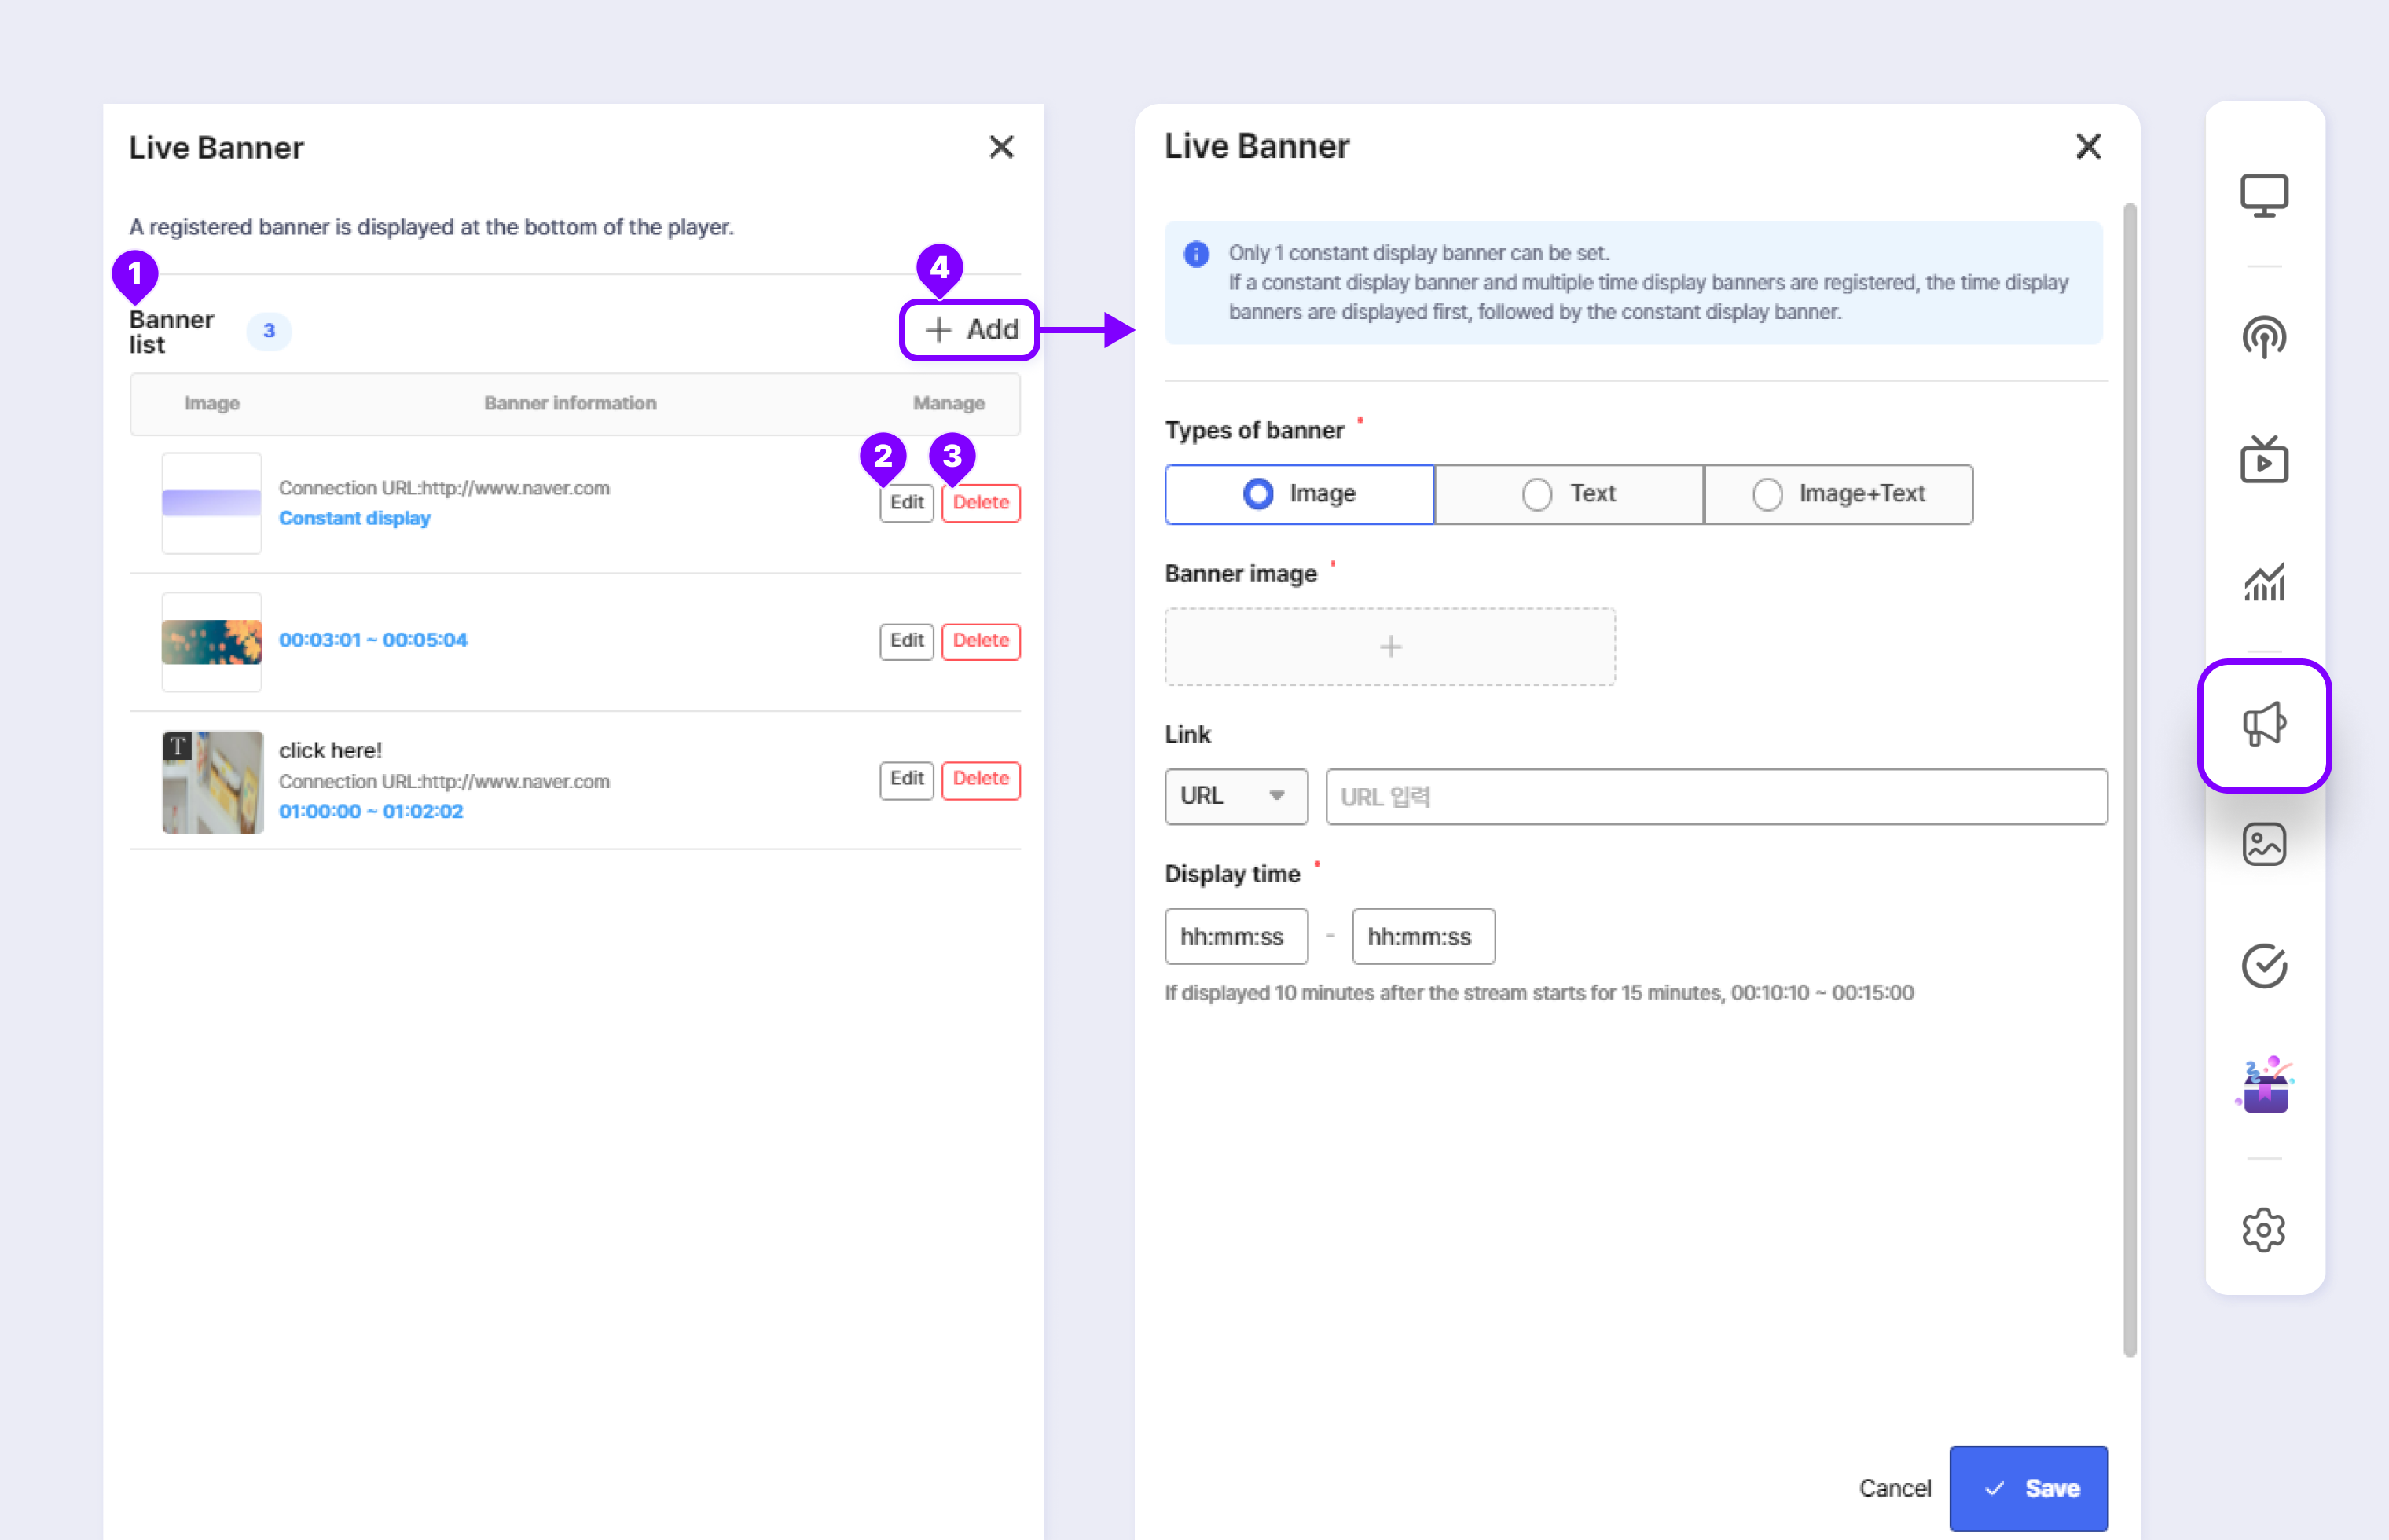
① Banner List: Displays the list of registered banners.
② Edit: Click to change details of the banner when needed.
③ Delete: Click Delete if you are not using the banner.
④ + Add: A layer screen for adding a banner is displayed. Enter details and click Save to add and register a banner. You cannot add a banner after the livestream ends.
Purchase Event
You can hold a purchase event through the Side Bar > Purchase Event icon.
The purchase event becomes available only when it is enabled in the stream table before the livestream starts.
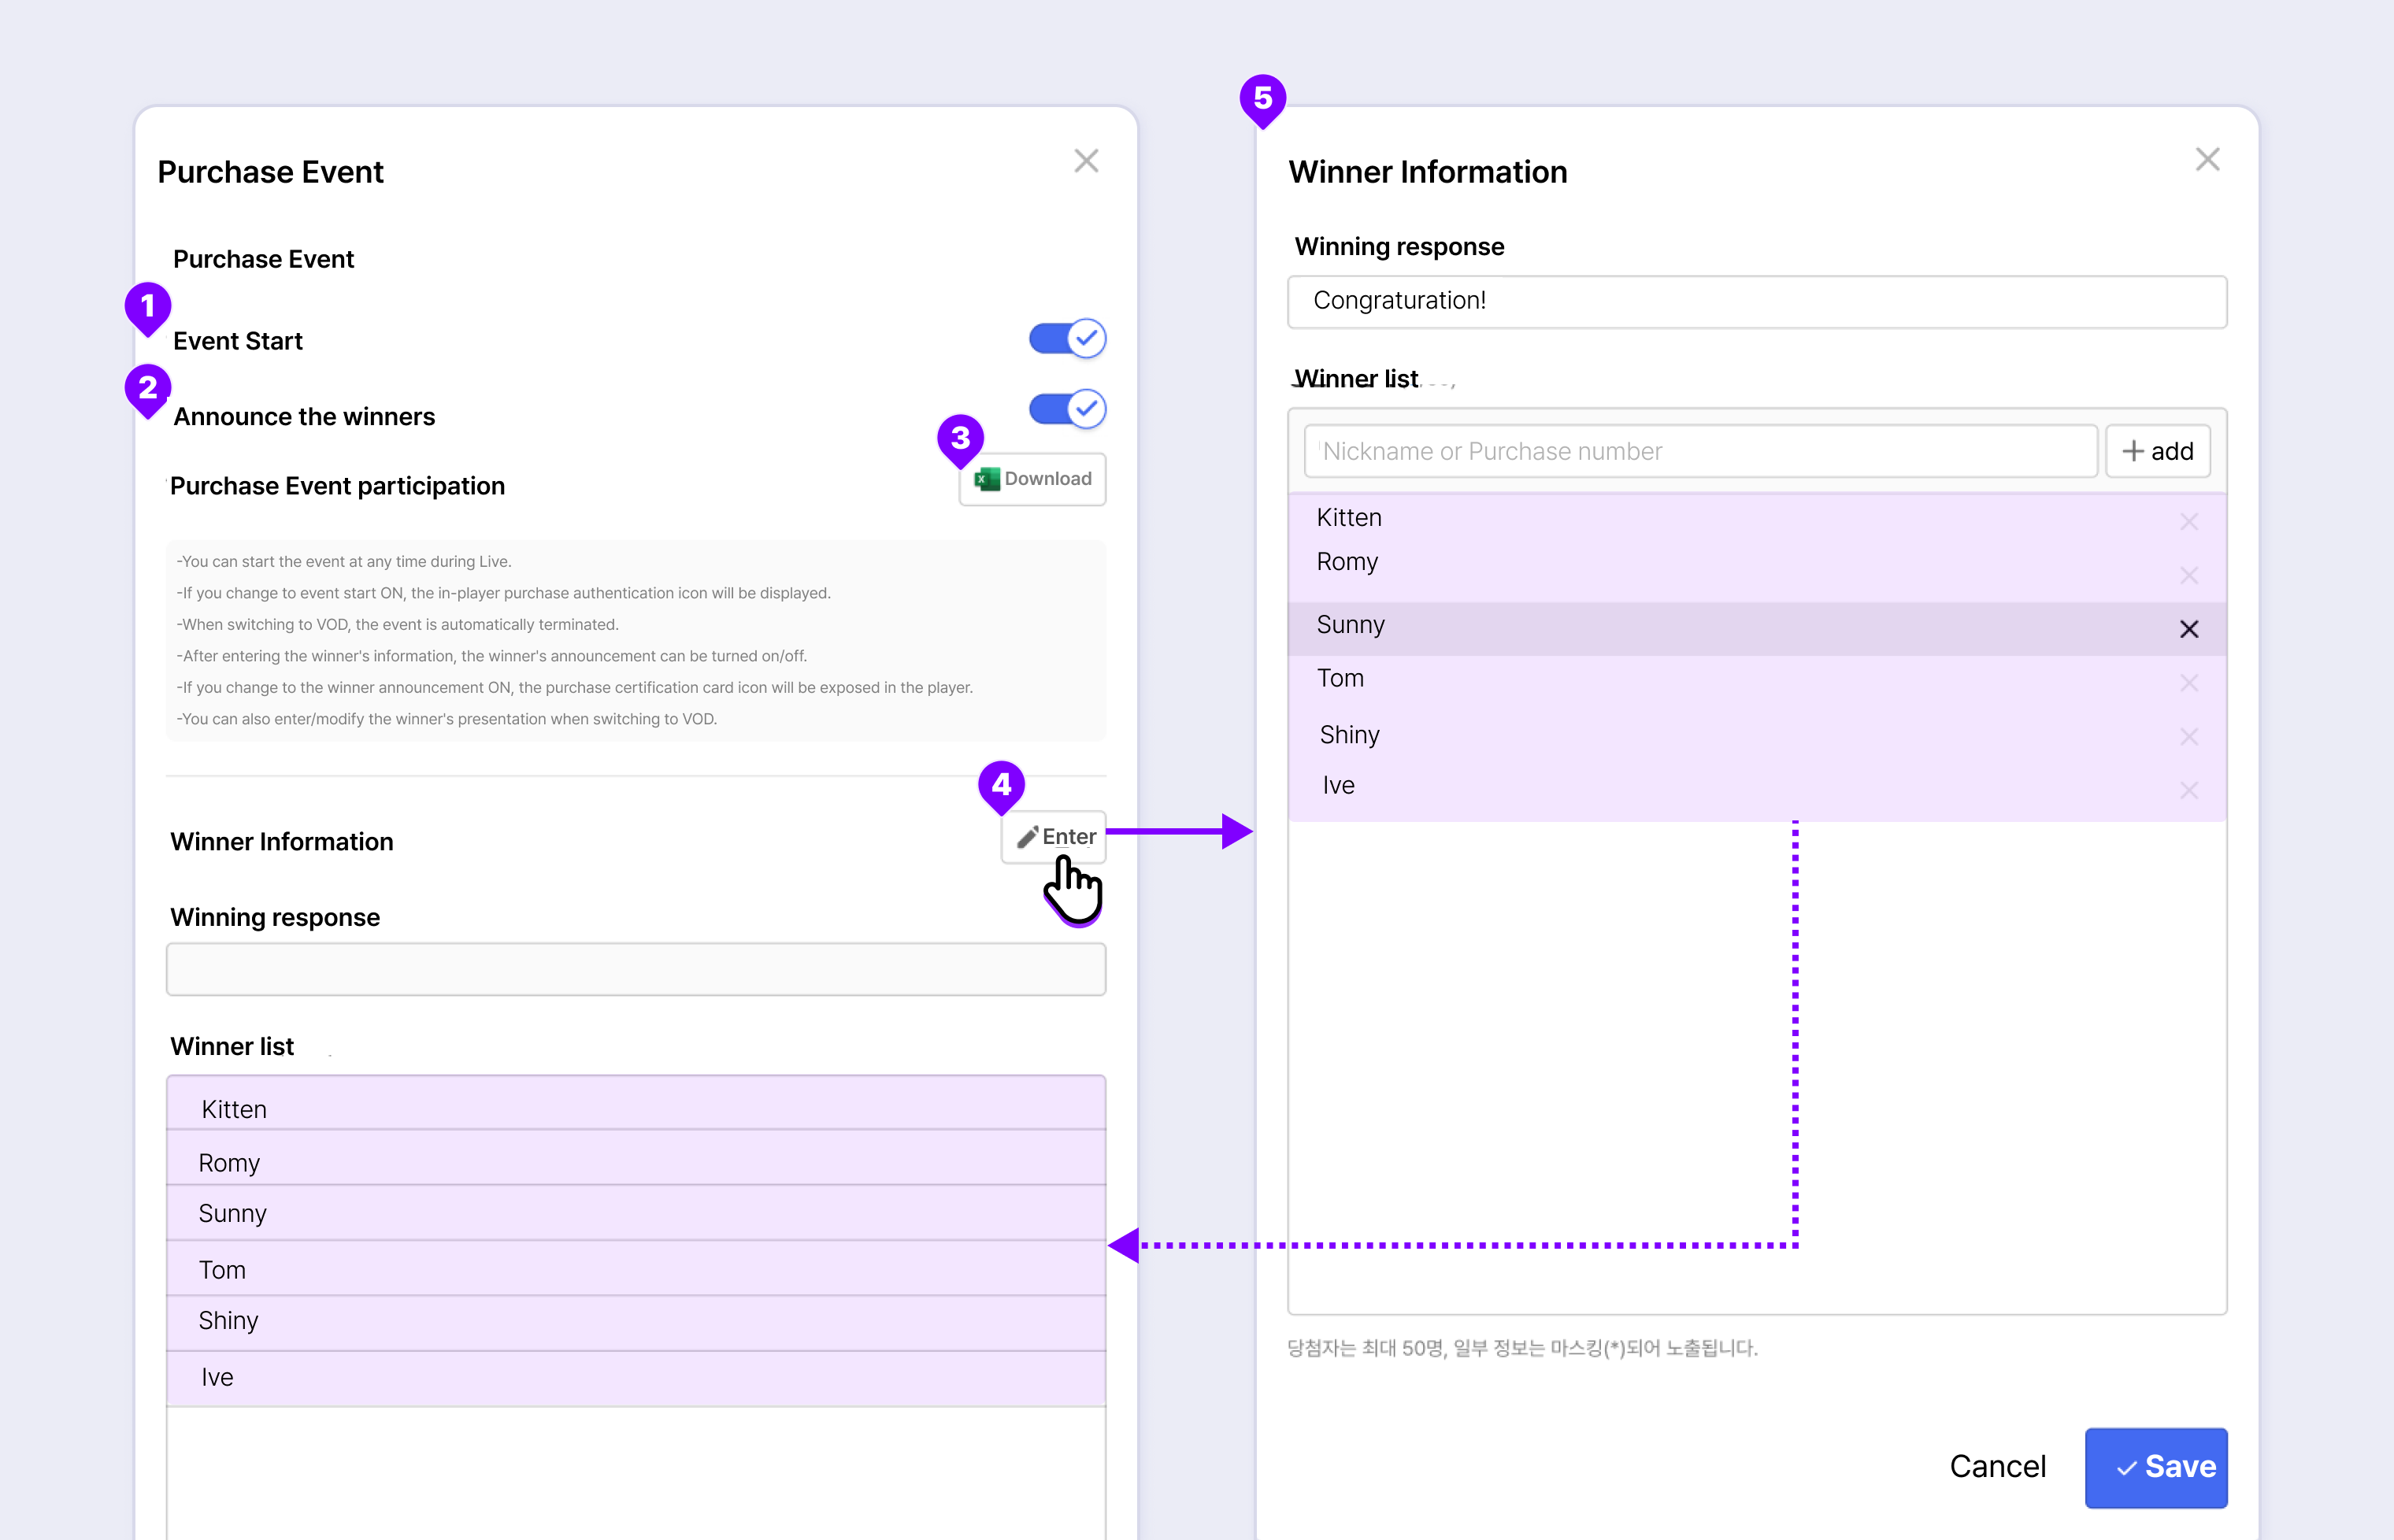
① Event Start: Toggle ON to show the Purchase Event icon on the player screen. When it is OFF, the Purchase Event icon is not shown on the player screen.
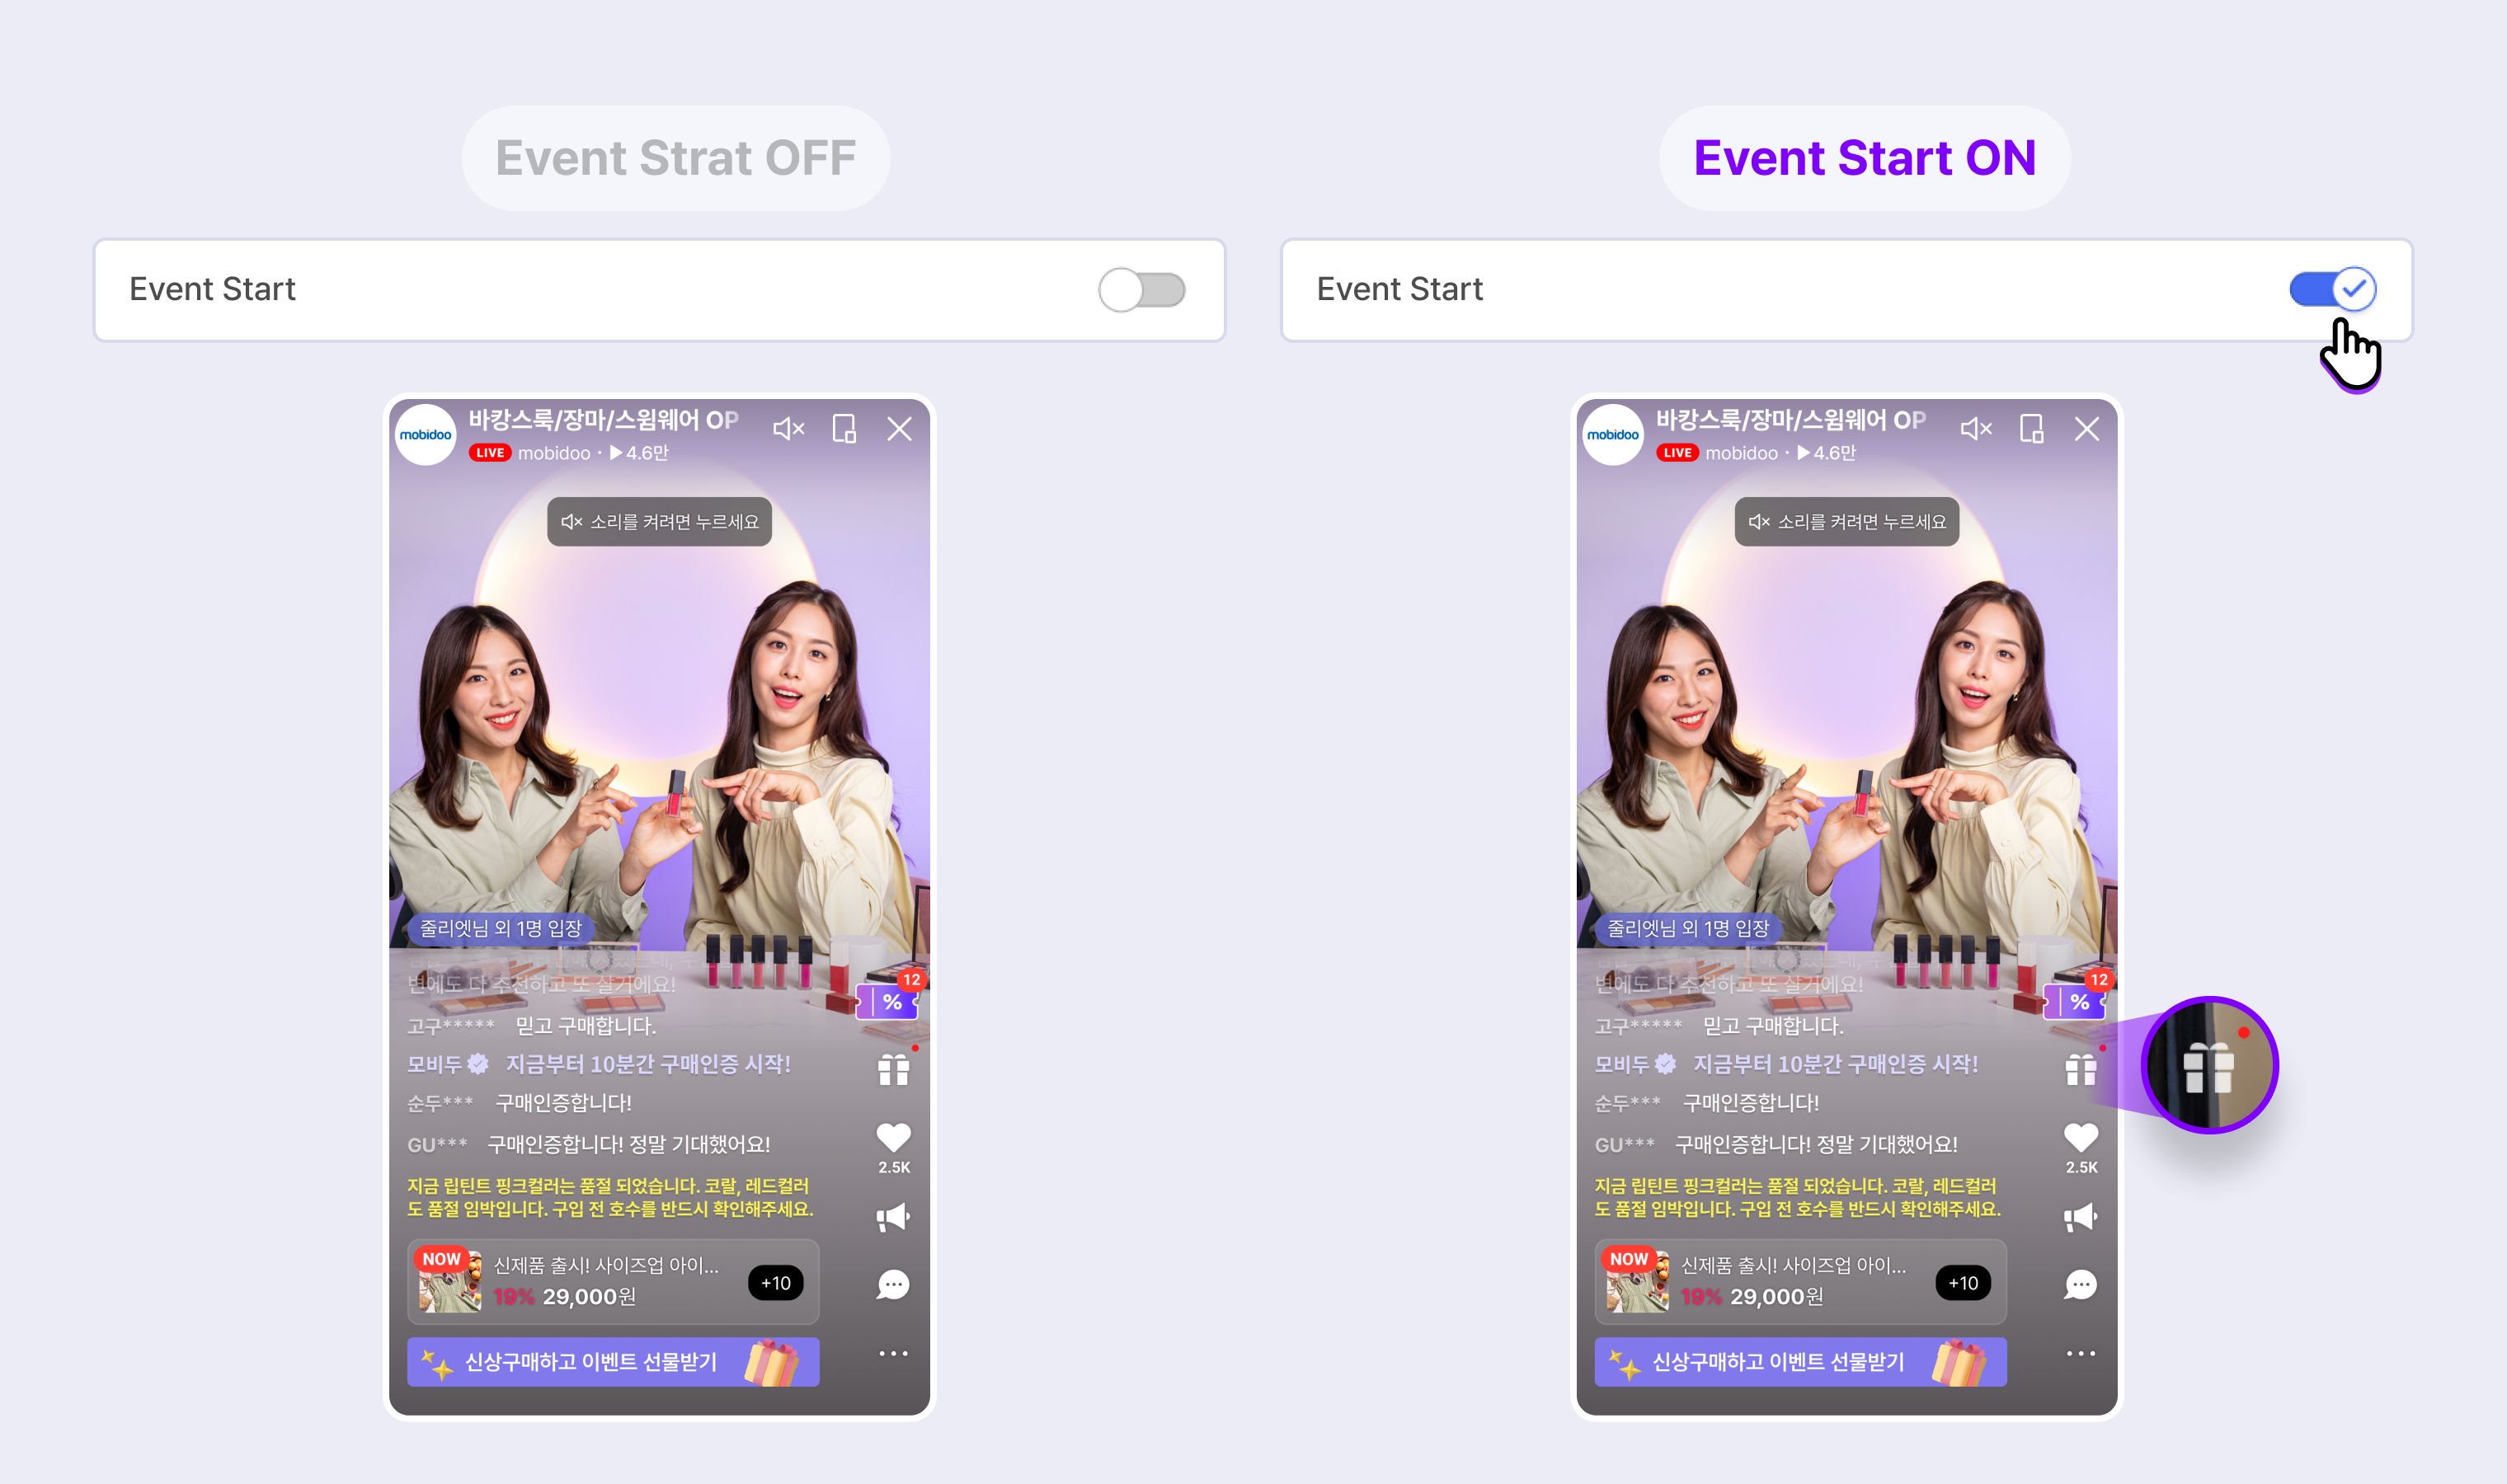
② Announce the Winners: Enter details in the Entering Winner Information window and set toggle ON to show the Announce the Winners icon on the player screen. If you have entered the winning-related information message, it is shown at the bottom of the winner list. If you have not entered the information message, only the winner list is shown.
The criteria for masking the winner information are as follows.
1-5 characters: Last two digits (1**)
6-10 characters: Last three digits (123***)
11 characters or more: Last four digits (1234567****)
③ Download: You can download information about purchase event participants as Excel file.
④ Winner Information > Enter: Displays a separate window for entering winner information.
⑤ Entering Winner Information: Enter the content to be shown to the user about the winner, such as the nickname, purchase number, or nickname and purchase number. You can also enter a winning response or a message for the winner if you want.
The Purchase Event function is available only while on air.
Settings
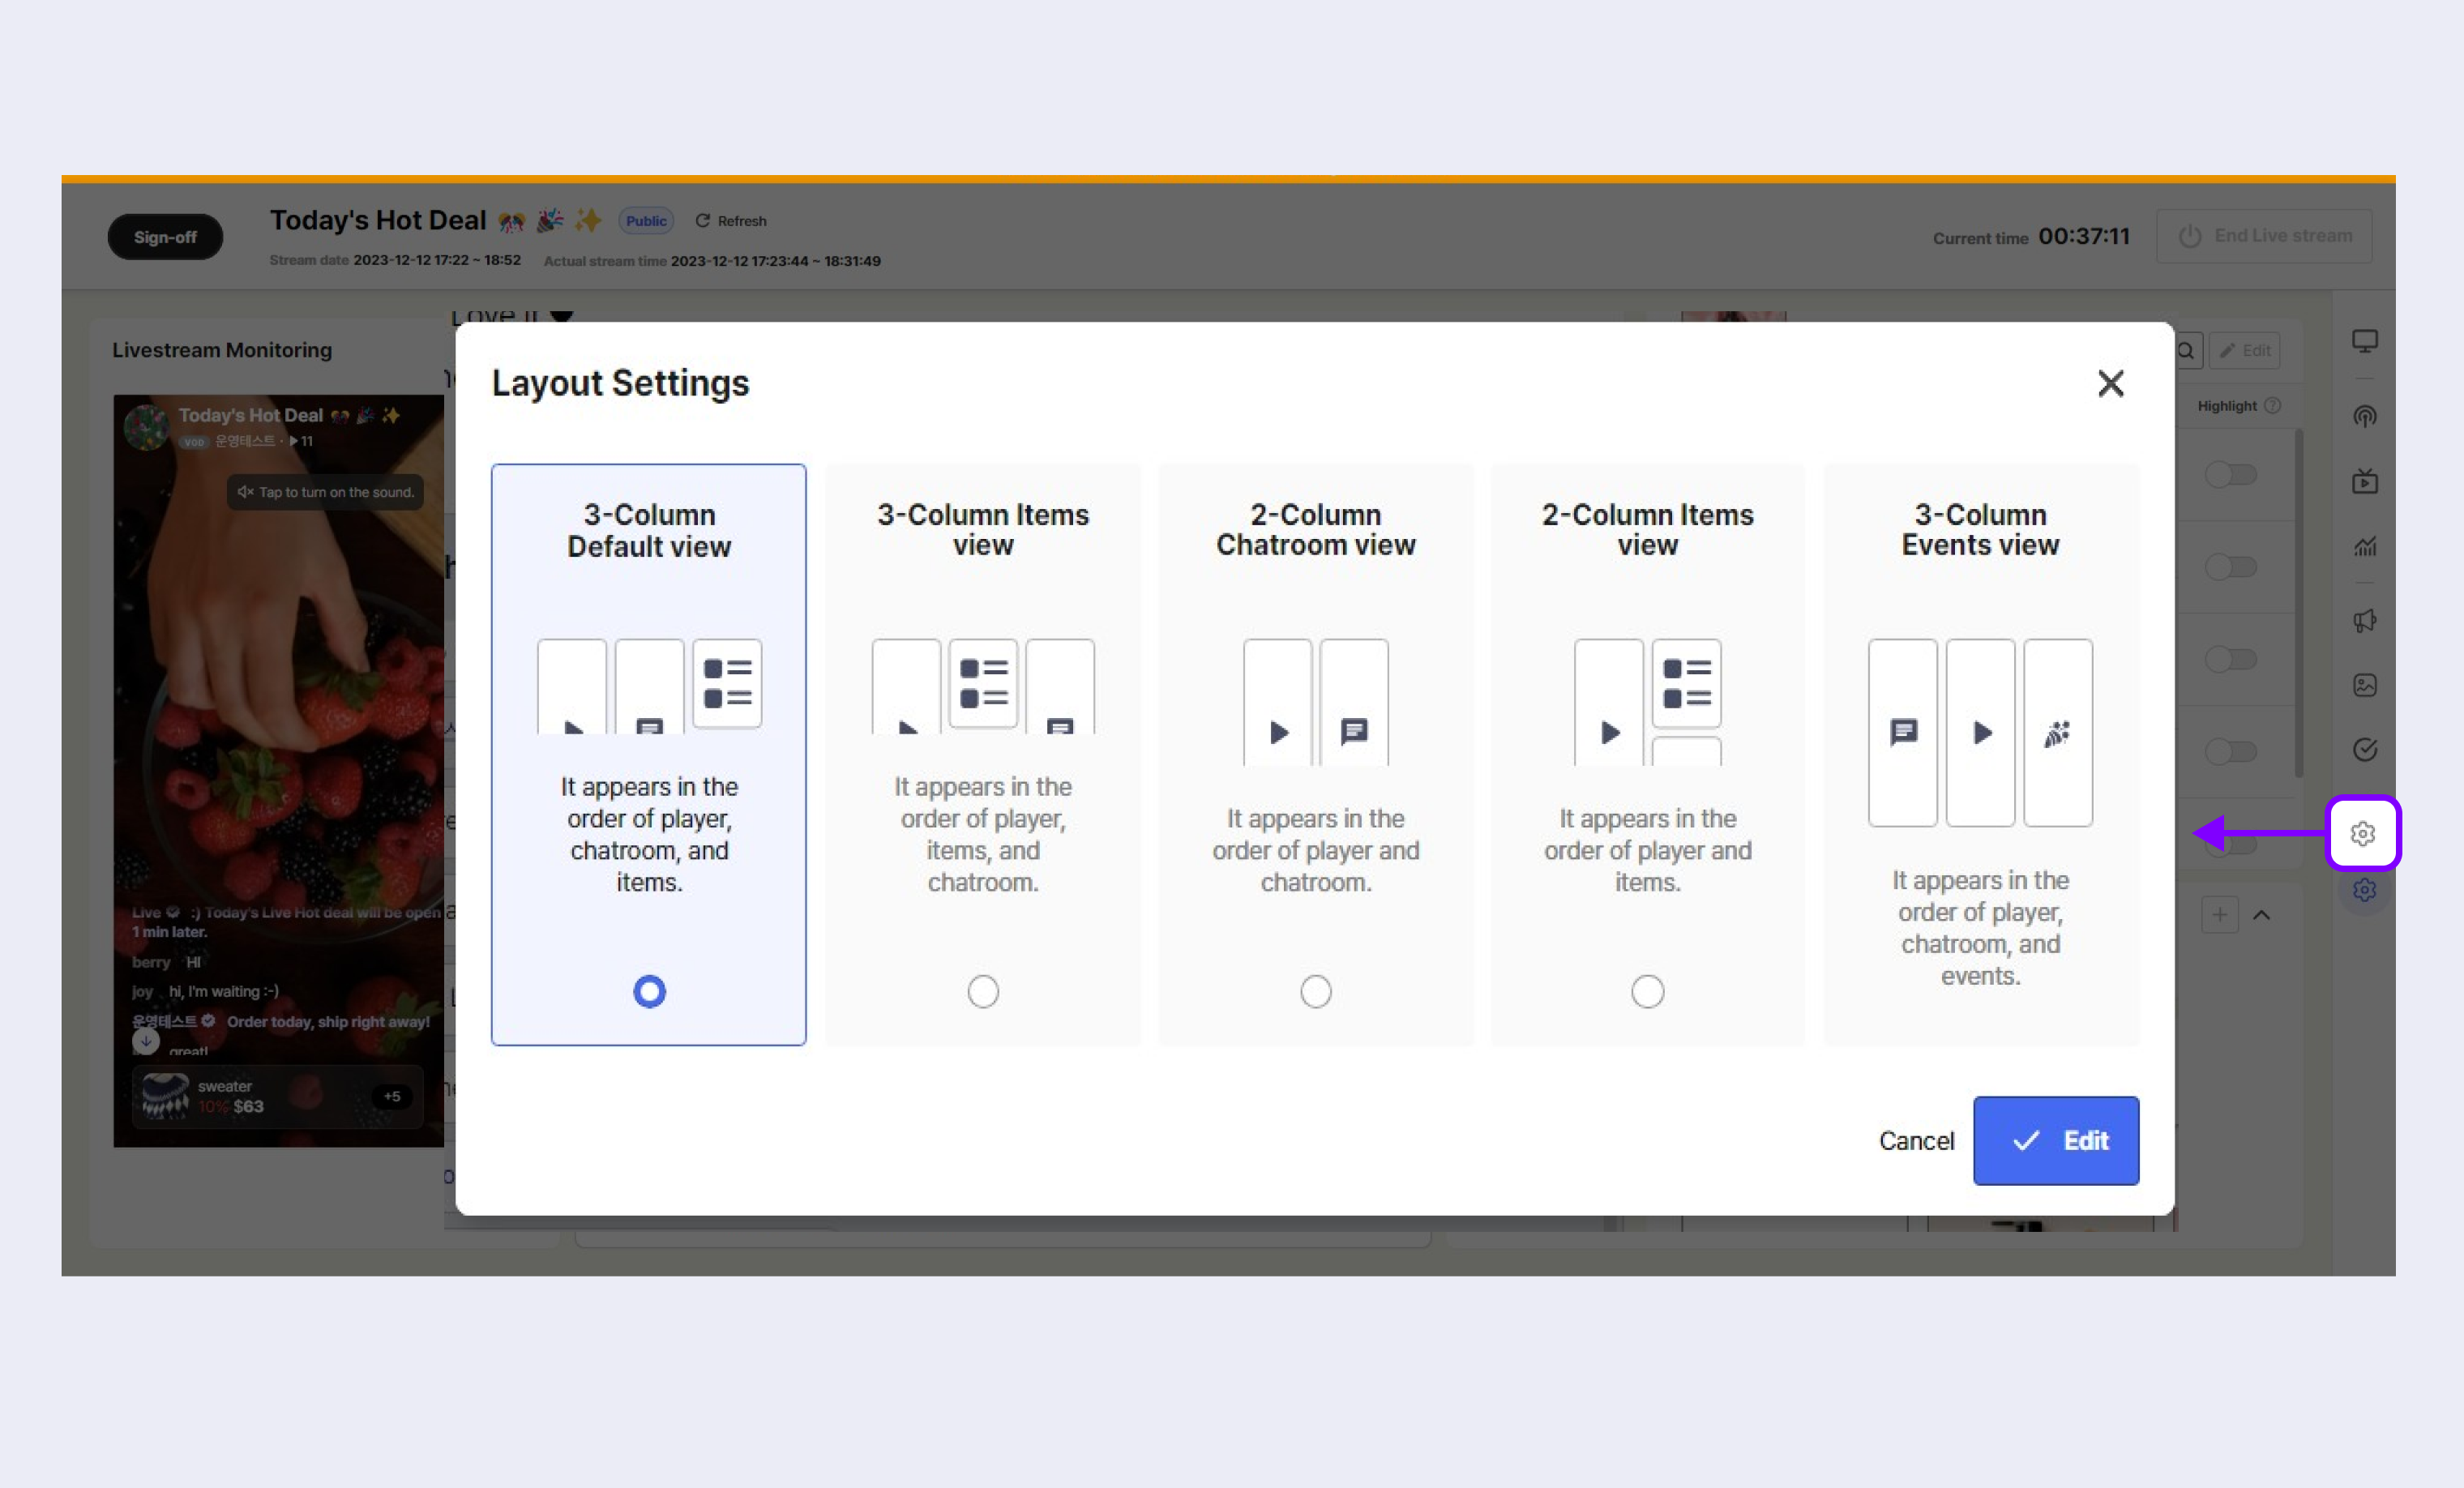
You can set the layout using the Side Bar > Settings icon.
- The default setting is 3-Level Default view.
- Click Save after setting the layout to save the settings. The settings are maintained even after the livestream ends.
- The layout settings can be saved for each partner ID.
Updated 4 months ago
