
Chat Management
This chapter describes functions related to chat you can use in Liveconsole.
- Real-time Chat: The administrator can join the real-time chat while on air.
- Using Chat Archive: This function archives chats you want to save separately.
- Copying Chat: You can copy the chat history you want from the real-time chat window.
- Changing Administrator Chat Nickname: This function allows the administrator to change the nickname to be used in chat.
- Pinning Administrator Chat: This function pins the phrase with details administrator wants the users to know among administrator chats.
- Replying to Chat: Reply to viewers' chat contents.
- Registering Chat Shortcuts: The administrator can register frequently used phrases as shortcuts in advance for easy and quick use in the administrator chat.
- Disabling Chat: Pause all viewers' chats except for the administrator chat.
- Stopping Chat Scrolling: If viewer's chat passes quickly, stop scrolling to pause the chat on the administrator screen.
- Adding Blocked Words in Chat: Add words you want to block in the livestream as blocked words.
- Managing Report and Block Chats: You can restrict the viewer from chatting through the report and block functions due to inevitable reasons while on air.
- Changing Chat Font Size: You can enlarge the chat font size.
- Searching Chat: You can search the chat content as needed.
Real-time Chat
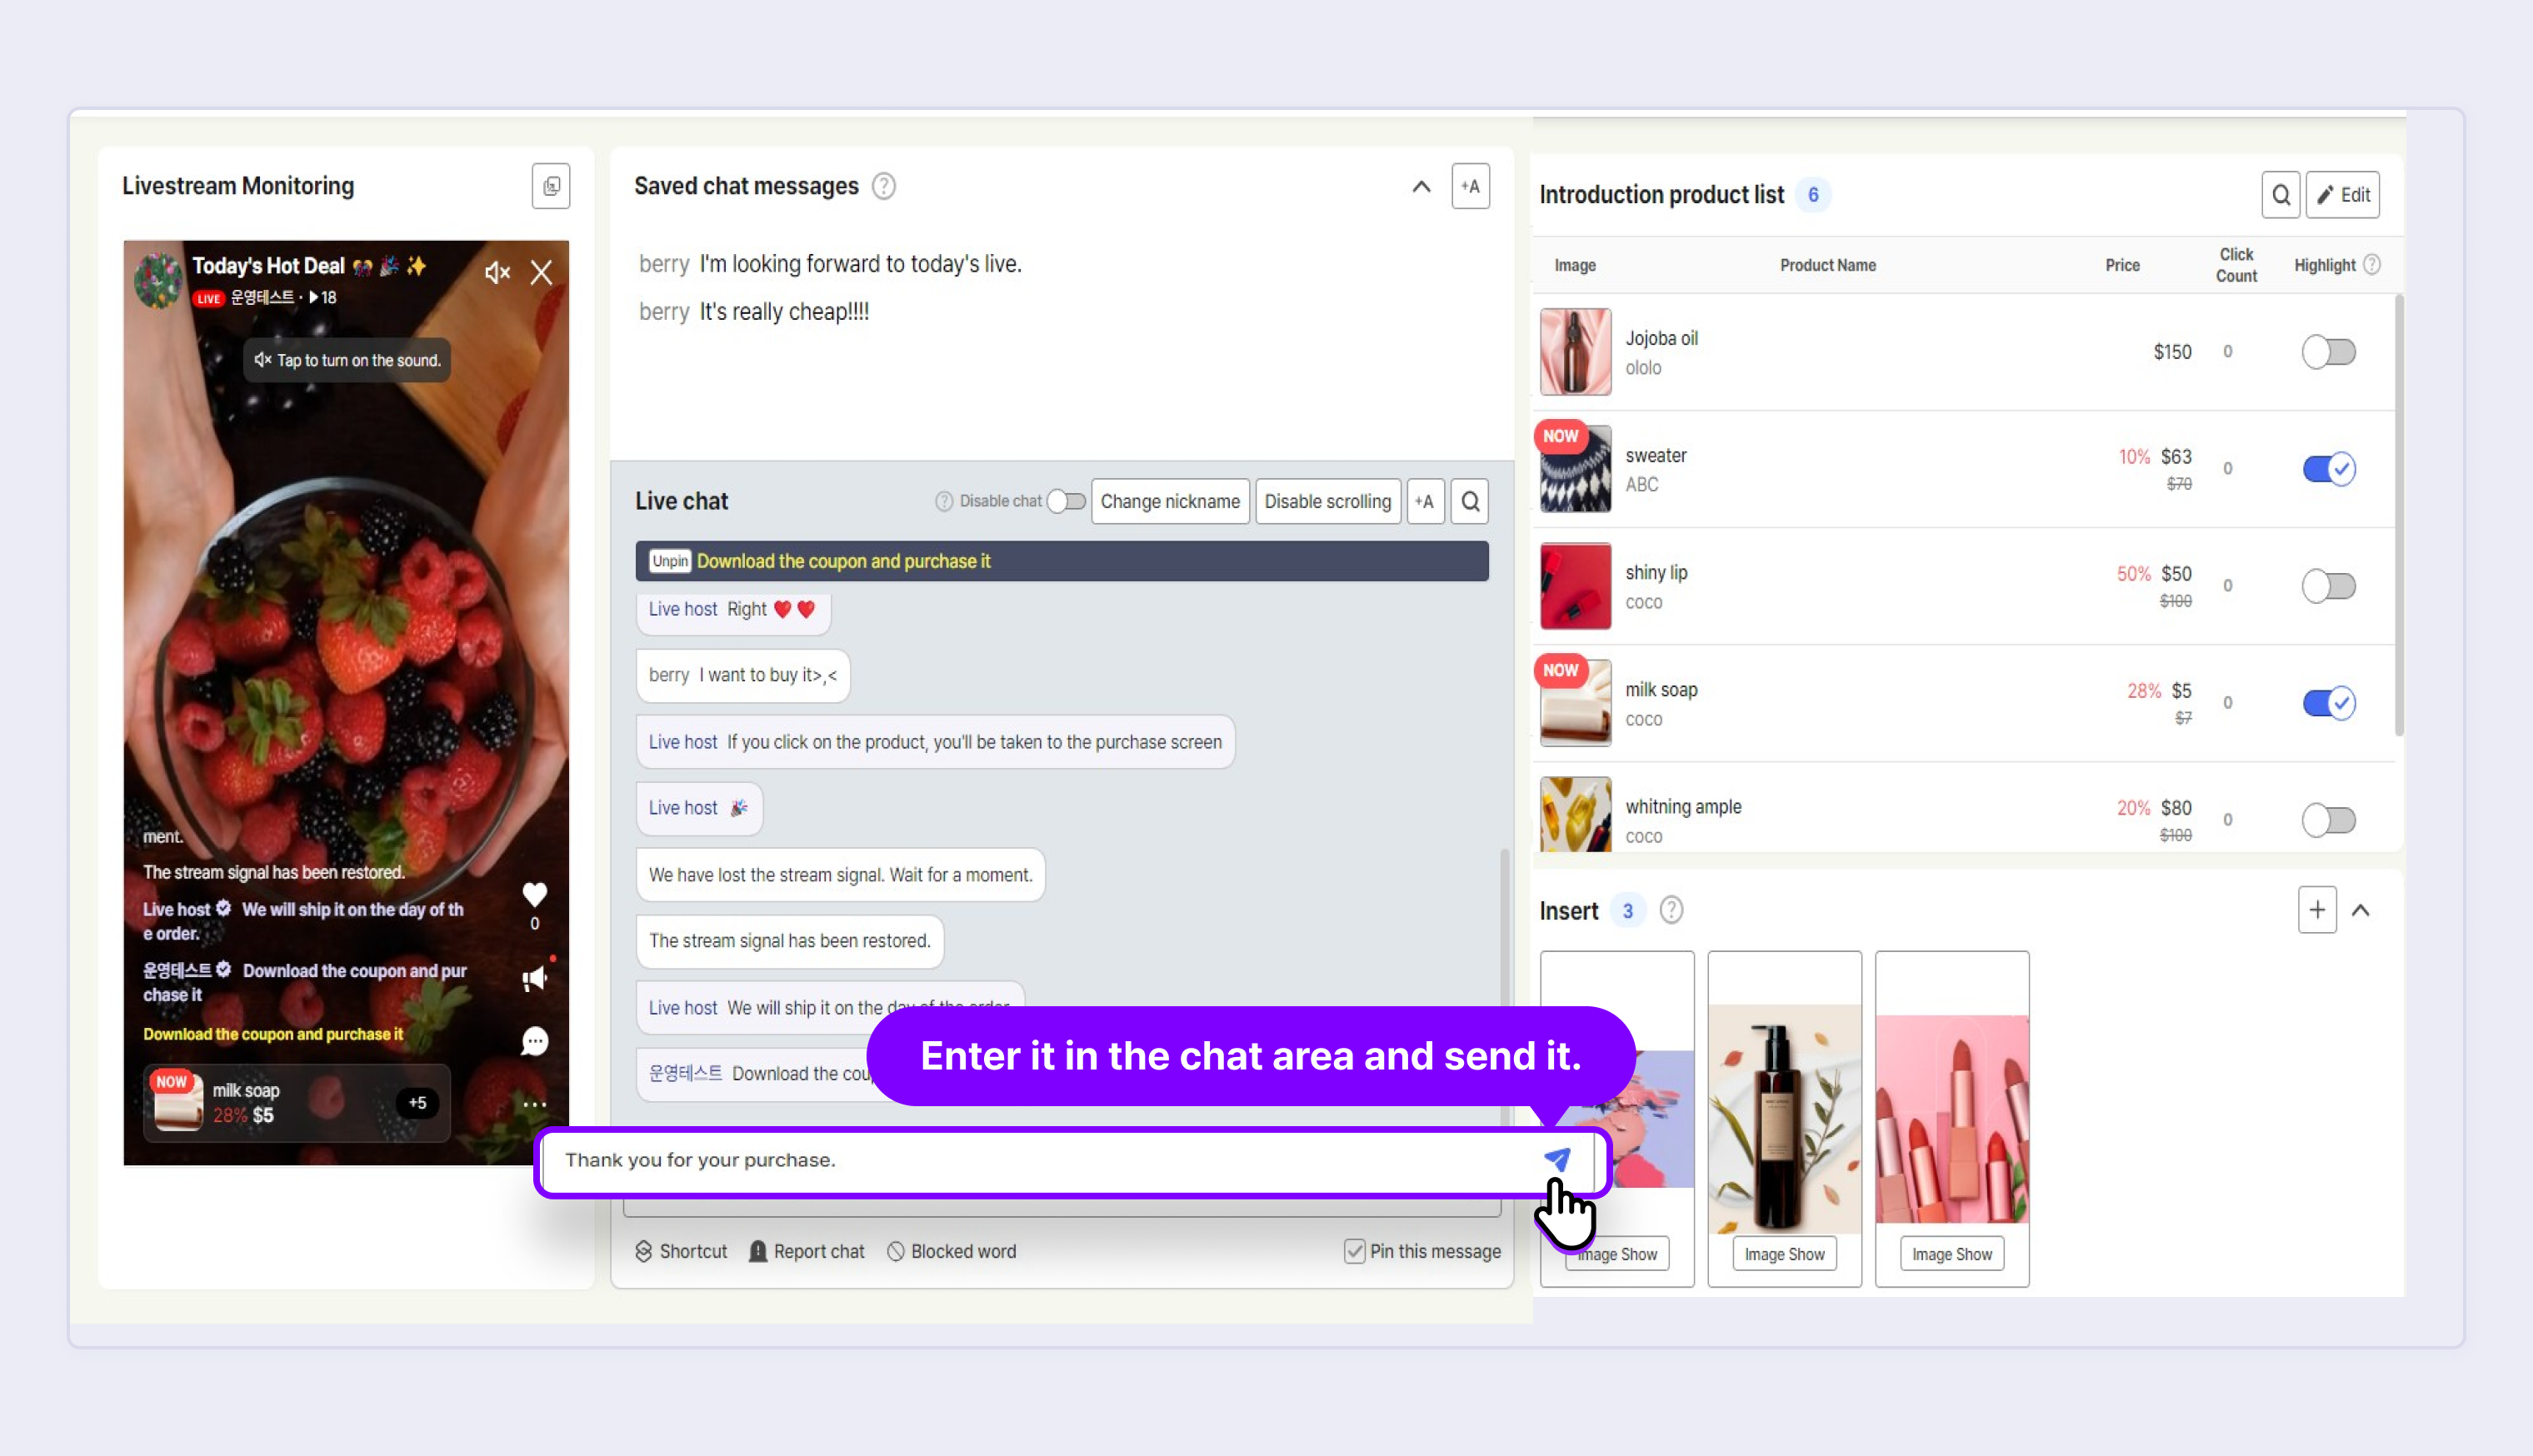
The administrator can join the real-time chat while on air. Enter the text in the Liveconsole chat area to join.
The administrator can enter a chat of up to 100 characters.
Using Chat Archive
This function can be used to archive a specific chat content. The saved content can also be viewed in Prompter.
The maximum number of chats that can be archived in Chat Archive is 1,000 and the most recently archived chat is shown at the top.
If you are not using the Chat Archive, you can collapse it.
Navigating to Chat Archive
STEP 1. When you move your mouse over the end of the user chat, you can see the Archive icon.
STEP 2. Click the Archive icon to save the chat in the Archive.

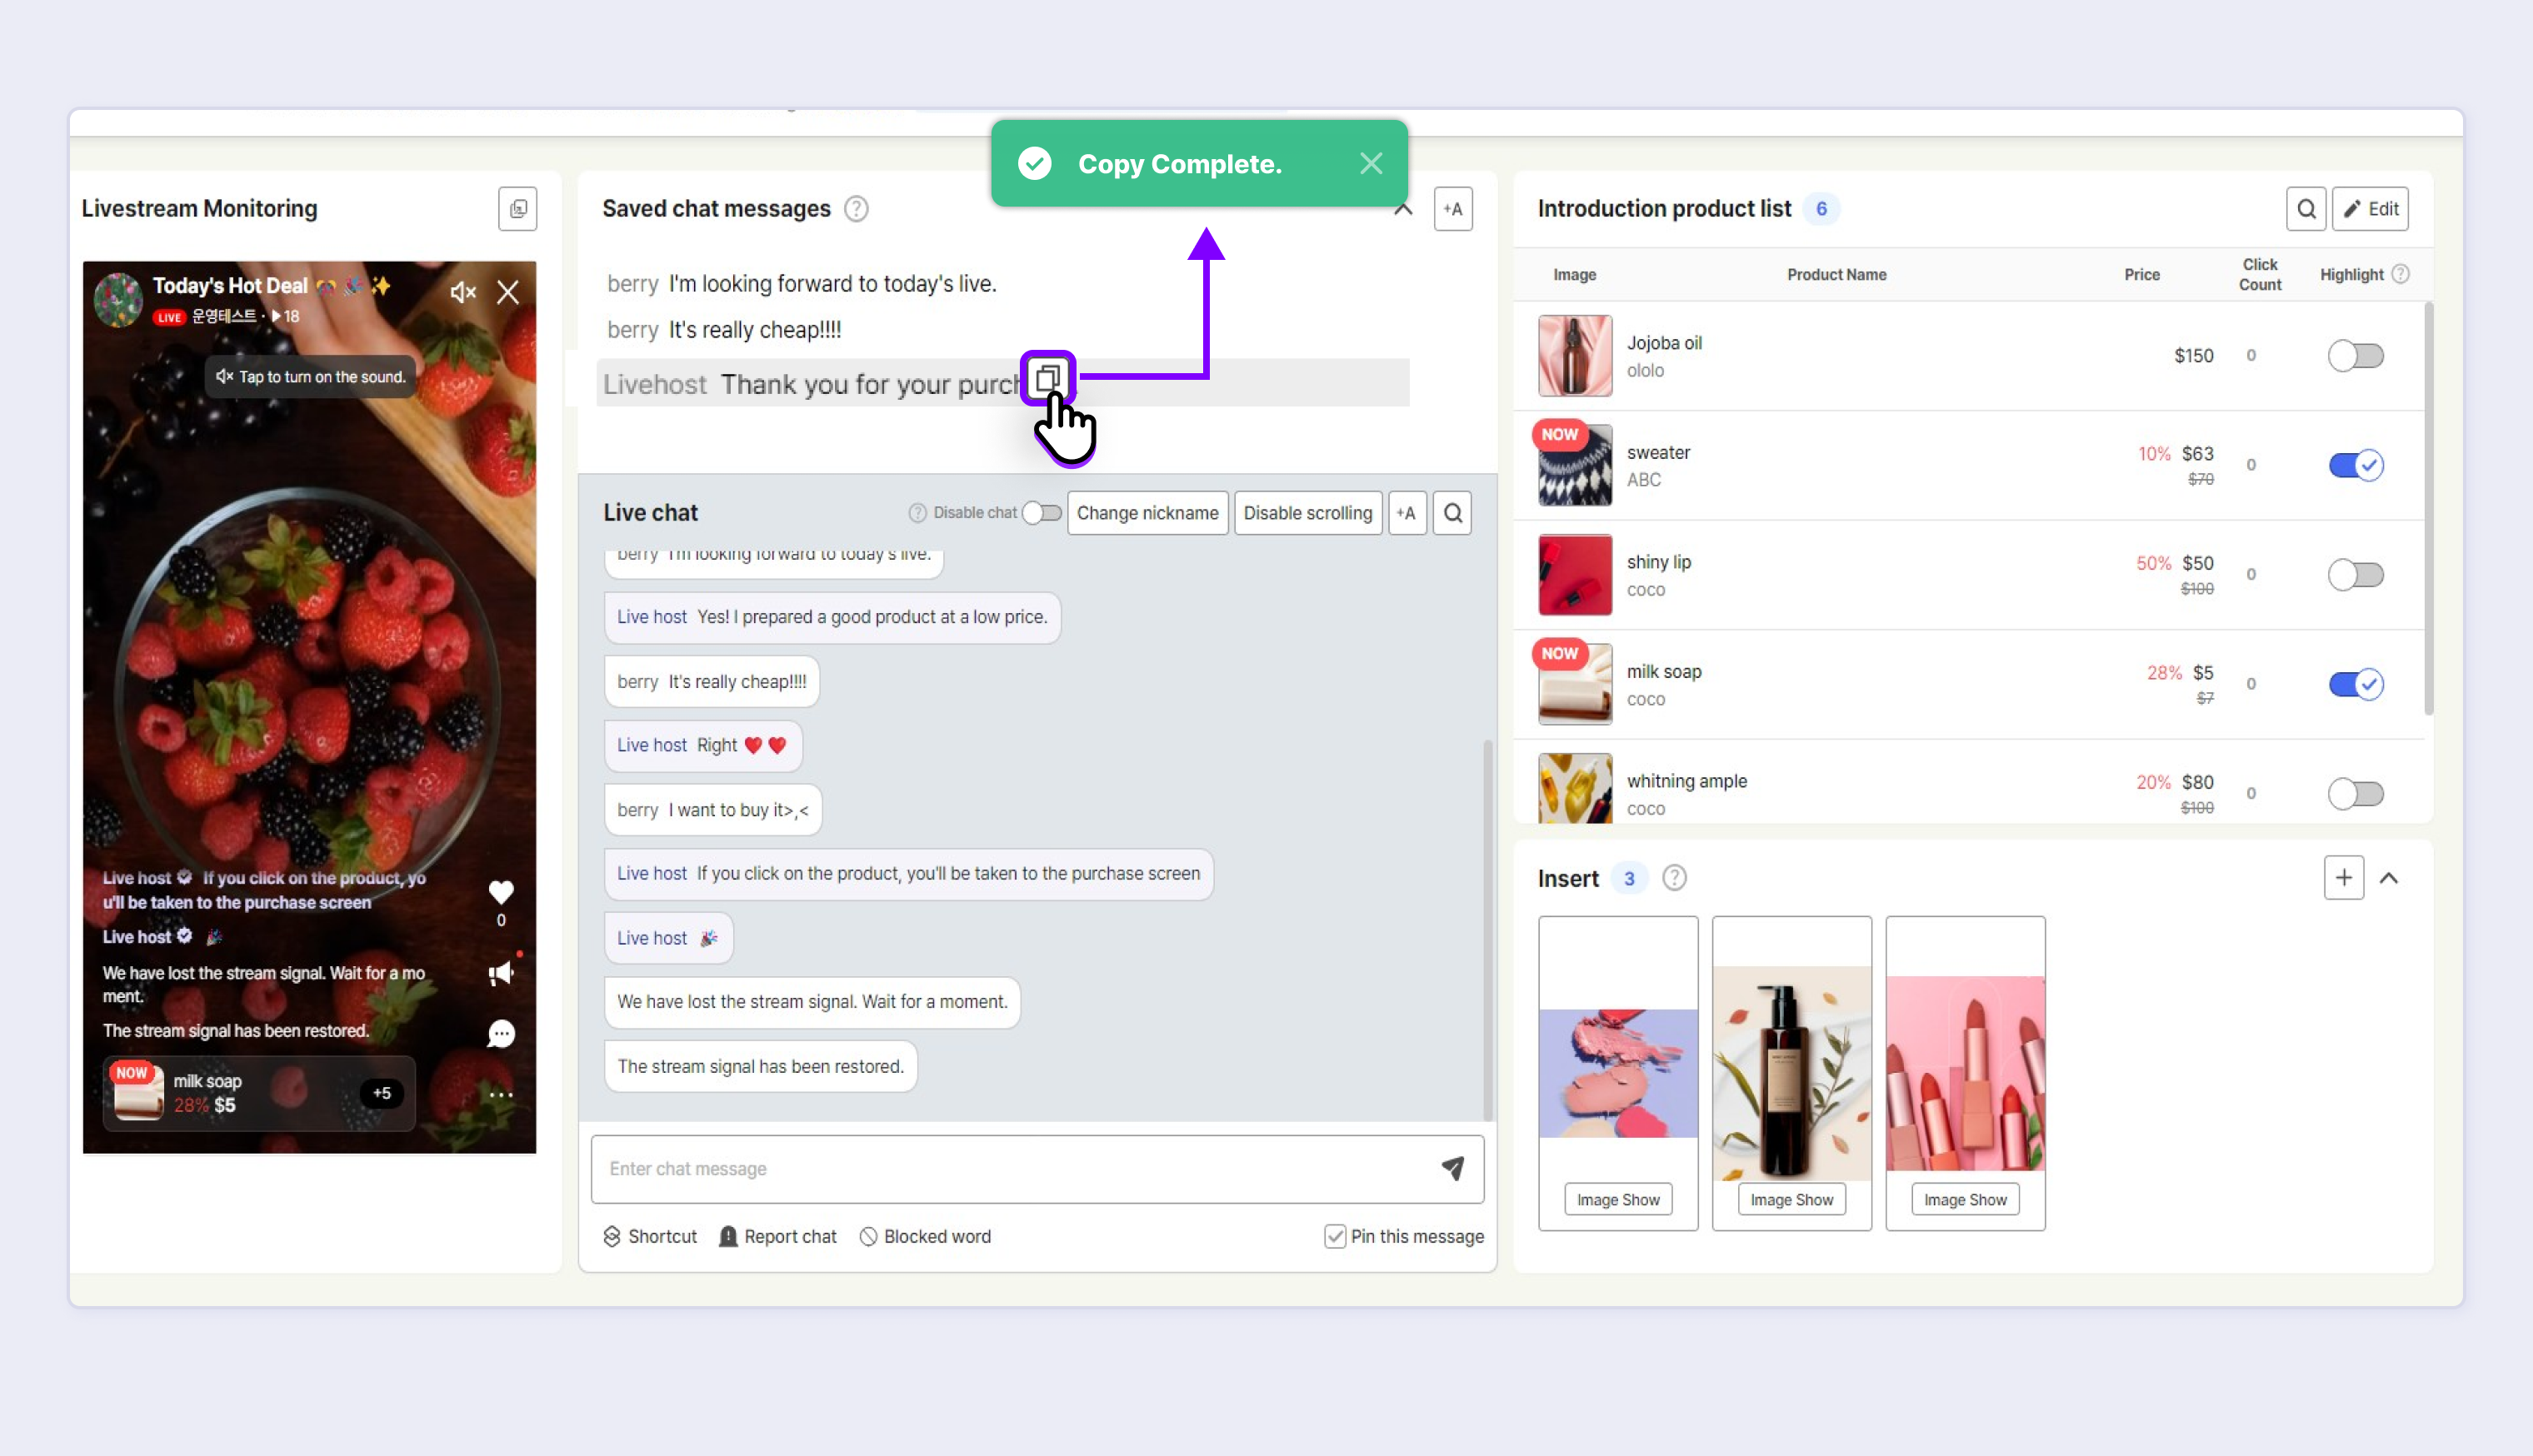
Copying Chat from the Chat Archive
STEP 1. When you move your mouse over the chat saved in the Chat Archive, you can see the Copy icon.
STEP 2. Click the Copy icon to copy the nickname and chat content.
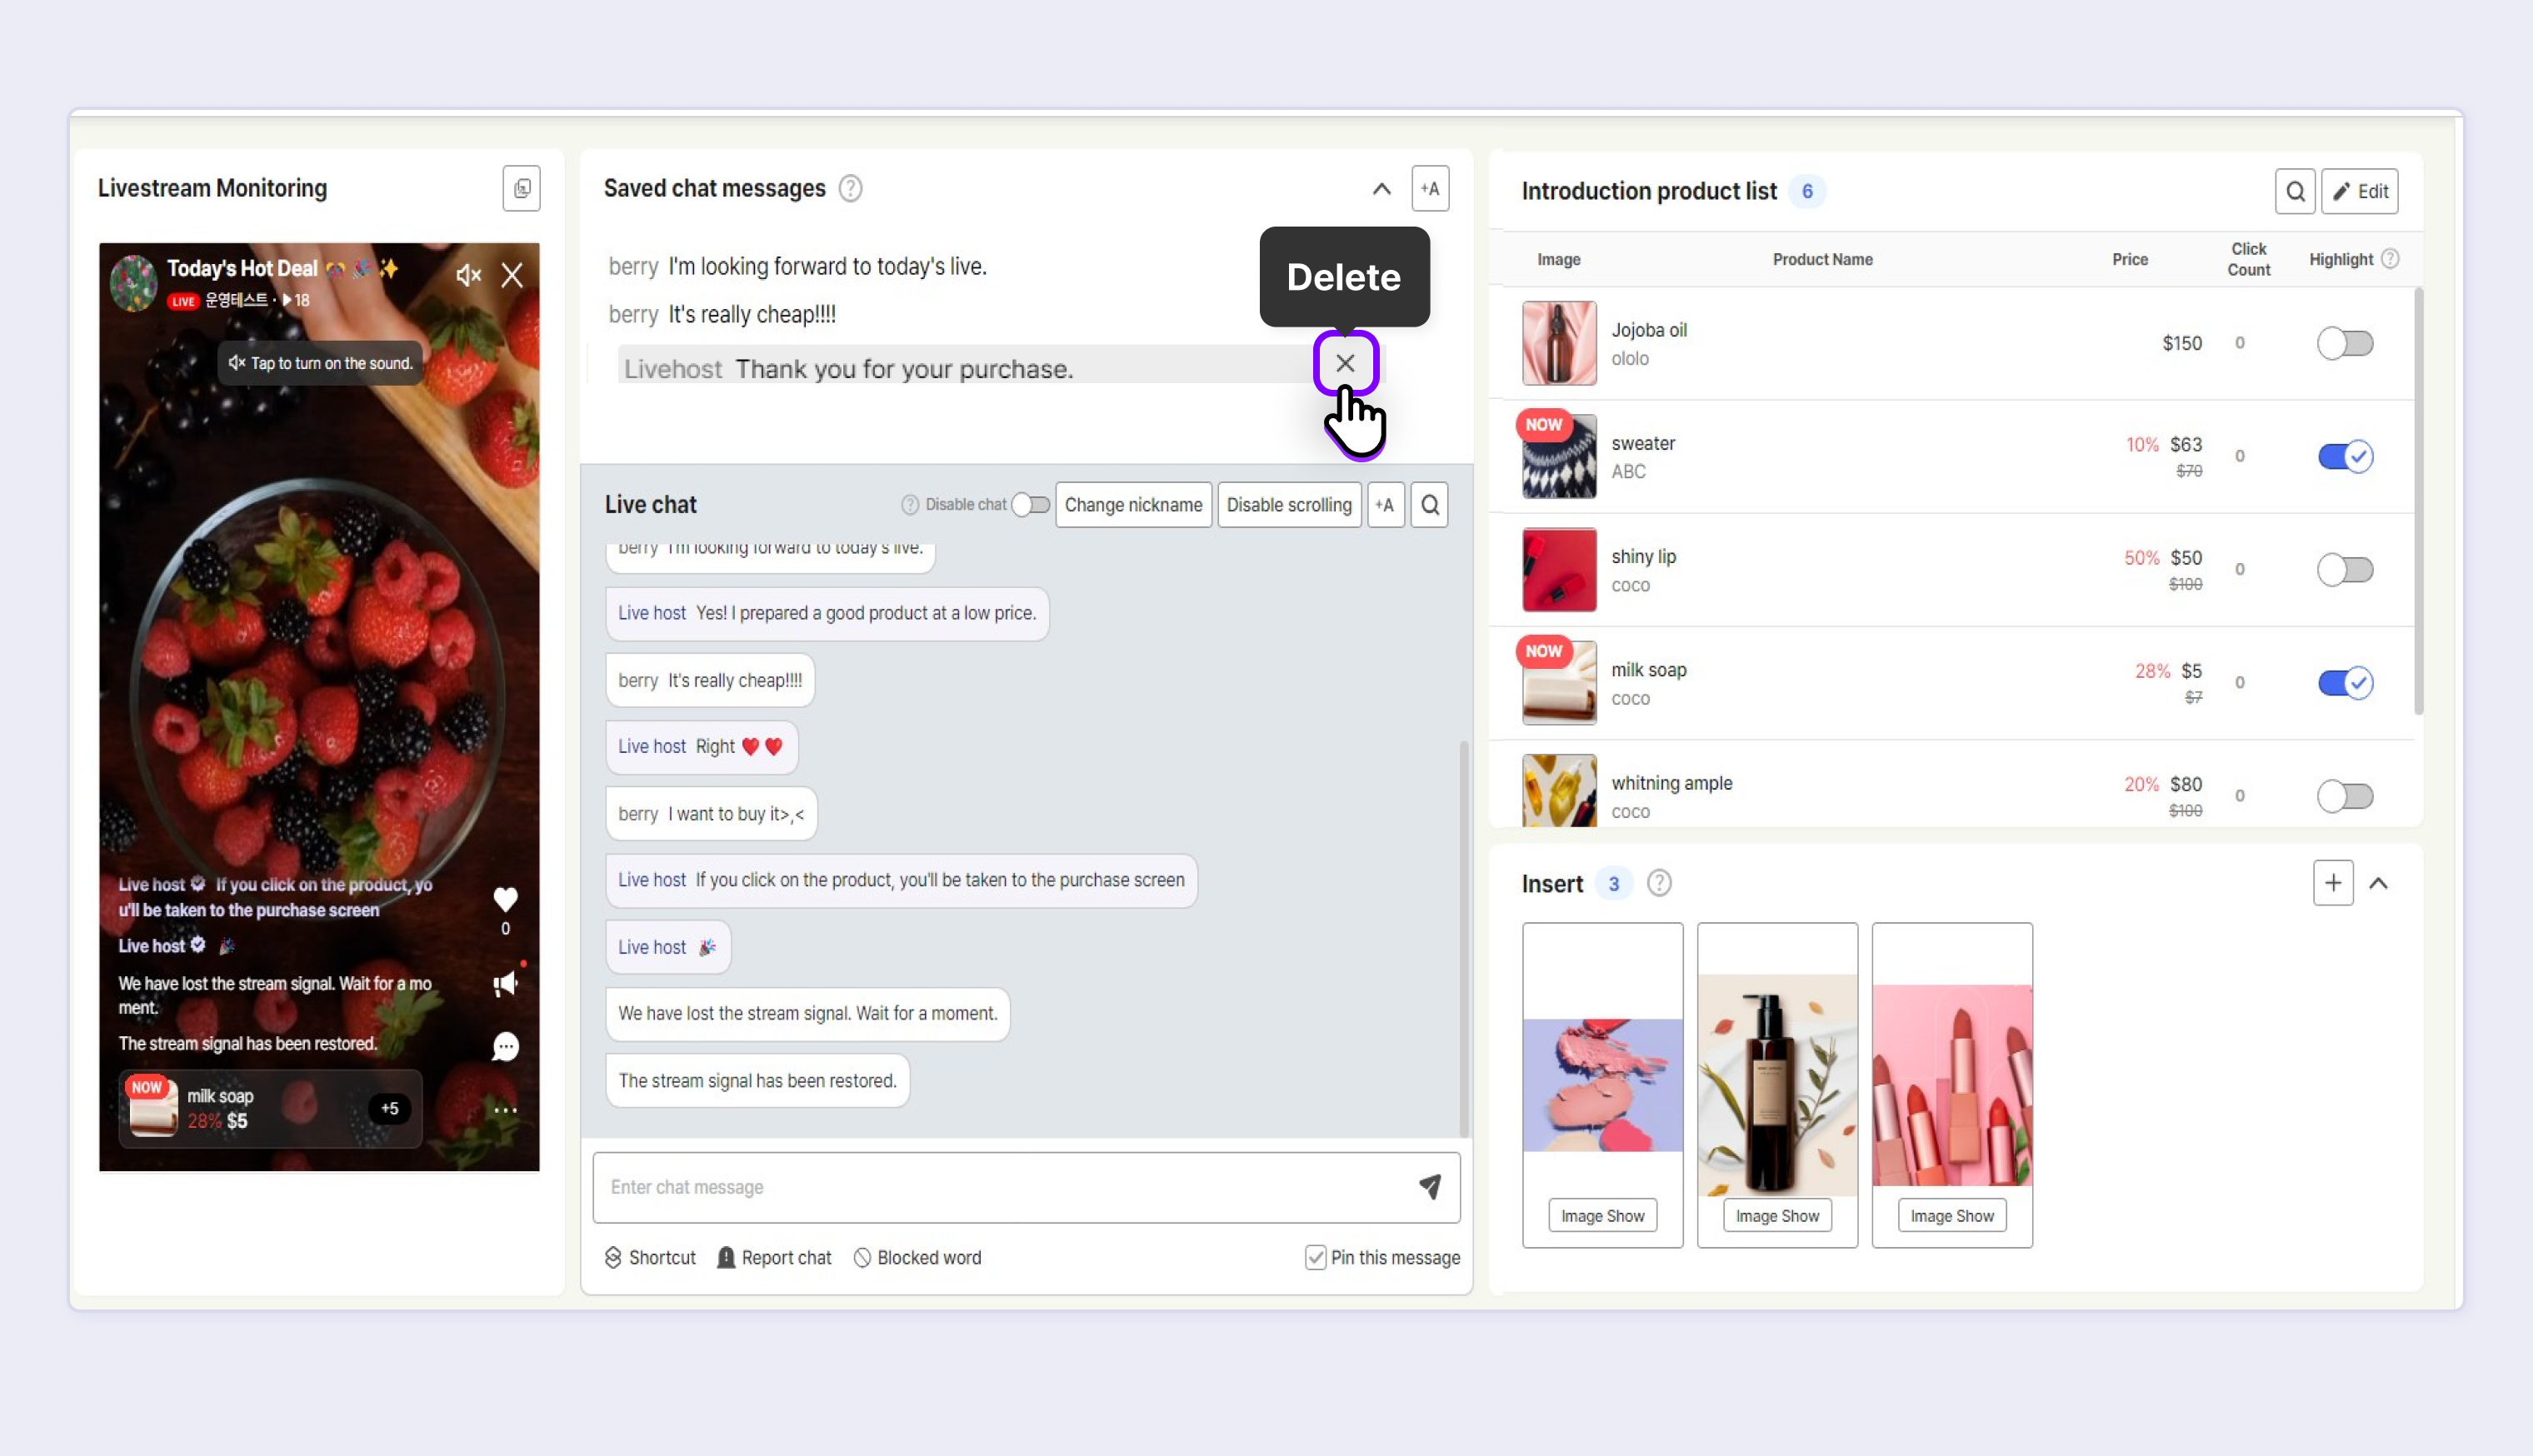
Deleting Chat Archive History
STEP 1. When you move your mouse over the chat you want to delete in the Chat Archive, you can see the X icon.
STEP 2. Click X to delete the chat archived in the Chat Archive.
You can no longer archive the chat when the livestream ends, and you can only copy the chat saved in Chat Archive.
Copying Chat
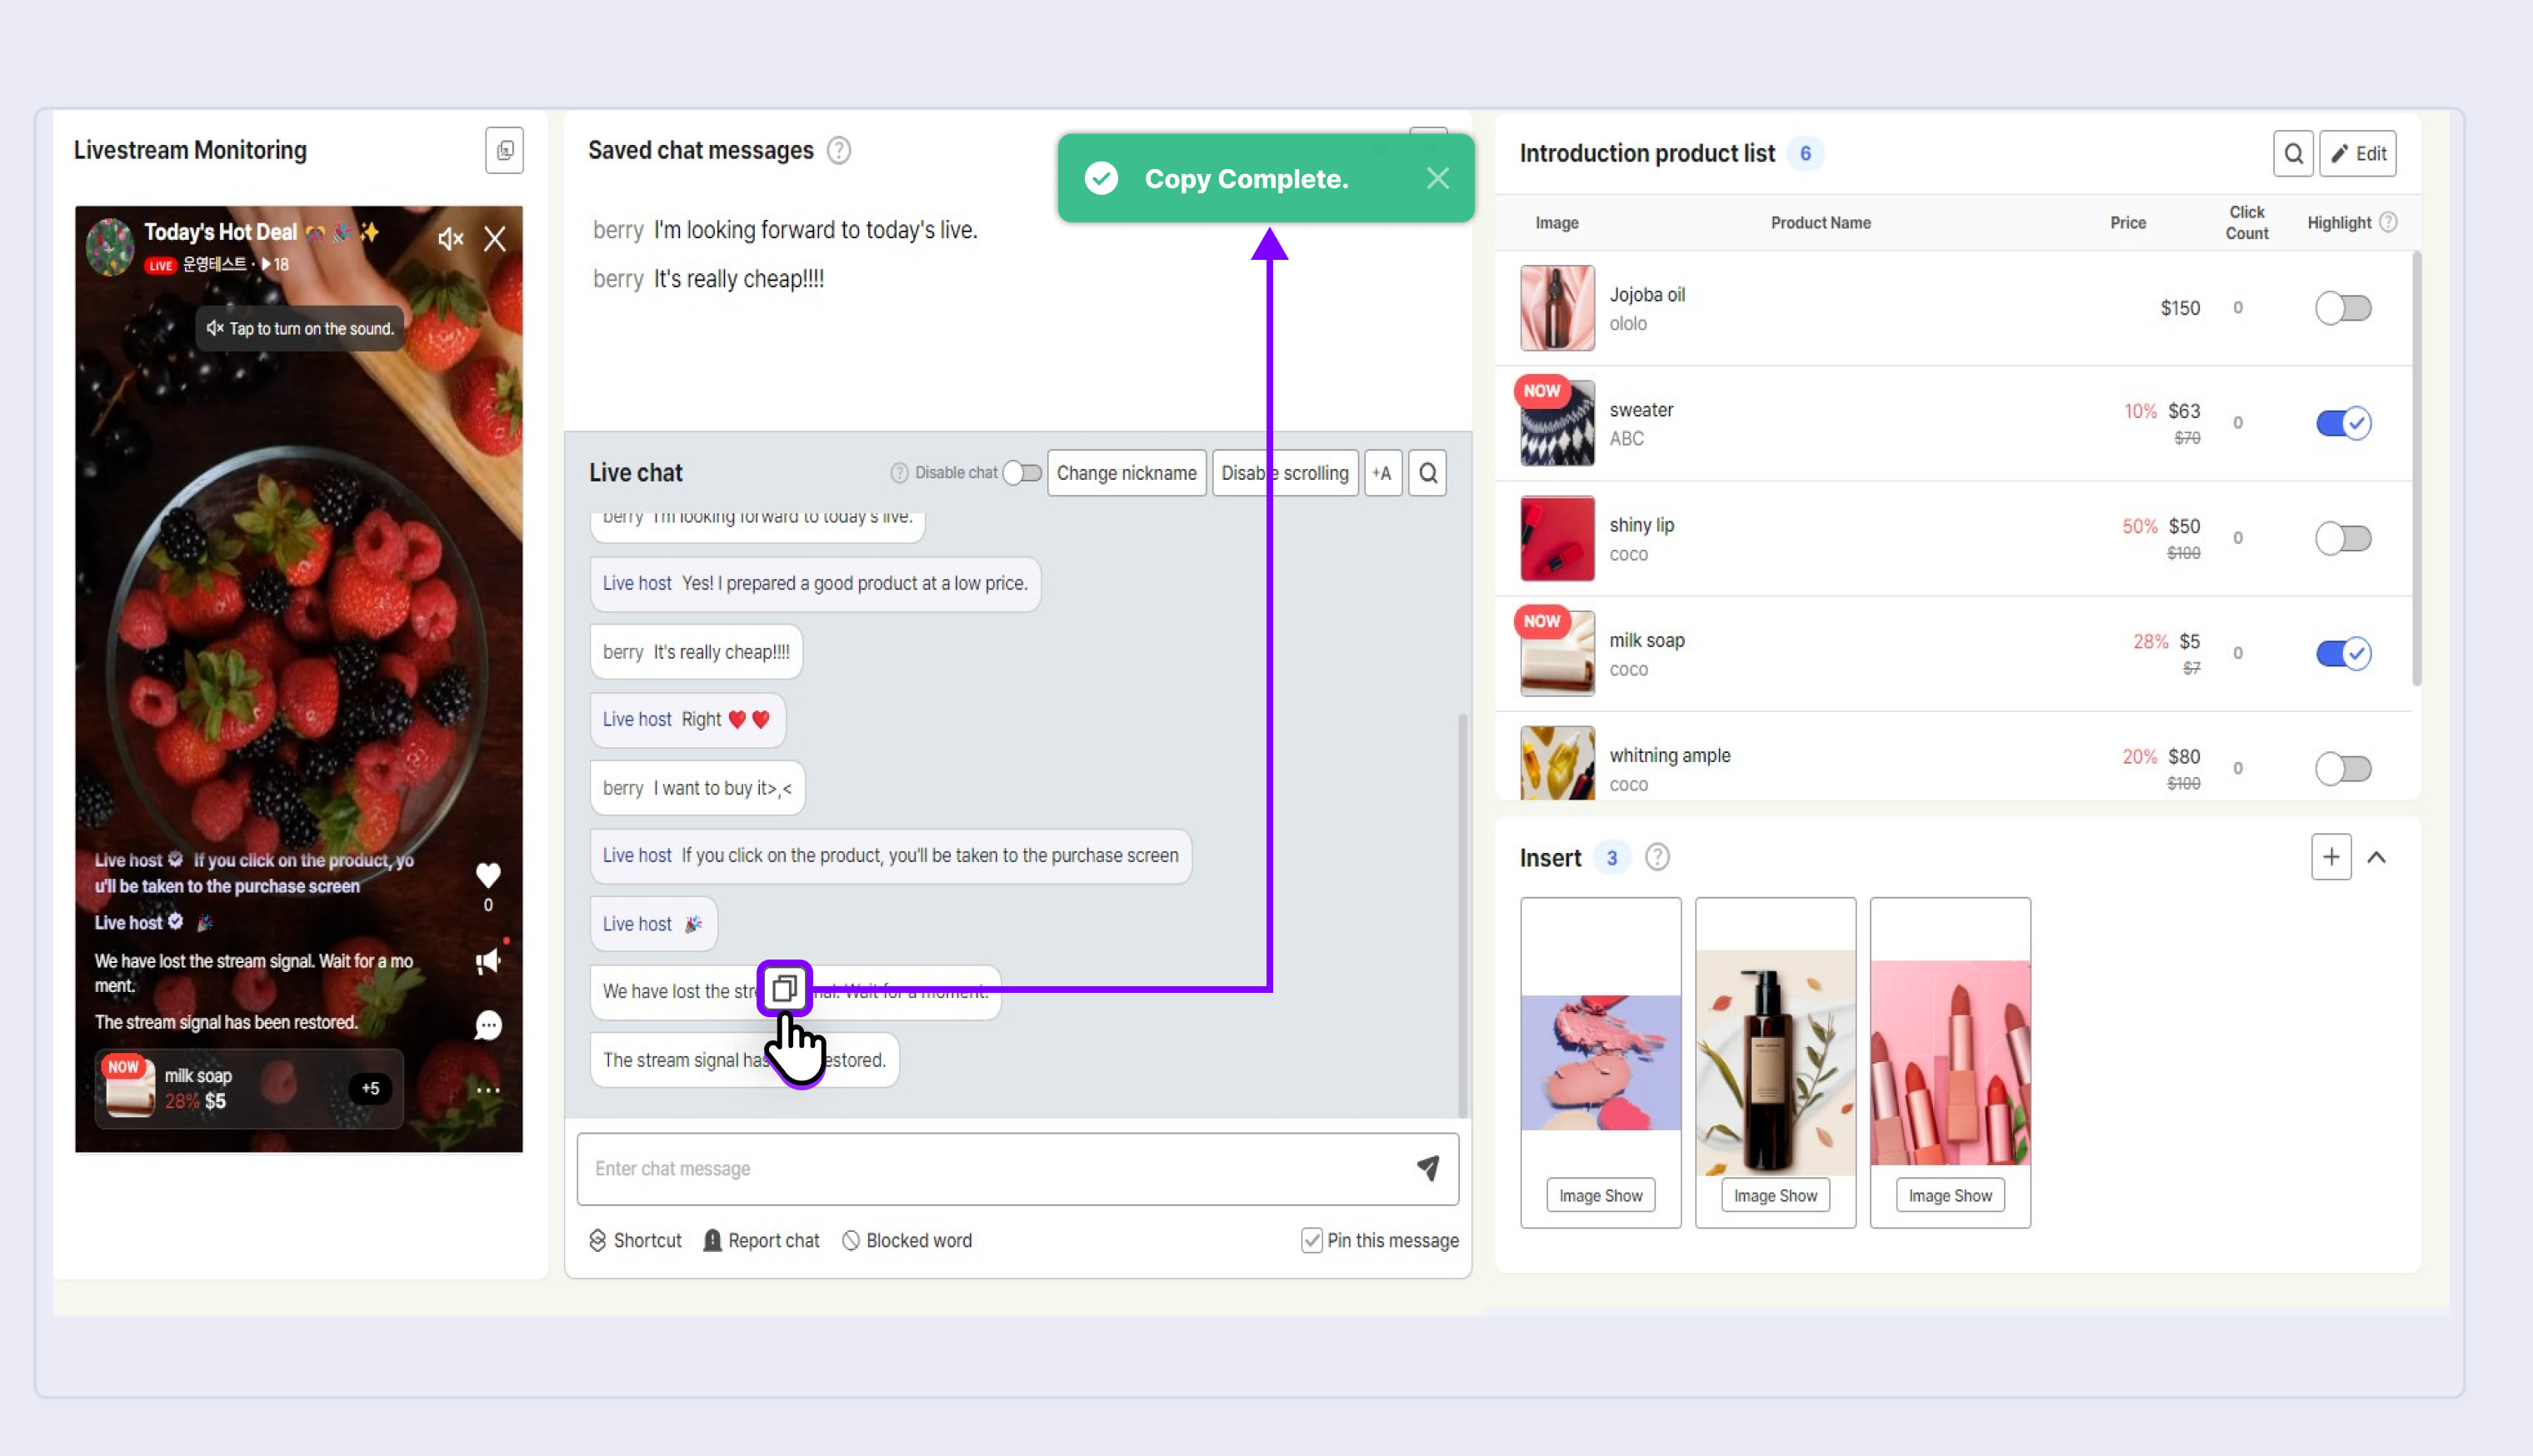
You can copy the chat content in the chat window by clicking the Copy icon.
STEP 1. When you move your mouse over the chat you want to copy, you can see the Copy icon.
STEP 2. Click the Copy icon to copy the nickname and chat content.
STEP 3.Paste the copied content where you want.
You can use the copy chat function during and after the livestream.
Changing Administrator Chat Nickname
The chat nickname of the administrator can be changed only when the livestream is on air. The initial administrator nickname is set as the store name + administrator. If you need to change the nickname, change it after starting the livestream.
STEP 1. Click Change Nickname in the chat window.
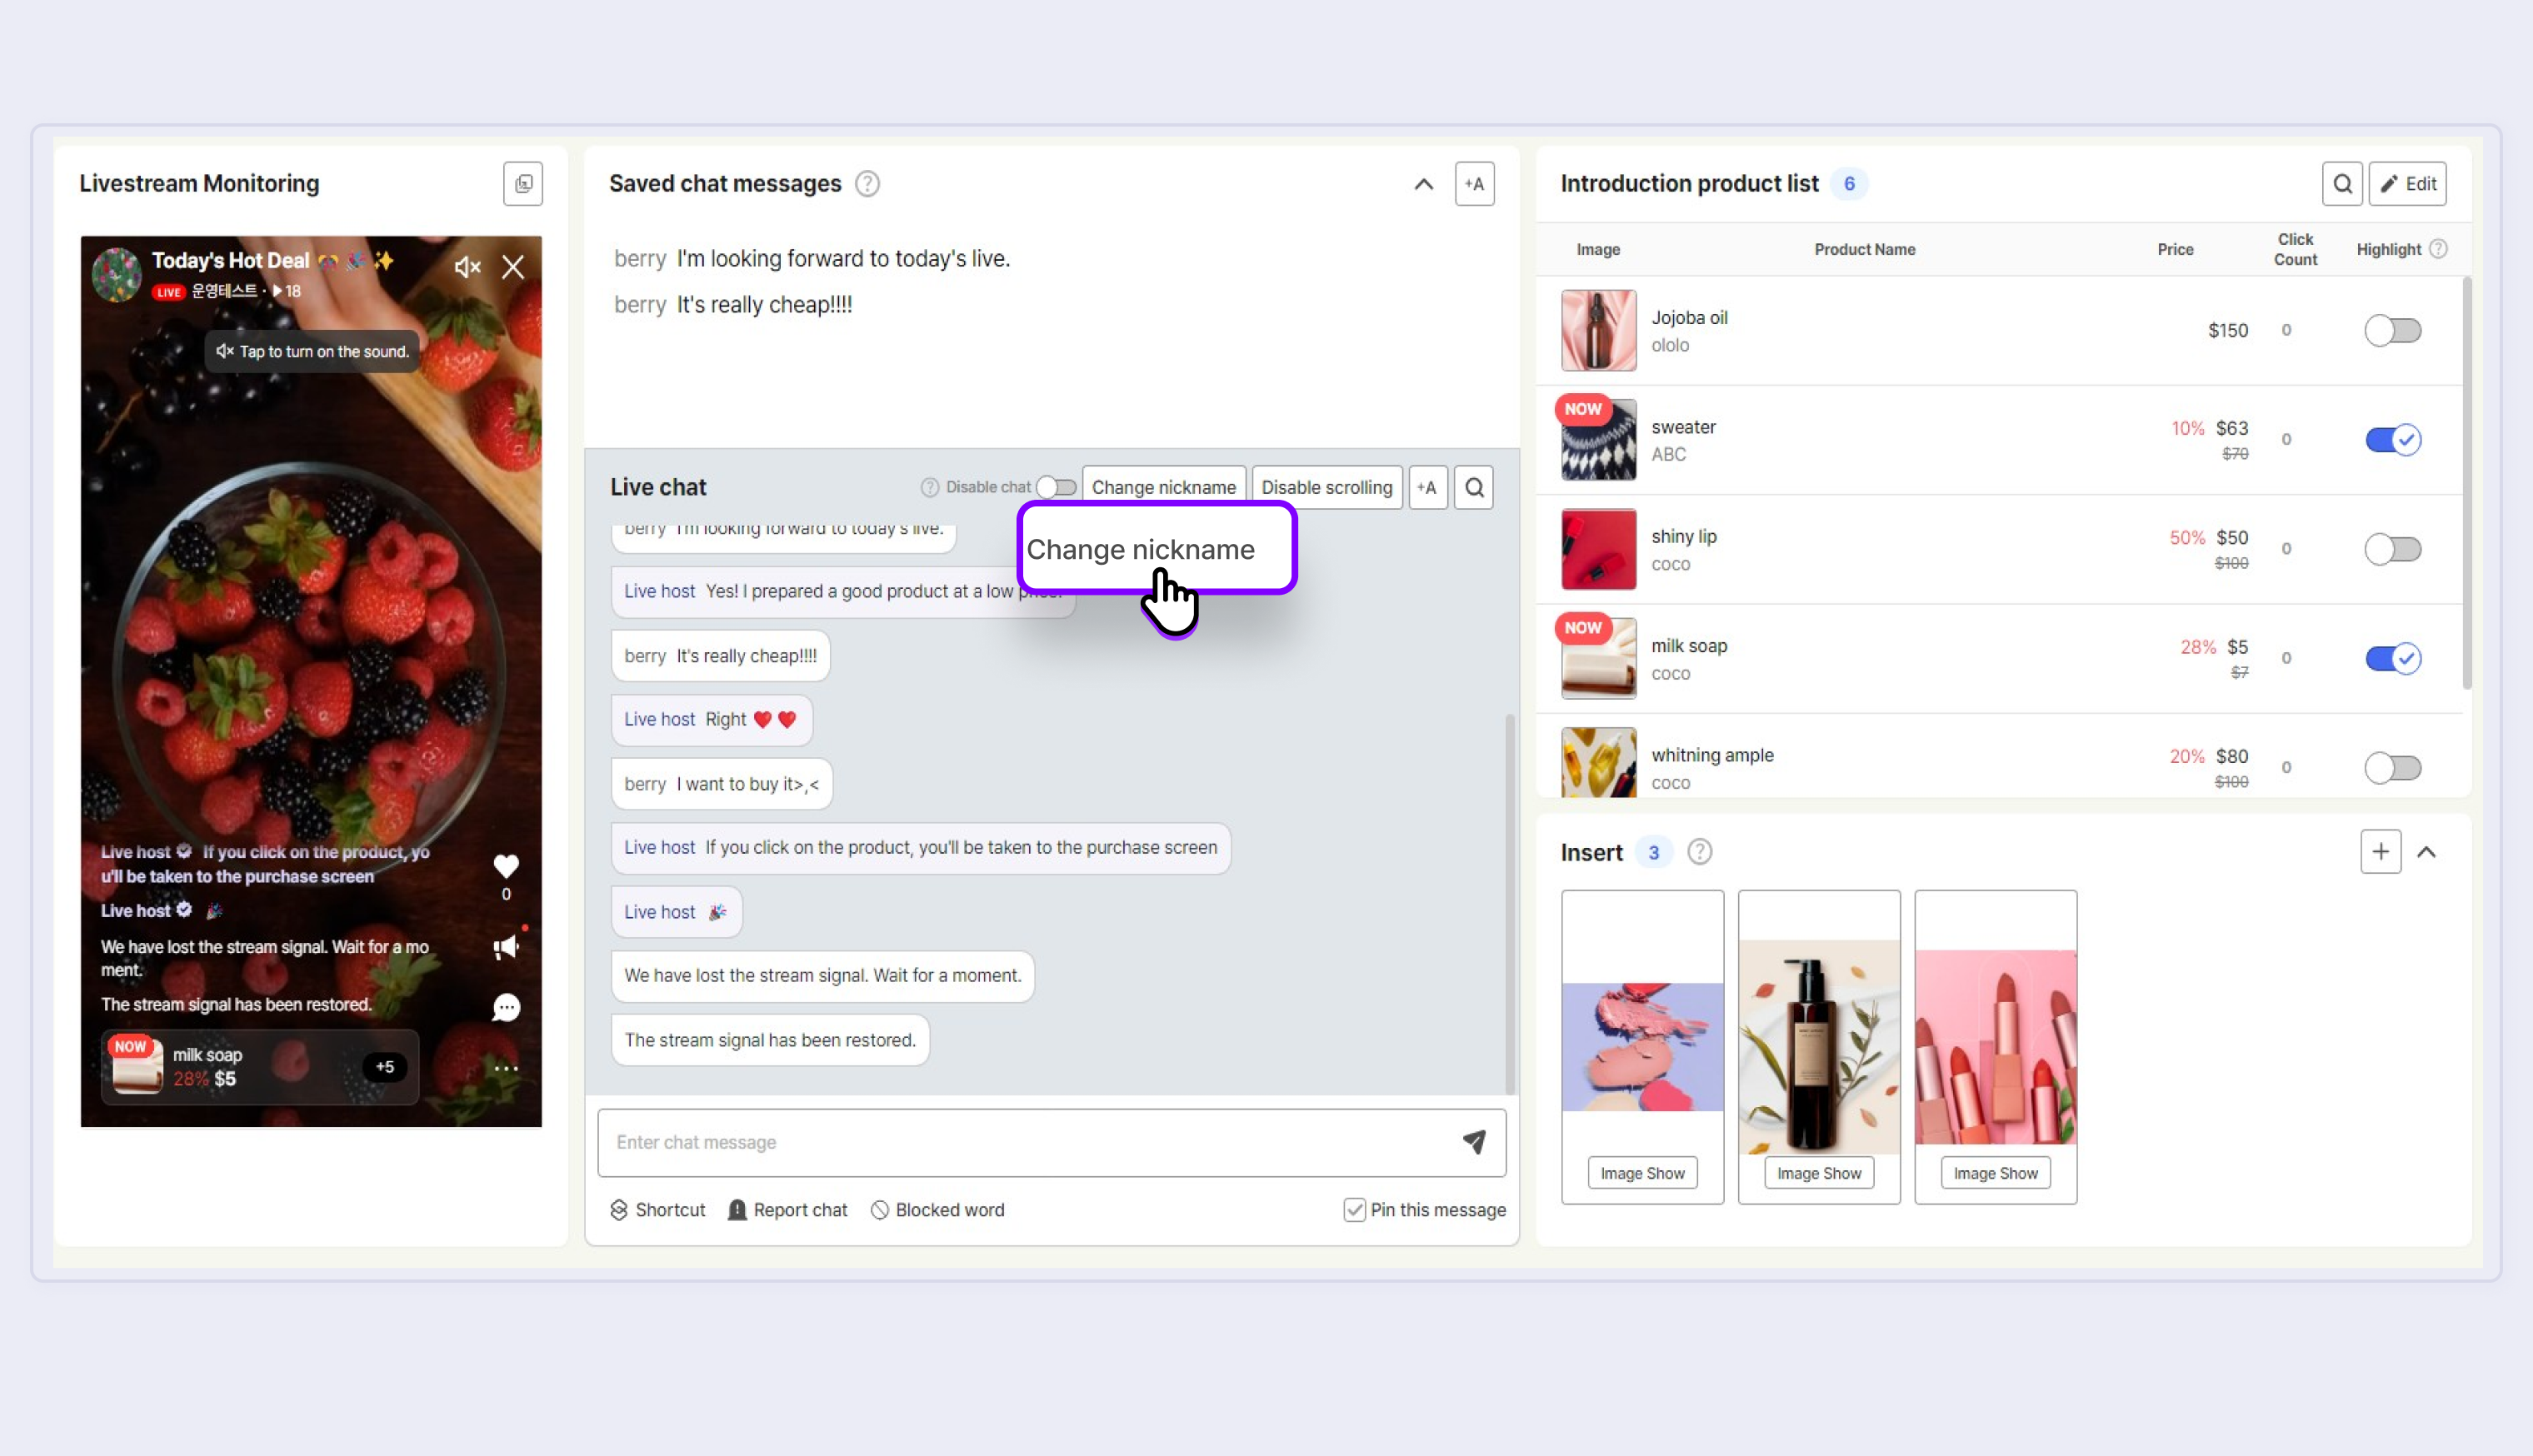
STEP 2. When the Change Chat Nickname window opens, enter the nickname you want to change to and click Confirm.
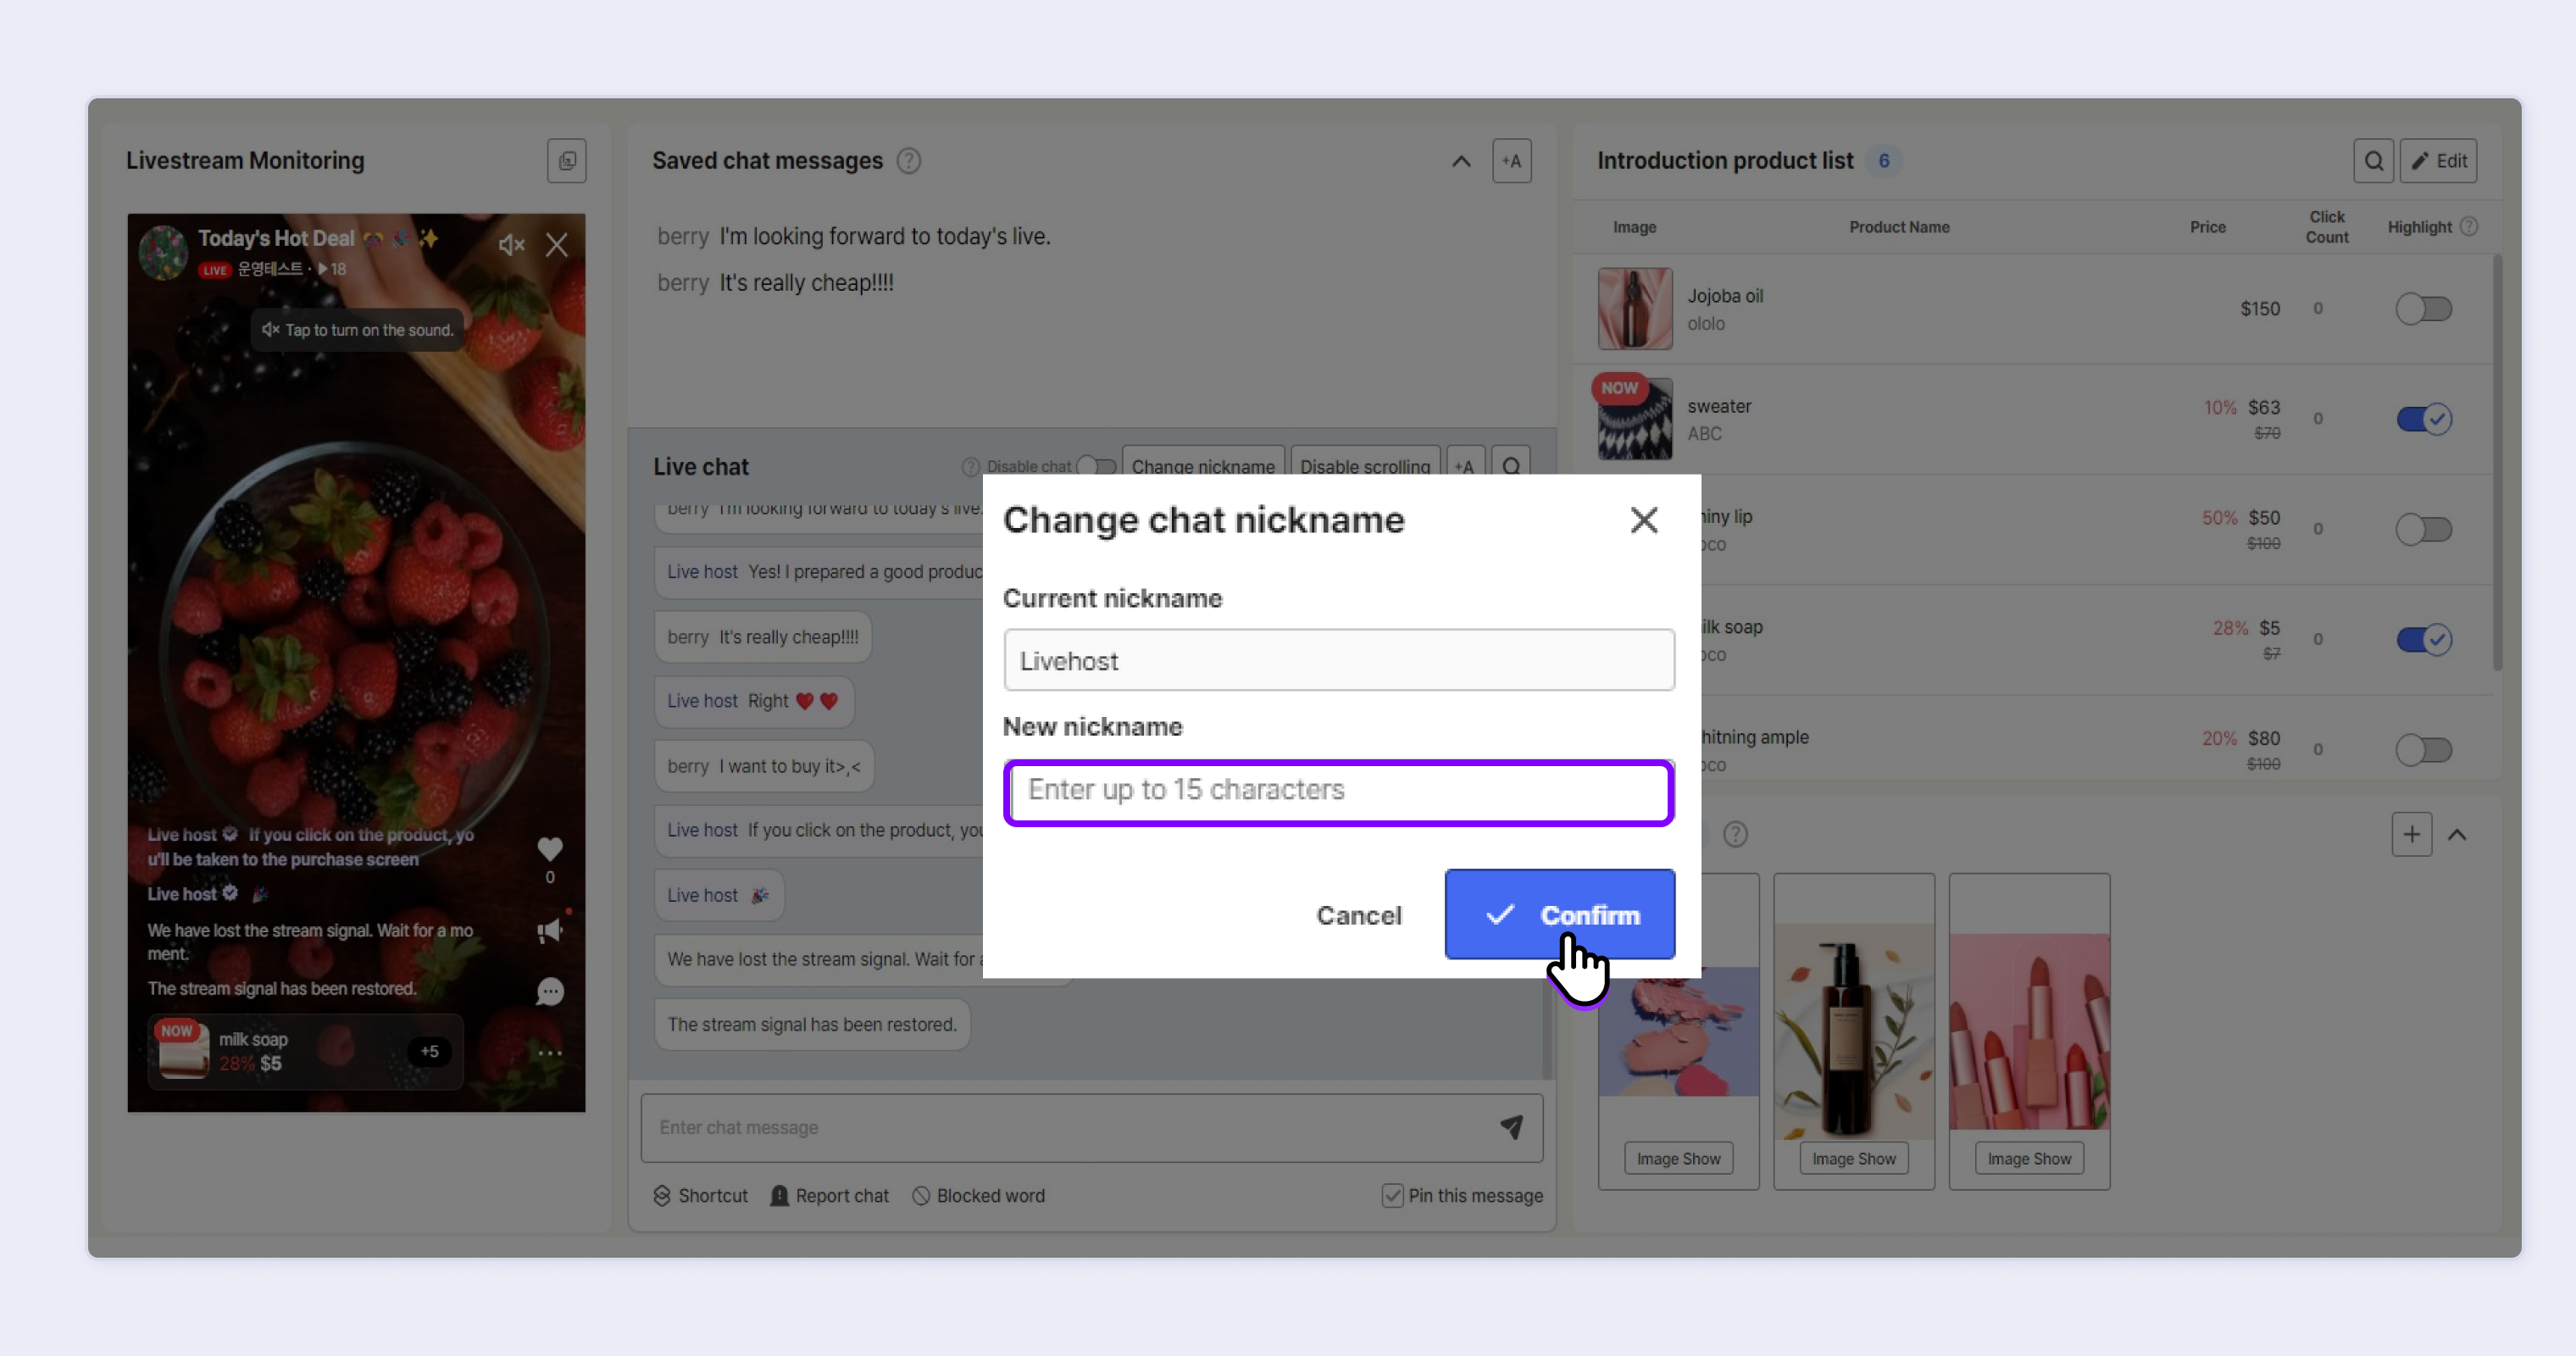
The chat nickname of the administrator can be changed only while on air.
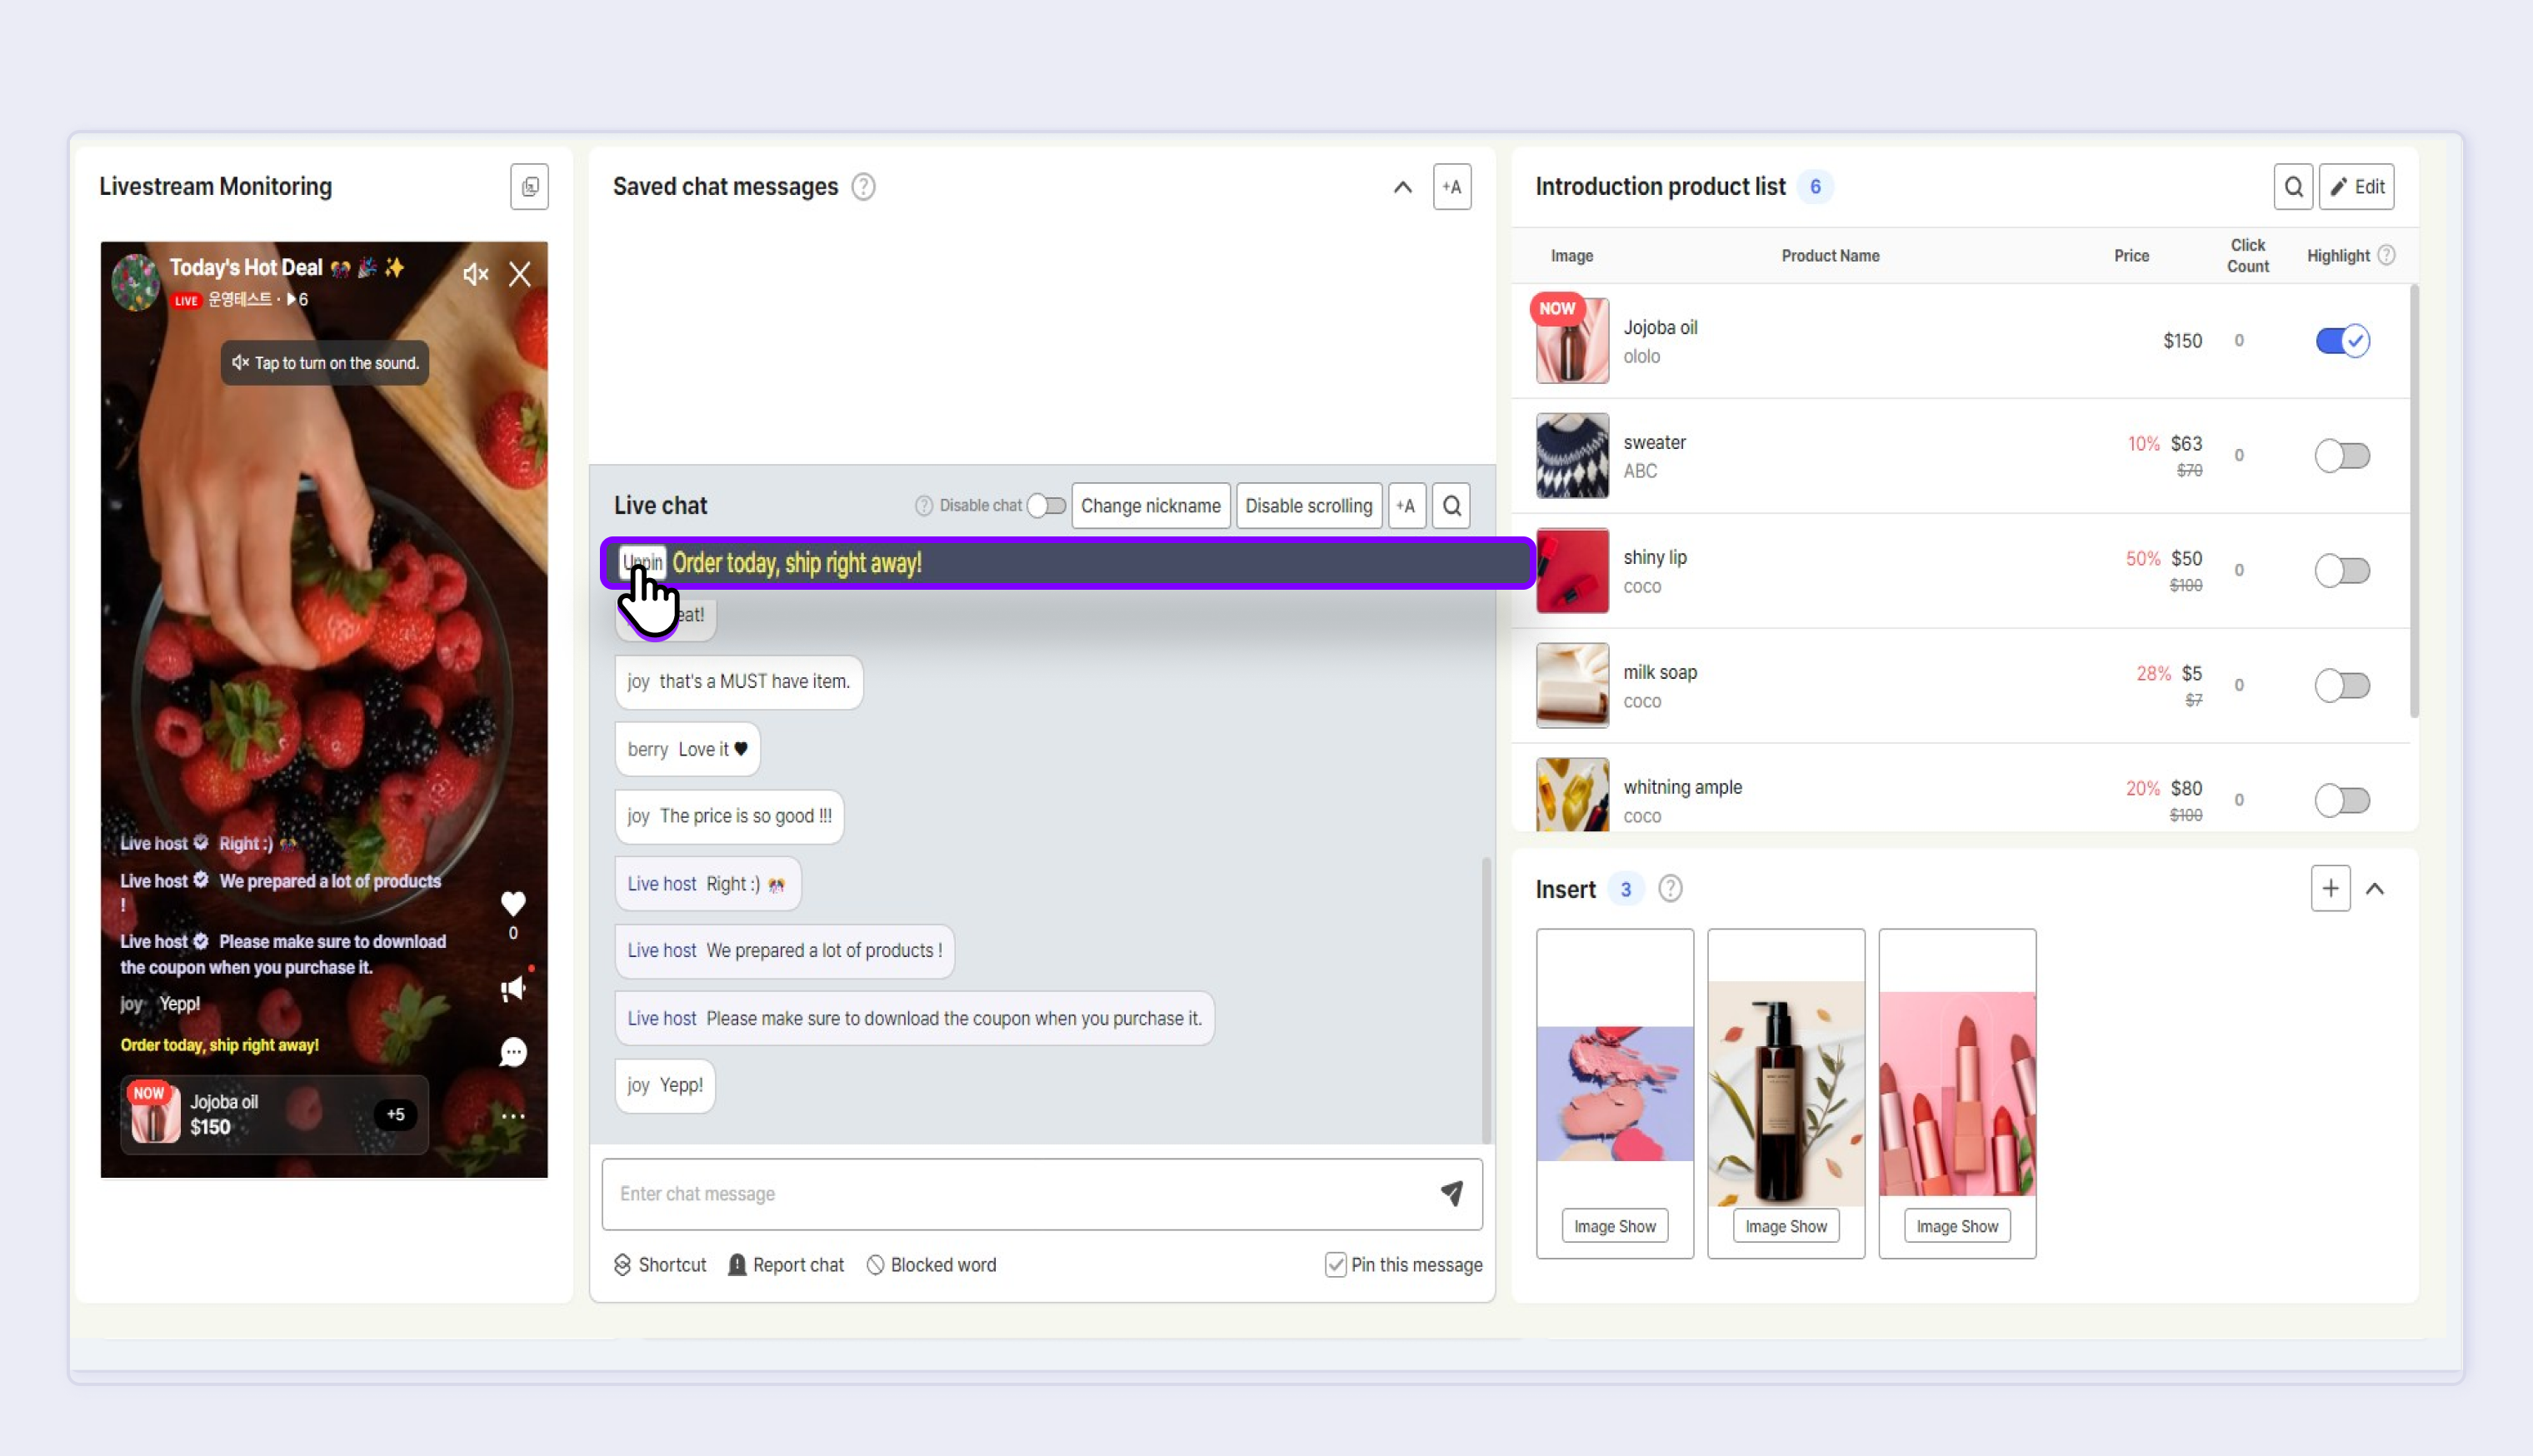
Pinning Administrator Chat
This function pins the chat entered by the administrator during the livestream to always display it on the top of the chat area, bottom of the player, and the Live Notice tab.
STEP 1. Check (✔) Pin this message below the input area of the chat window and enter a message you want to pin. You can enter up to 50 characters.
STEP 2. Click the Send button to pin the message on the ① top of the chat window, ② bottom of the player, and the ③ Live Notice tab of the player. At the bottom of the player, the message can be displayed up to two lines.
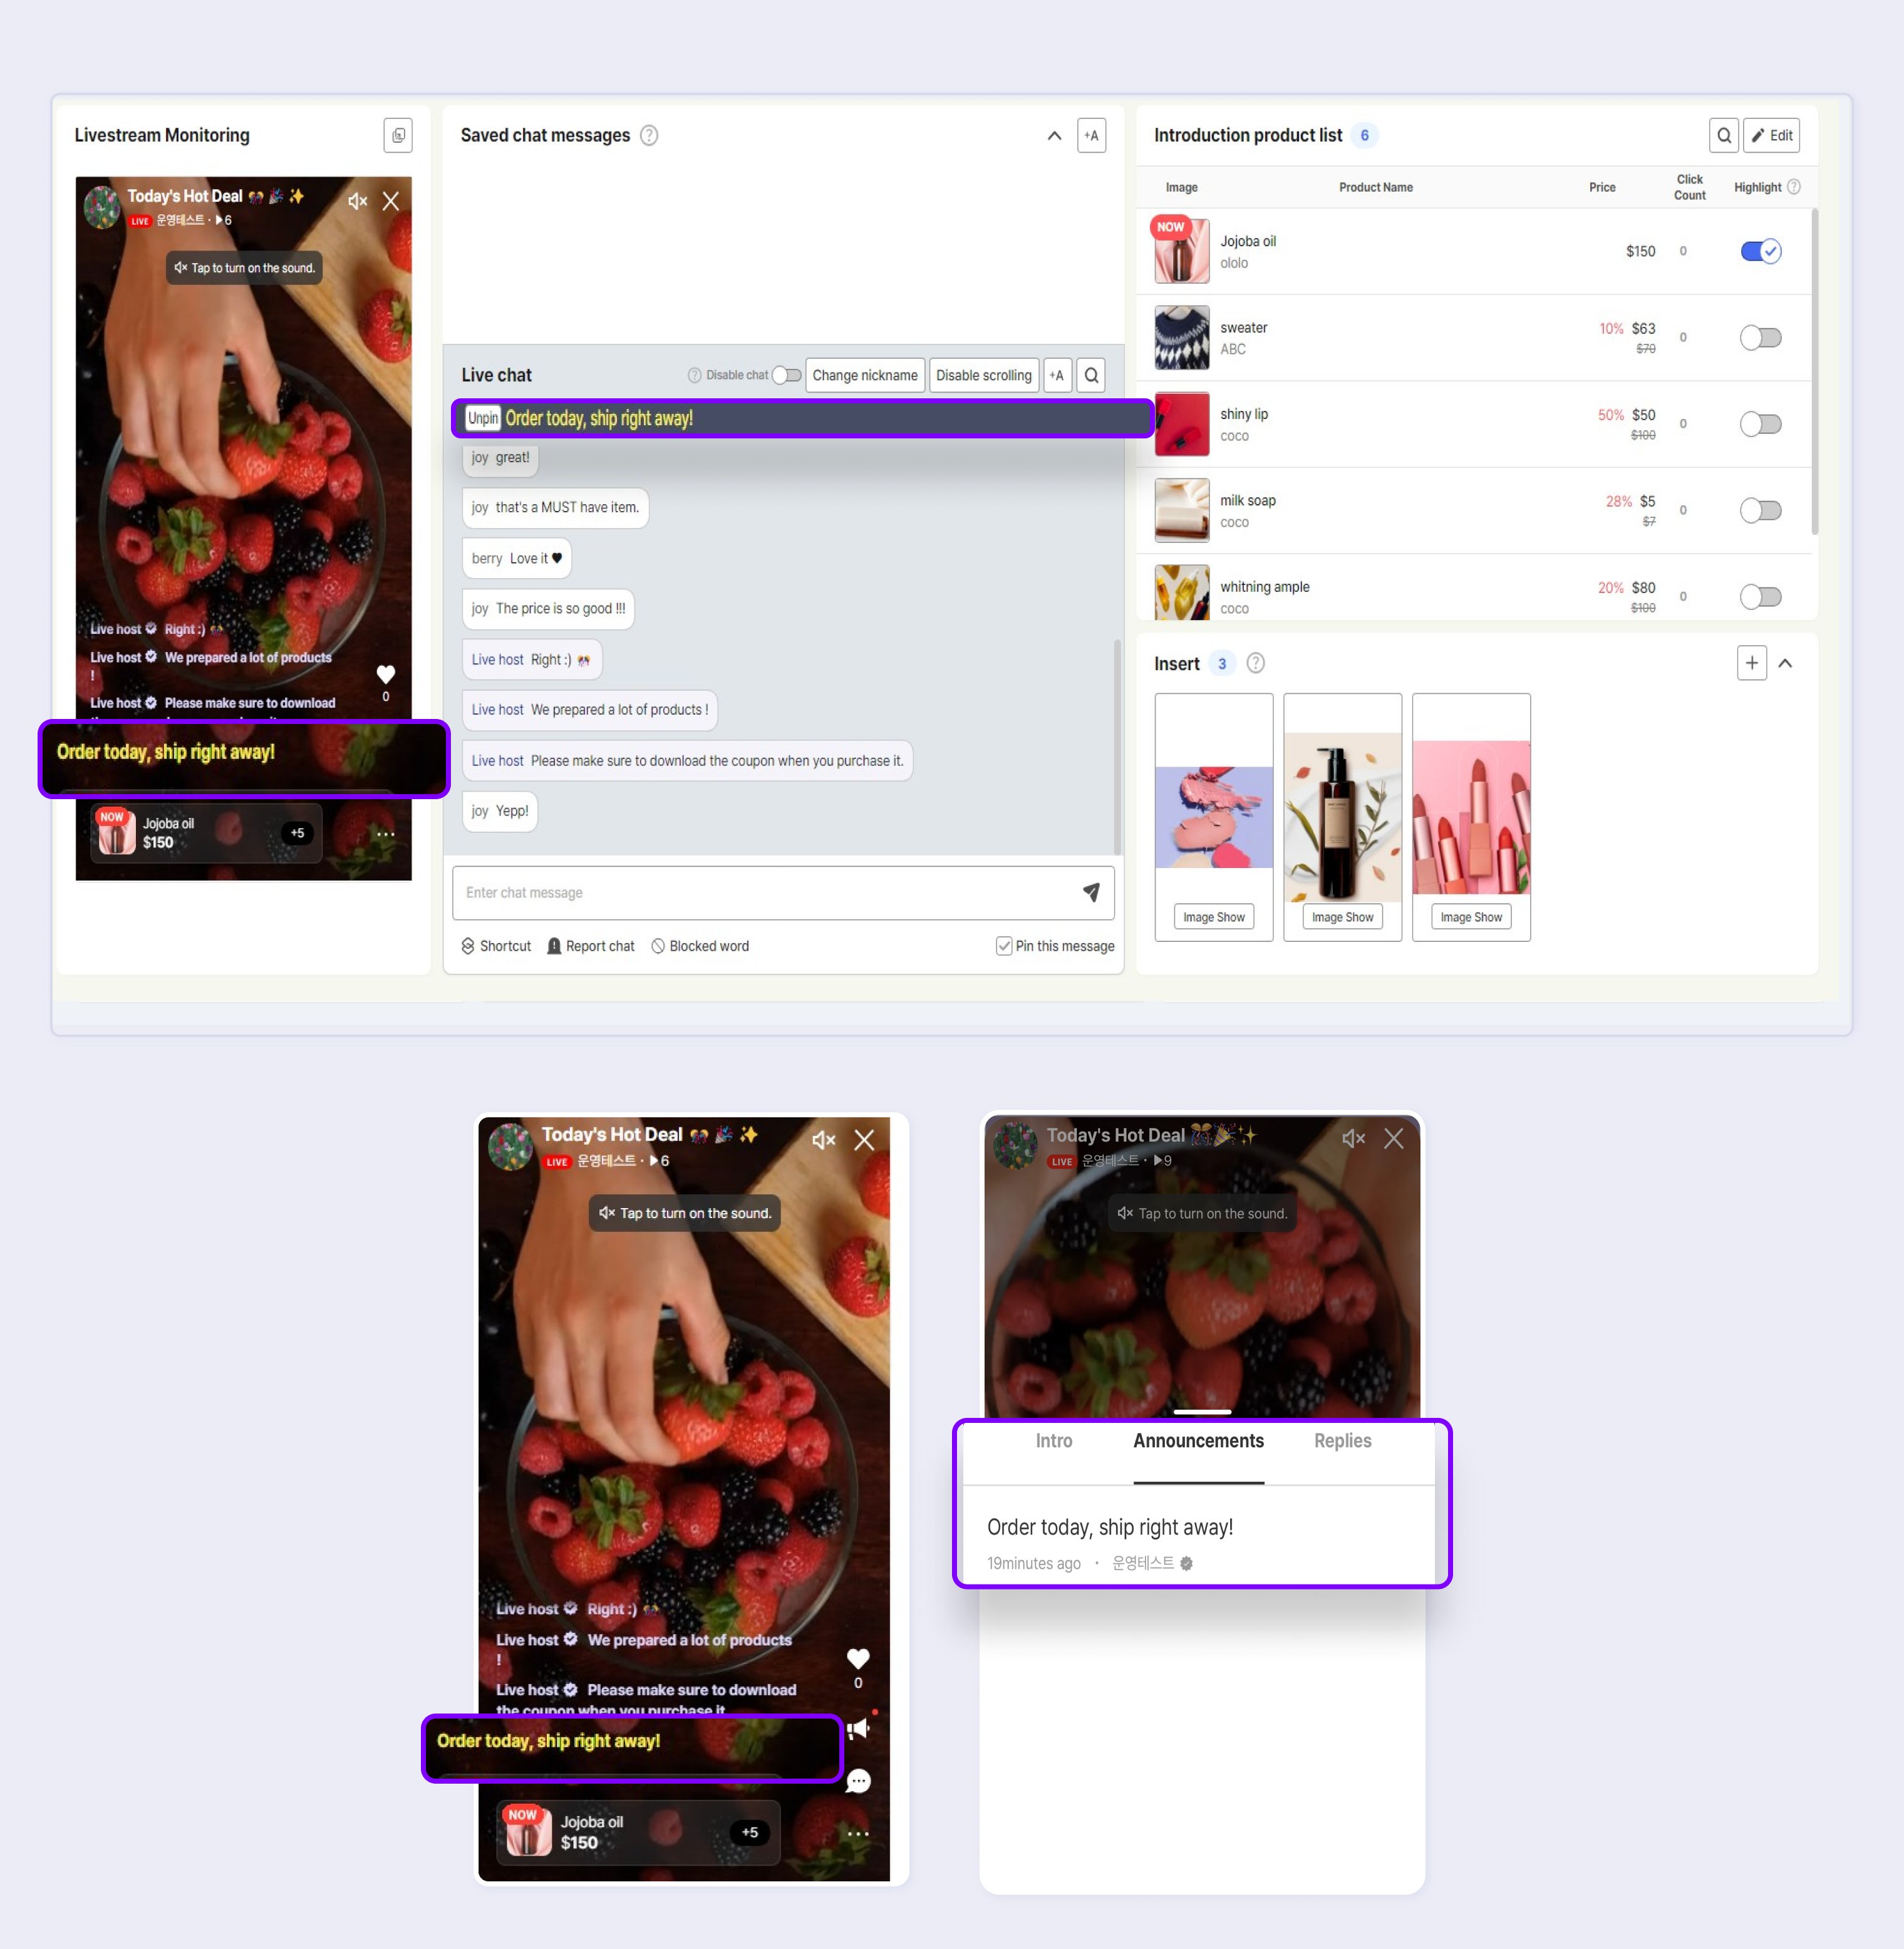
STEP 3. If you want to unpin a pinned message, click Unpin. If you want to change the message, Unpin it and register another phrase.
- The pinned message is shown on the Live Notice tab only while on air.
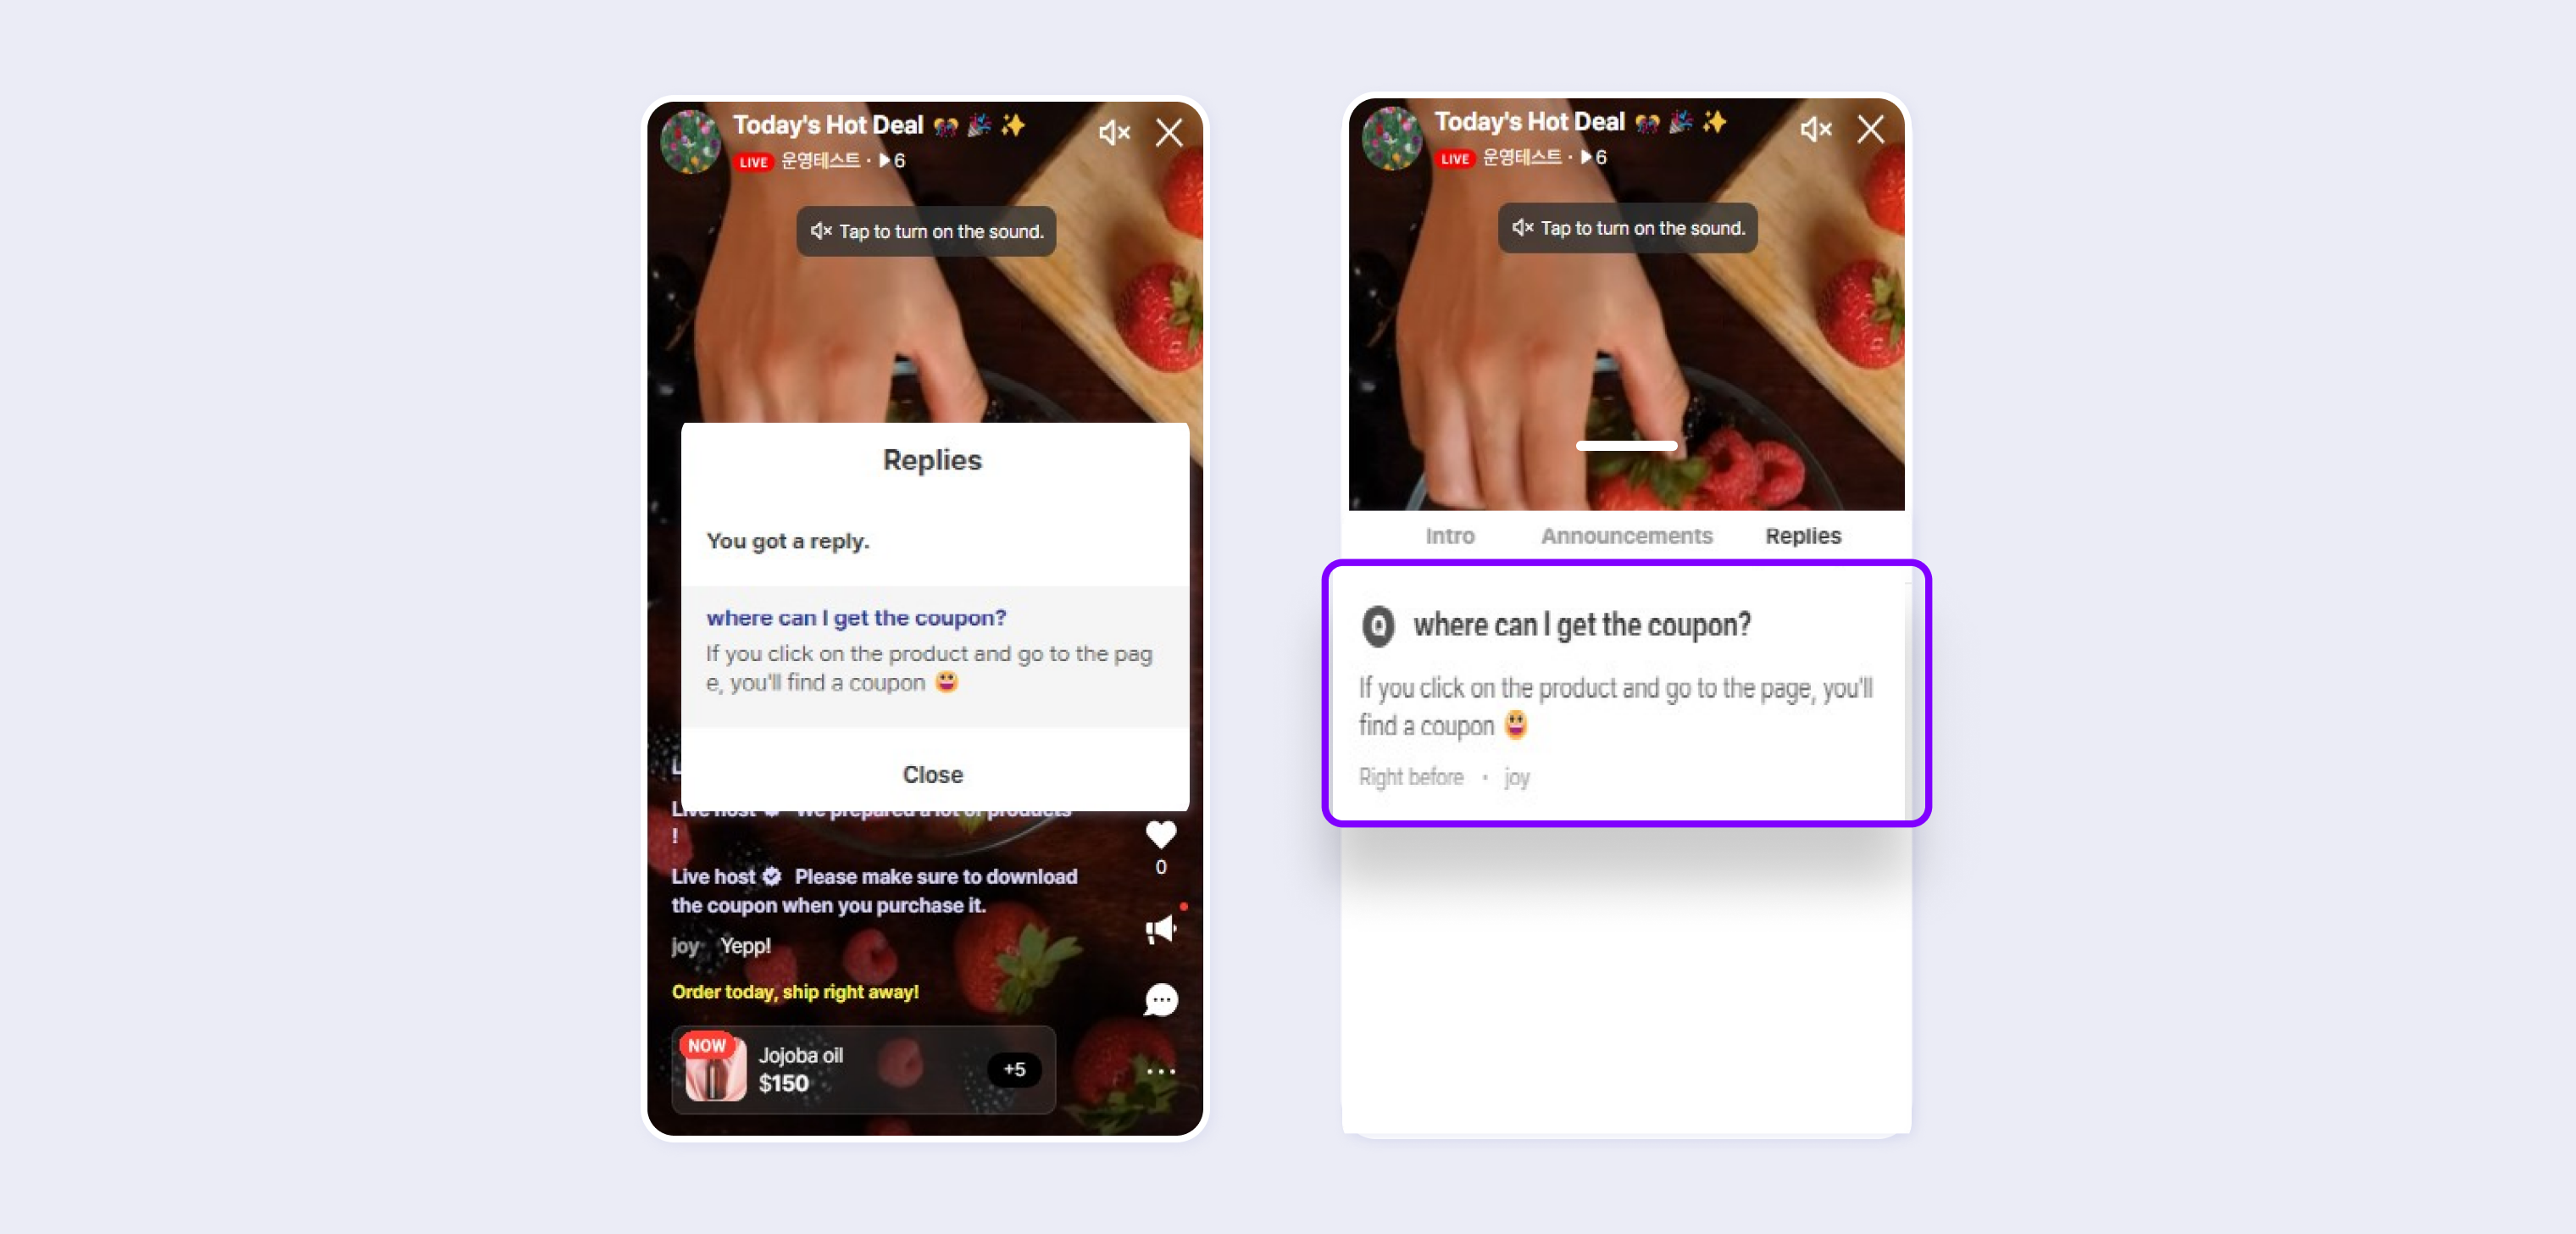
Reply to Chat
This function can be used to reply to the viewer's chat.
STEP 1. When you move your mouse over the end of the viewer's chat you want to reply, you can see the Reply icon.
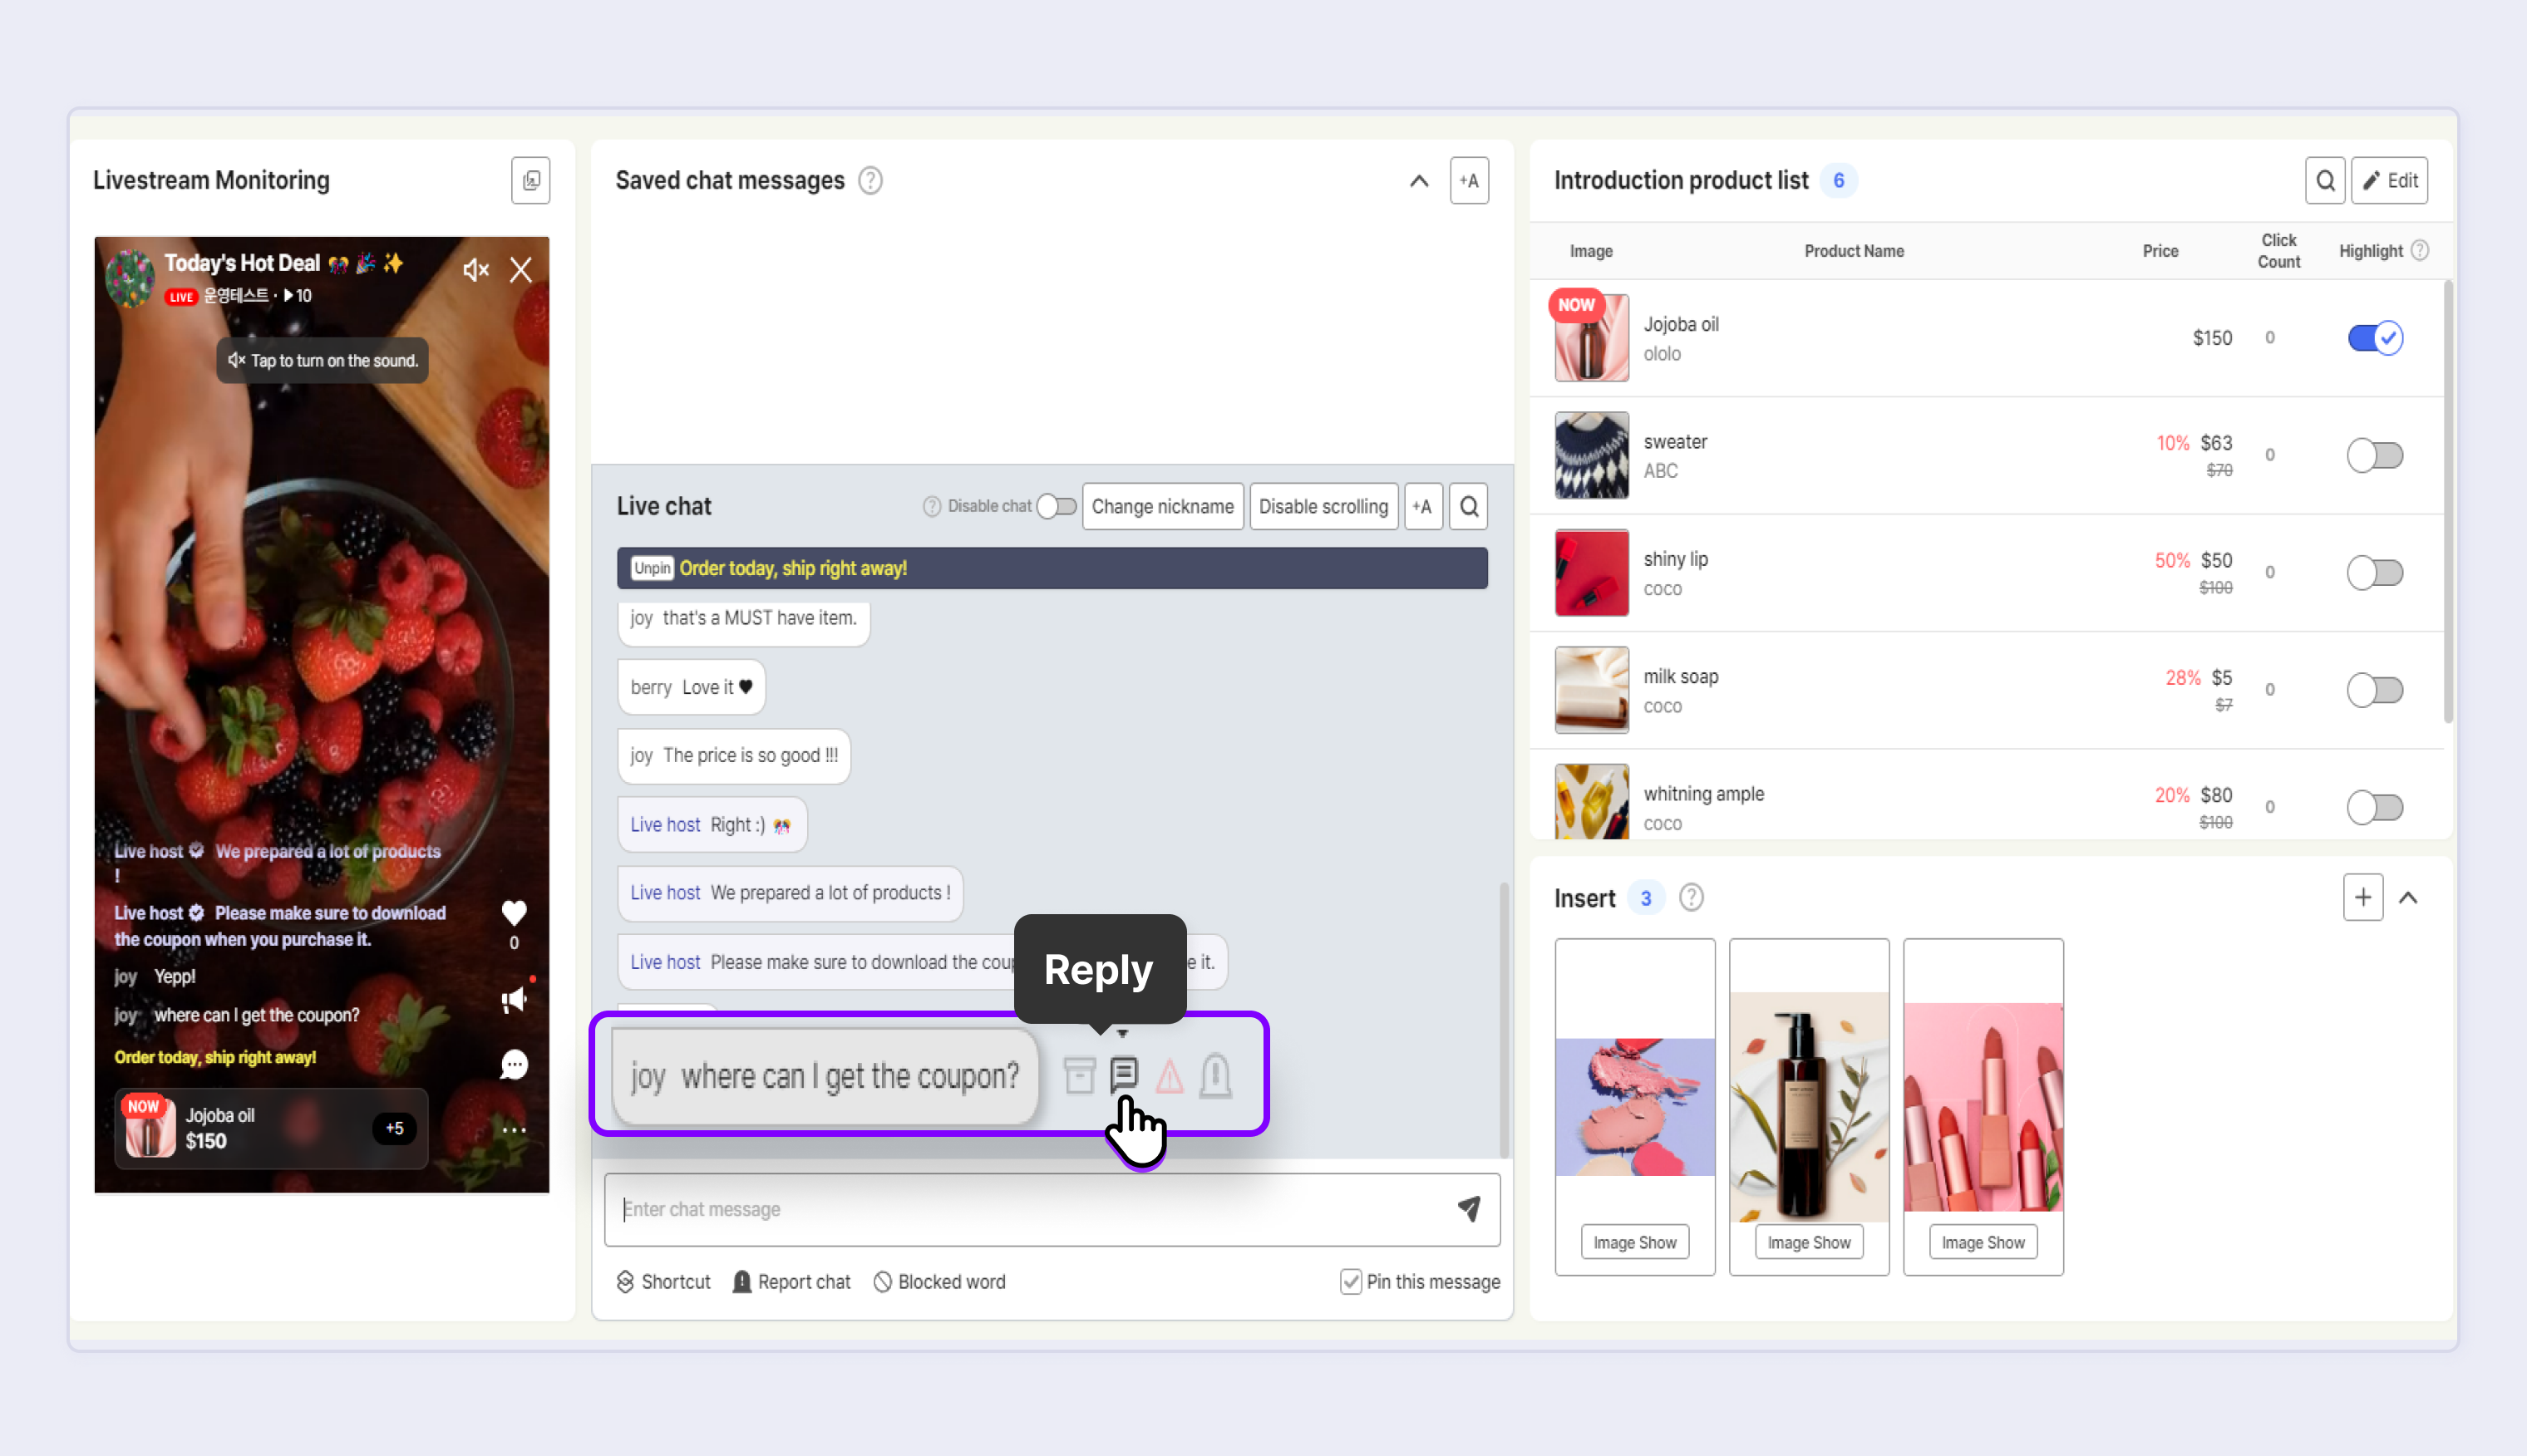
STEP 2. Click the Reply icon to enter a message and click the Send button to send the reply to the viewer.
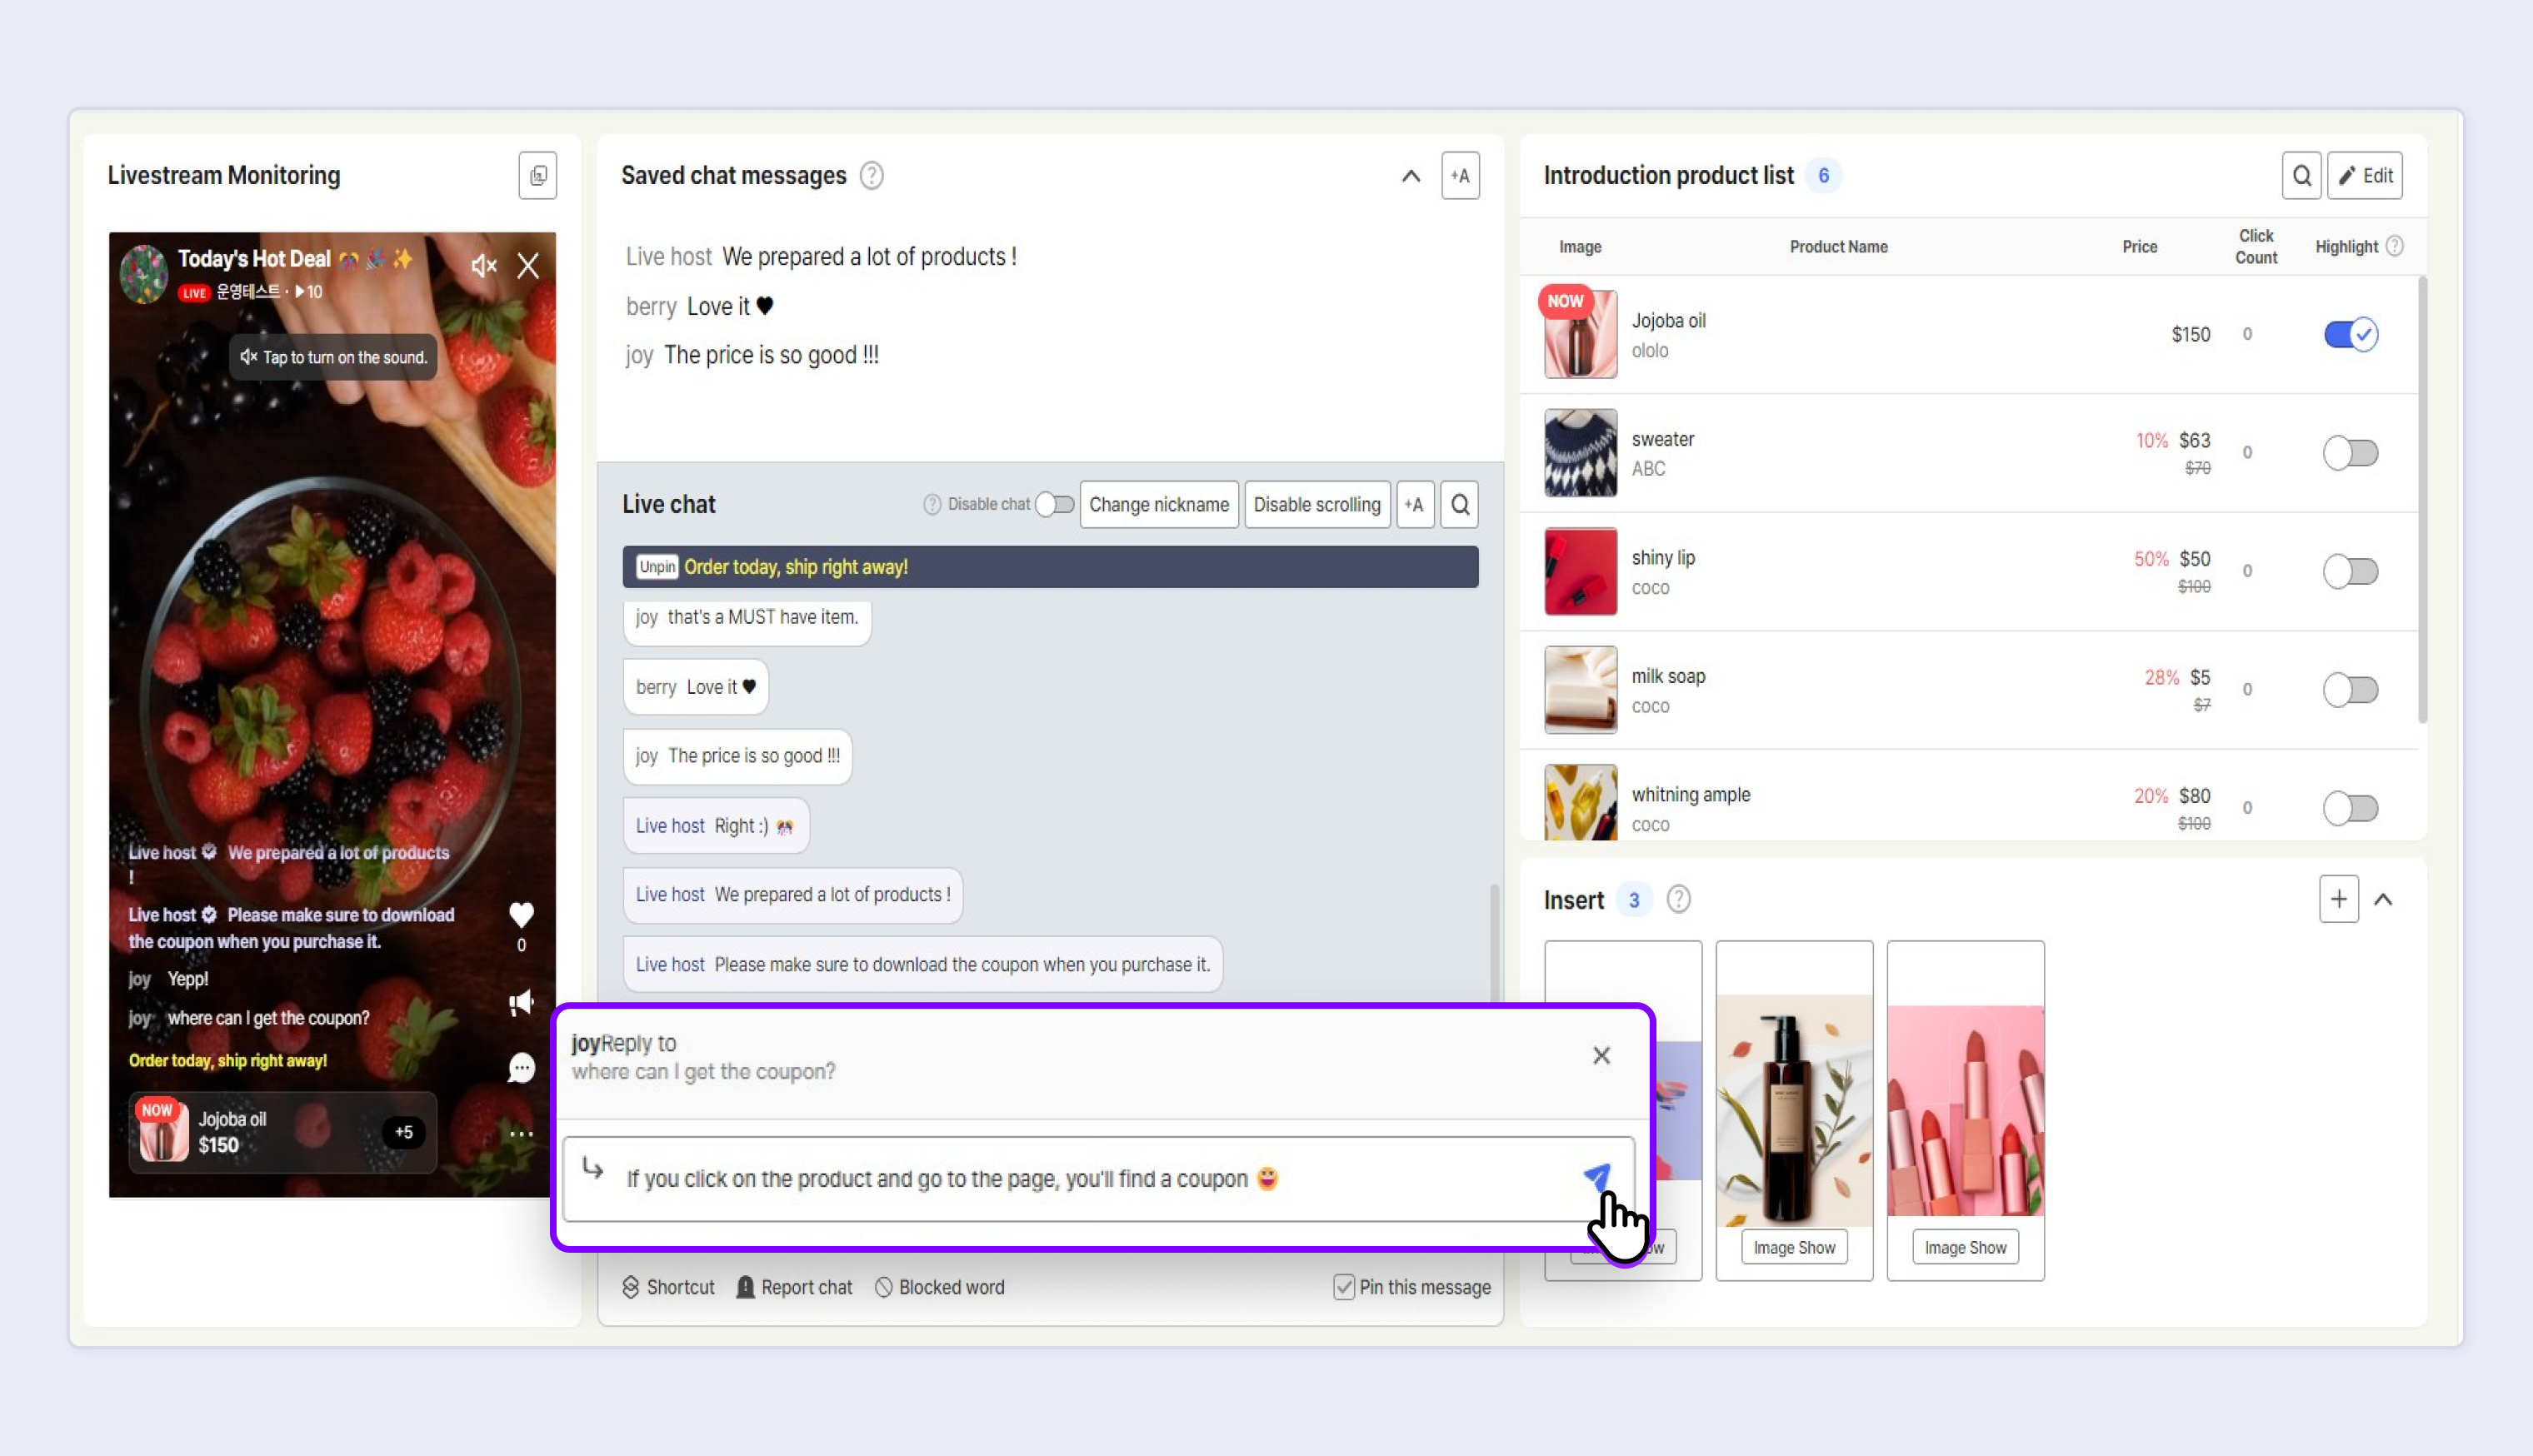
STEP 3. The reply history is shown as a popup on the viewer's player and posted on the Live Reply tab.
The Reply Chat function is available only while on air.
Registering Shortcuts
You can save the frequently used chat contents as shortcuts to conveniently communicate with viewers.
Using Recently Registered Shortcuts
You can simply click the Shortcuts icon to use the recently registered shortcuts.
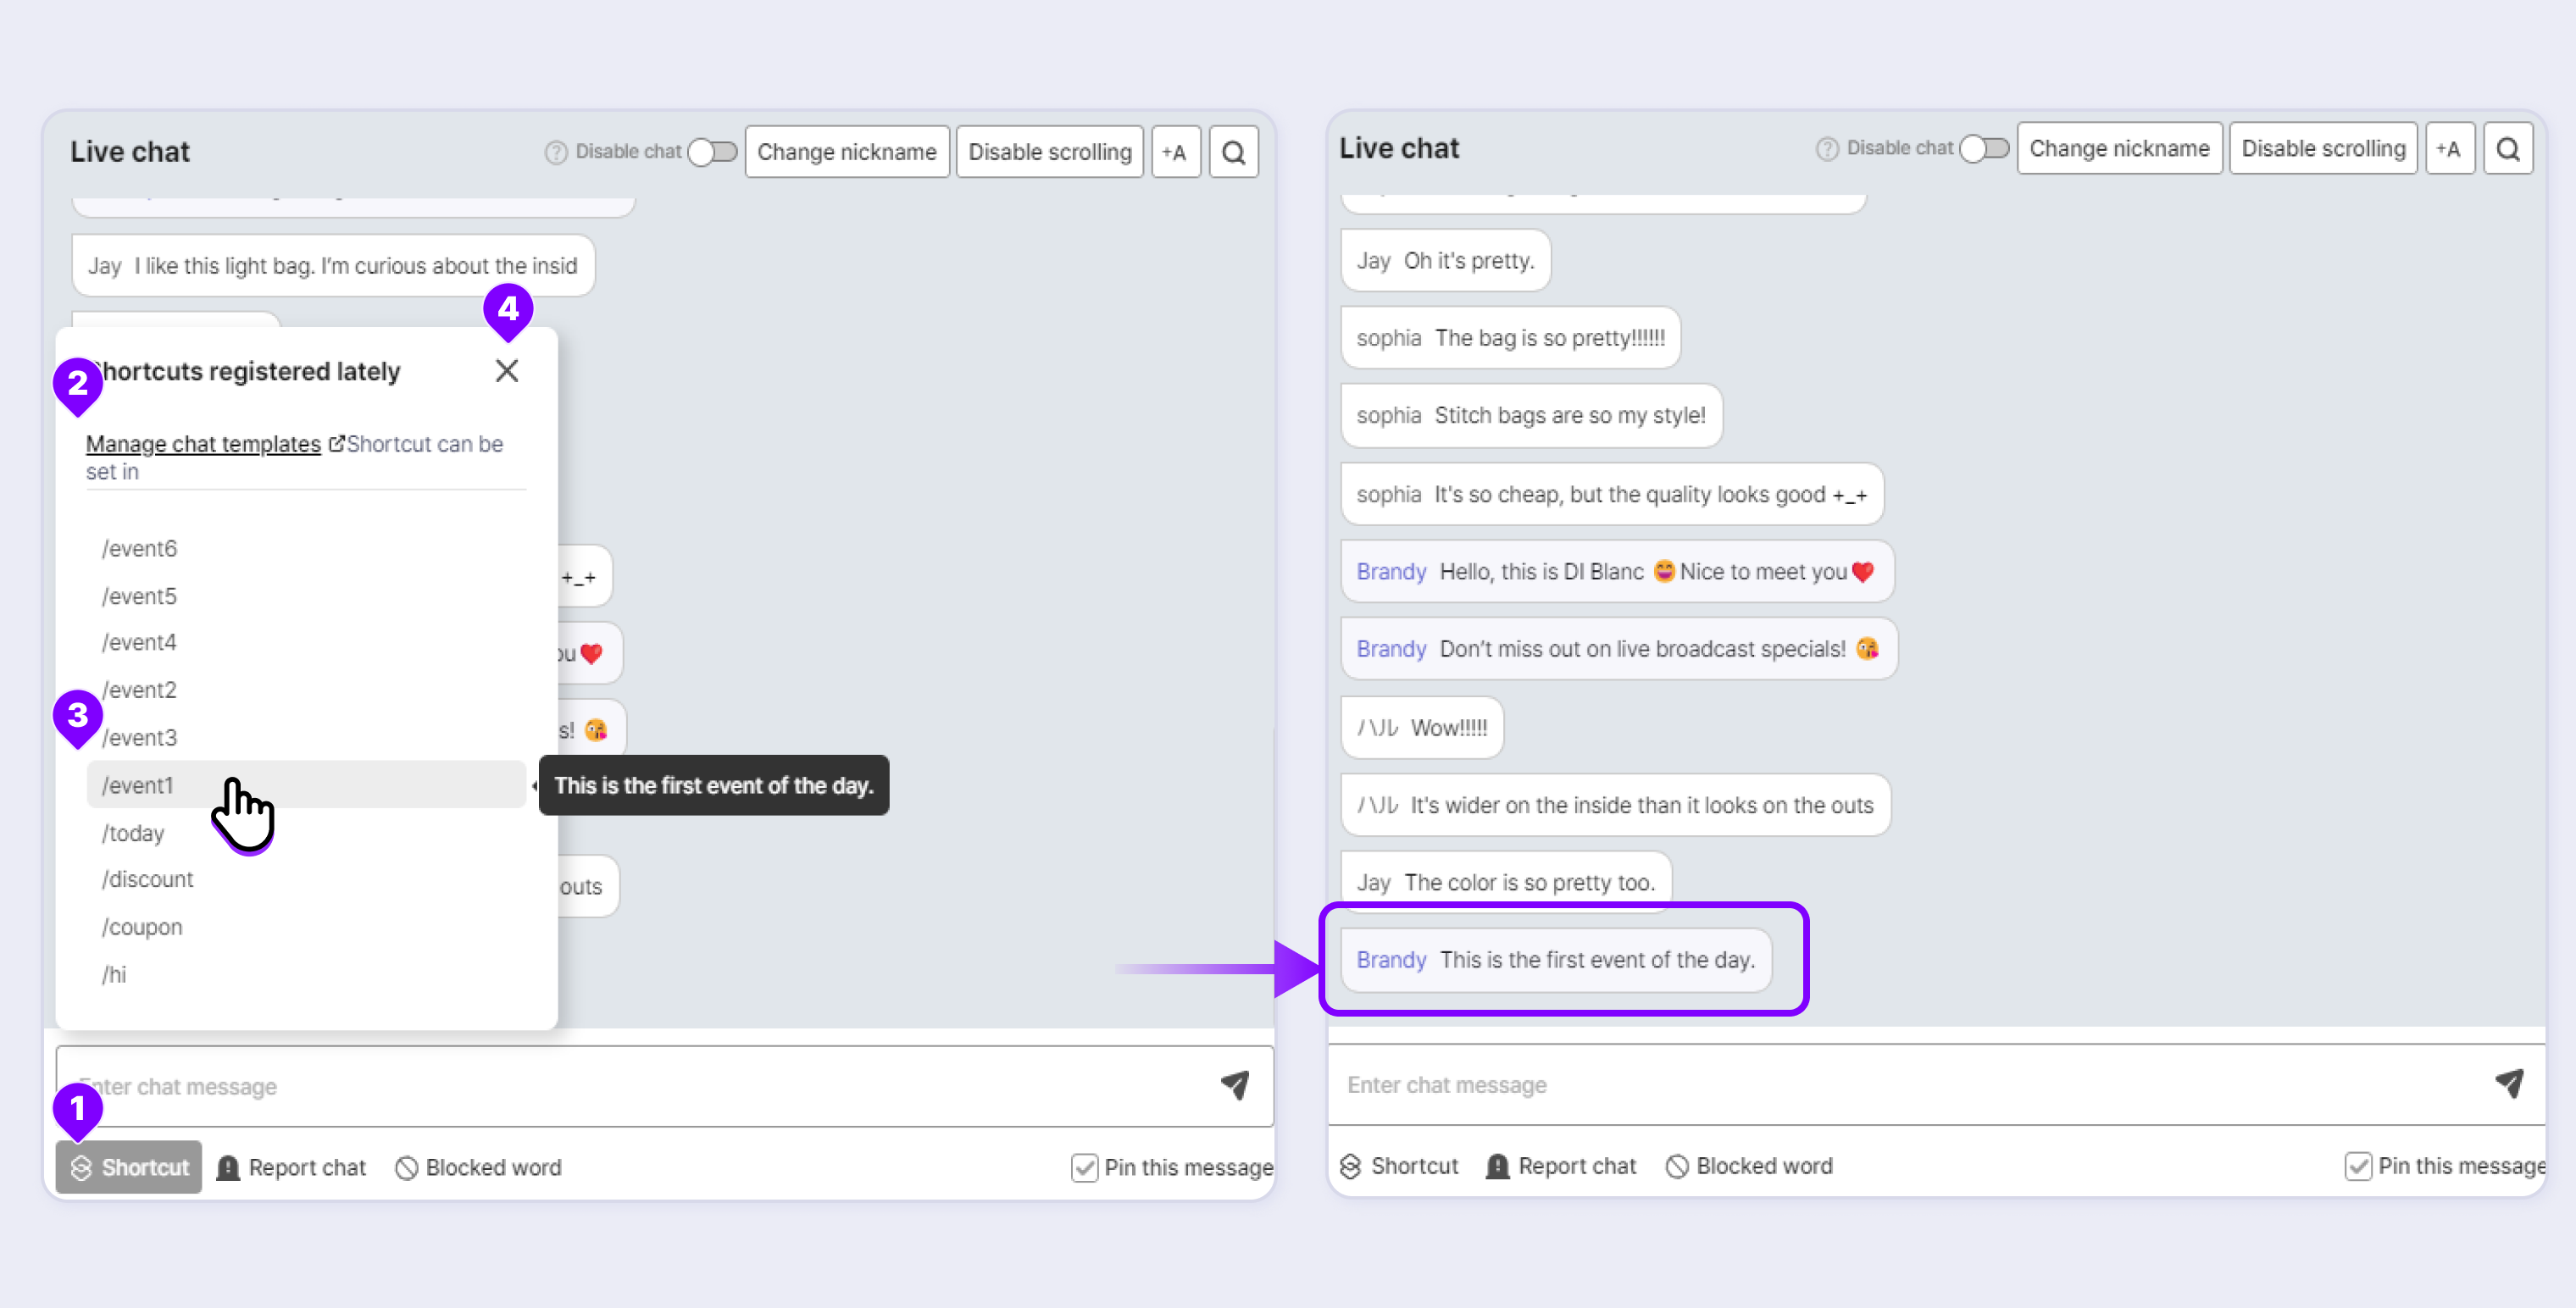
STEP 1. .Shortcuts: When you click the Shortcuts icon, the list of registered shortcuts is displayed in the order of most recently registered. Up to 10 most recently registered shortcuts are shown.
STEP 2. Manage chat templates : If you have shortcuts to add, click Chat Template Management to go to the menu on the Saucelive Admin site in a new window.
STEP 3. When you move your mouse over Shortcuts, the registered content is shown. When you click a shortcut, it is immediately sent to the real-time chat window.
STEP 4. Click X to close the window.
Using Registered Shortcuts
You can use the Shortcuts function by entering a part of the registered shortcuts.
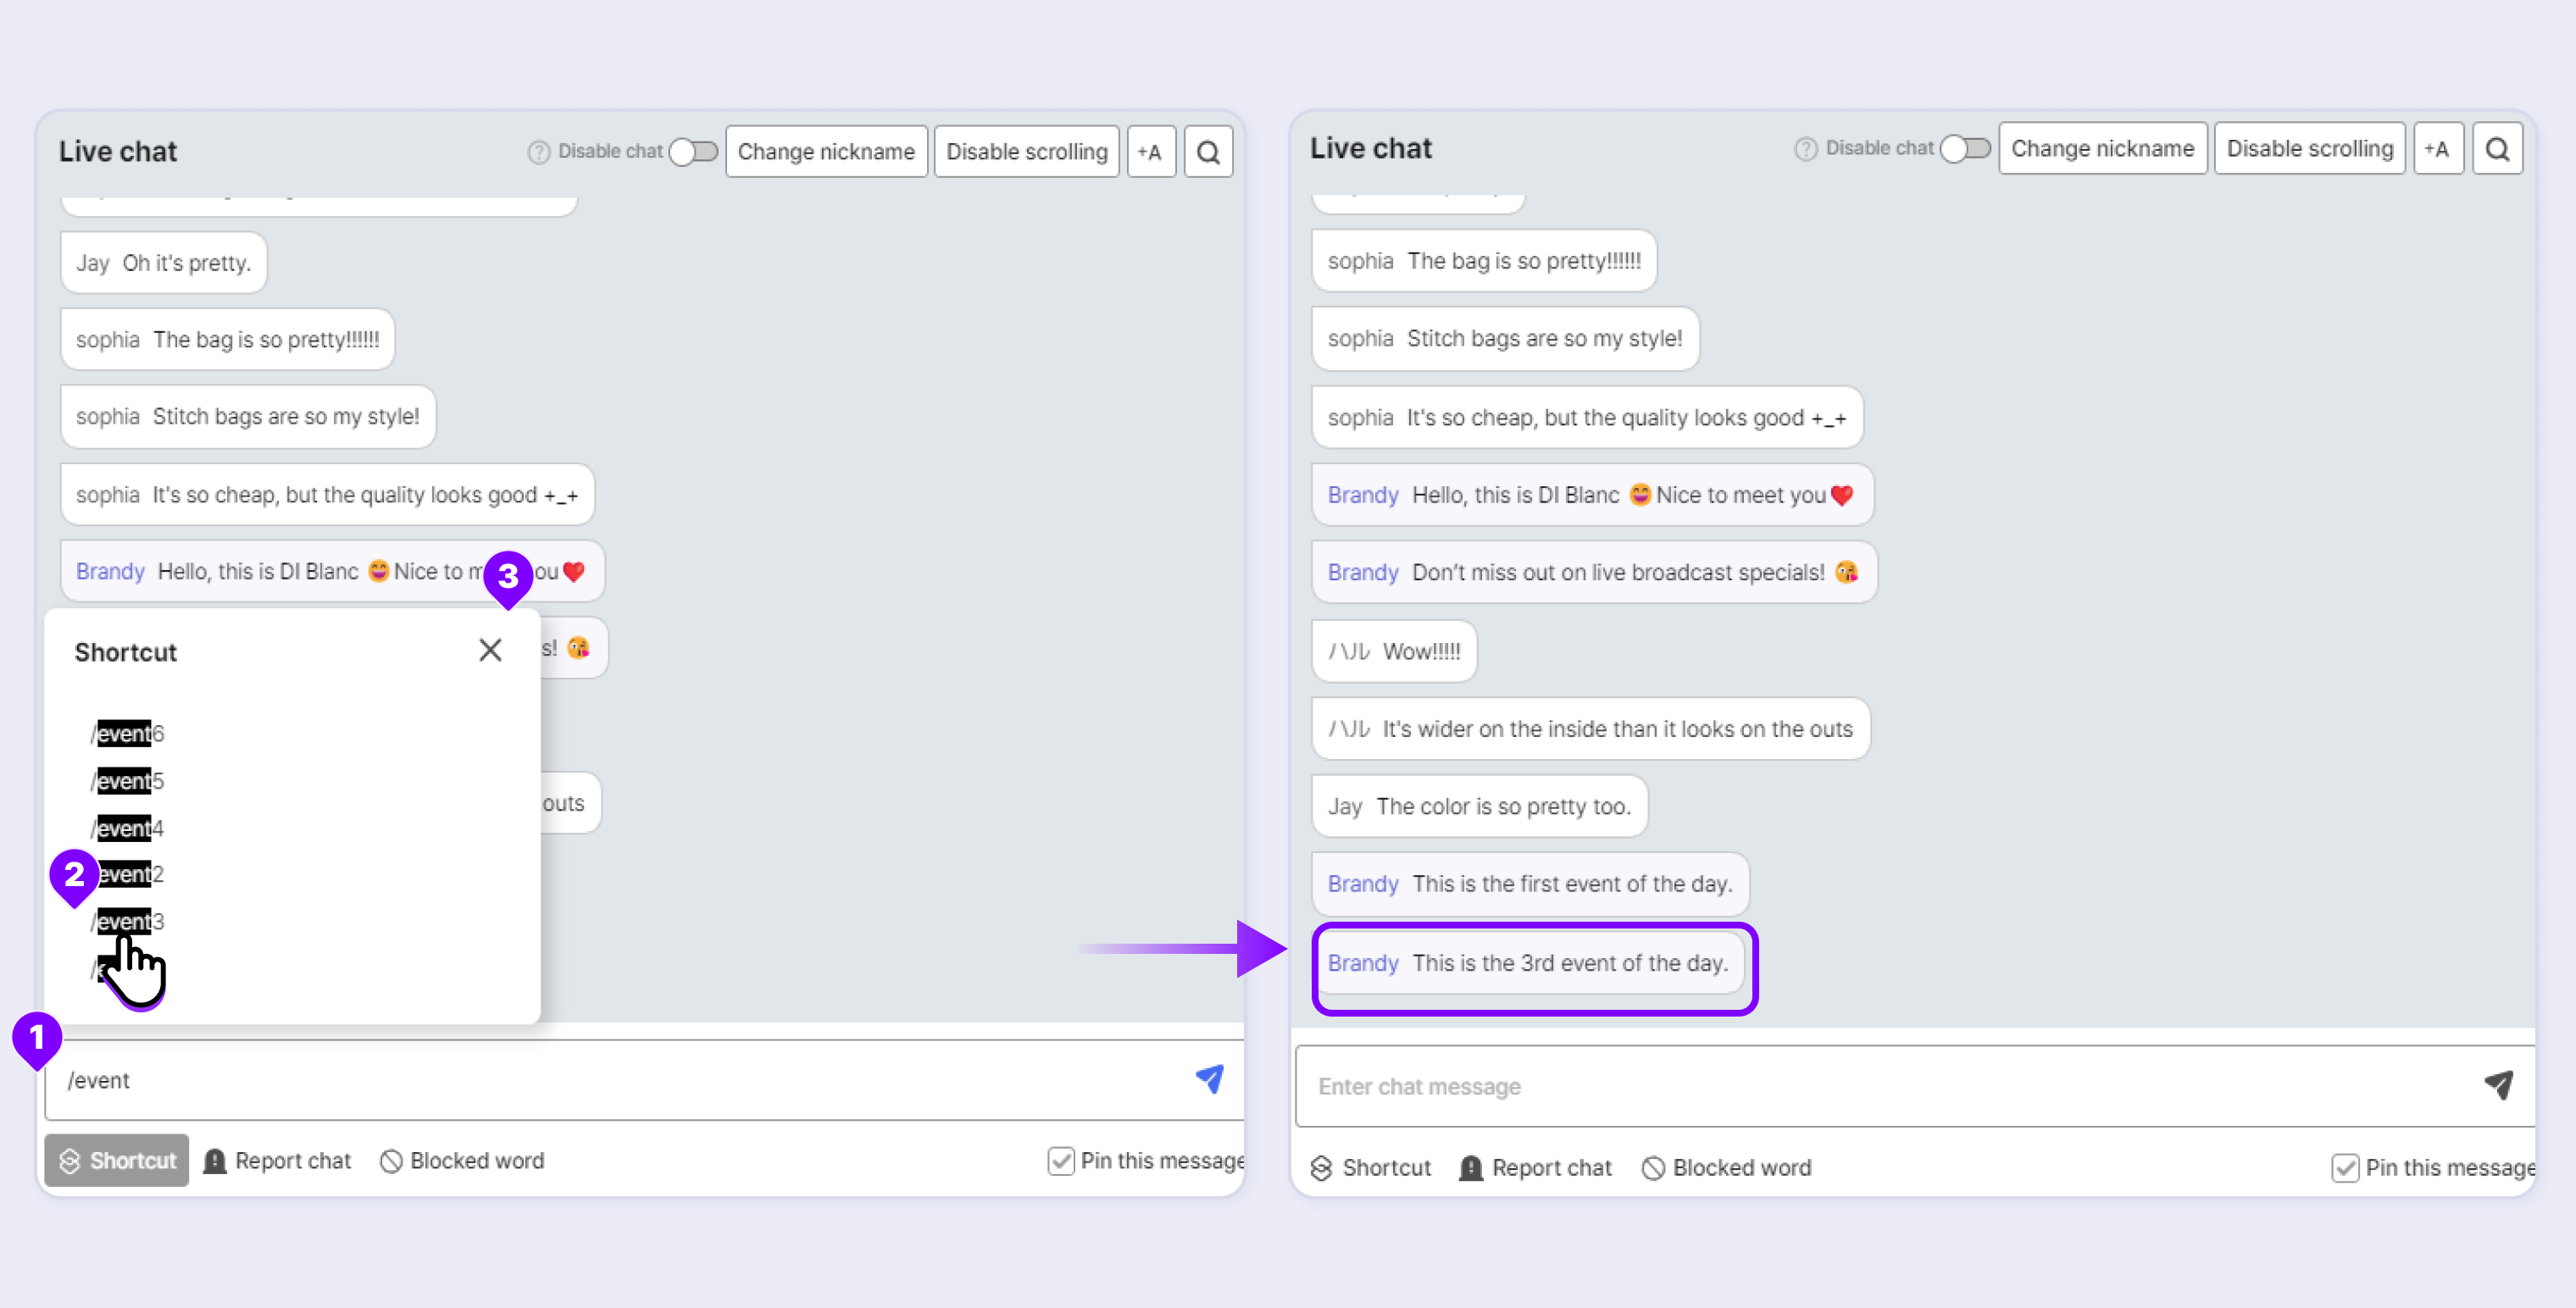
STEP 1. Enter "/ + some combination of abbreviations" in the chat window to see which abbreviations have been registered as auto-completion starting from 2 or more characters.
STEP 2. Click on the abbreviated word you searched to immediately send it to the real-time chat window.
STEP 3. Click X to close the Shortcut window.
Registering Shortcuts in SauceLive Admin
Click Chat > Shortcuts > Add Shortcut in Saucelive Admin.
STEP 1. Register shortcuts you want to conveniently enter in the chat window.
STEP 2. Enter the content to be displayed when you enter the shortcut. You can enter up to 100 characters.
STEP 3. Once you have entered the above, click Confirm. Now the chat shortcut is ready, and you can register up to 20 shortcuts.
STEP 4. When managing the list, you can select multiple items by clicking the checkboxes and delete them. When managing individual items, you can use individual Edit or Delete buttons.
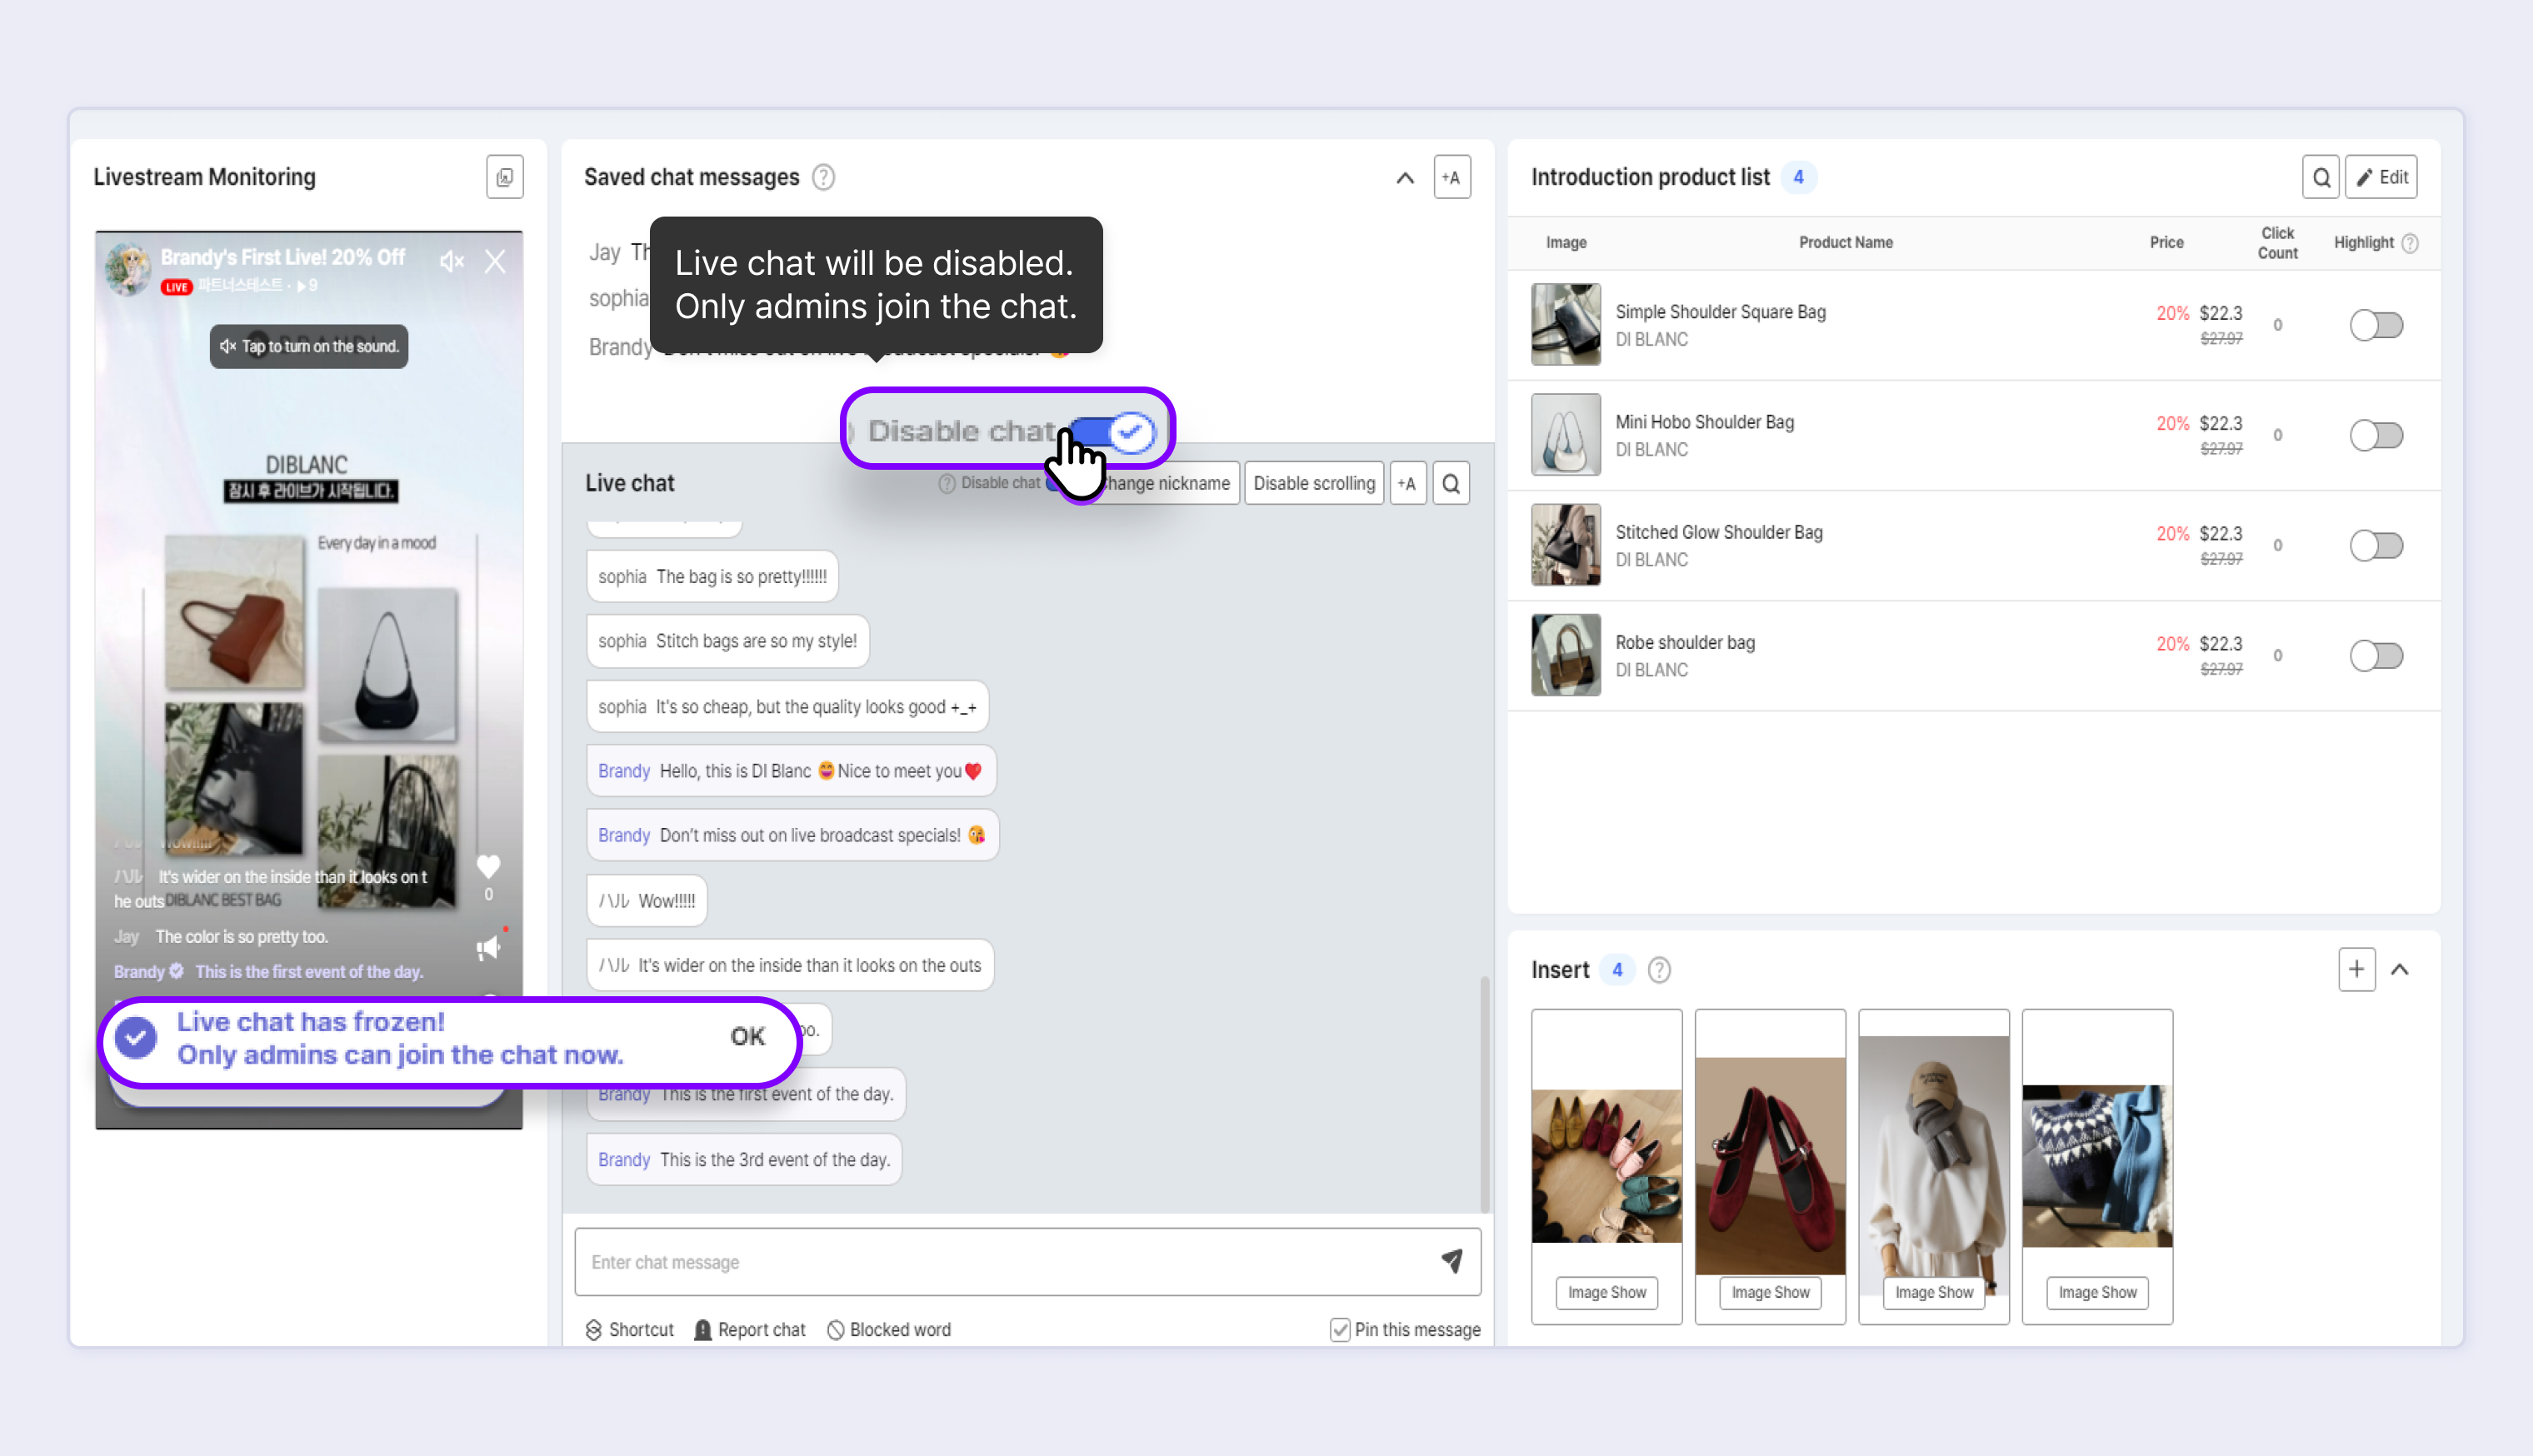
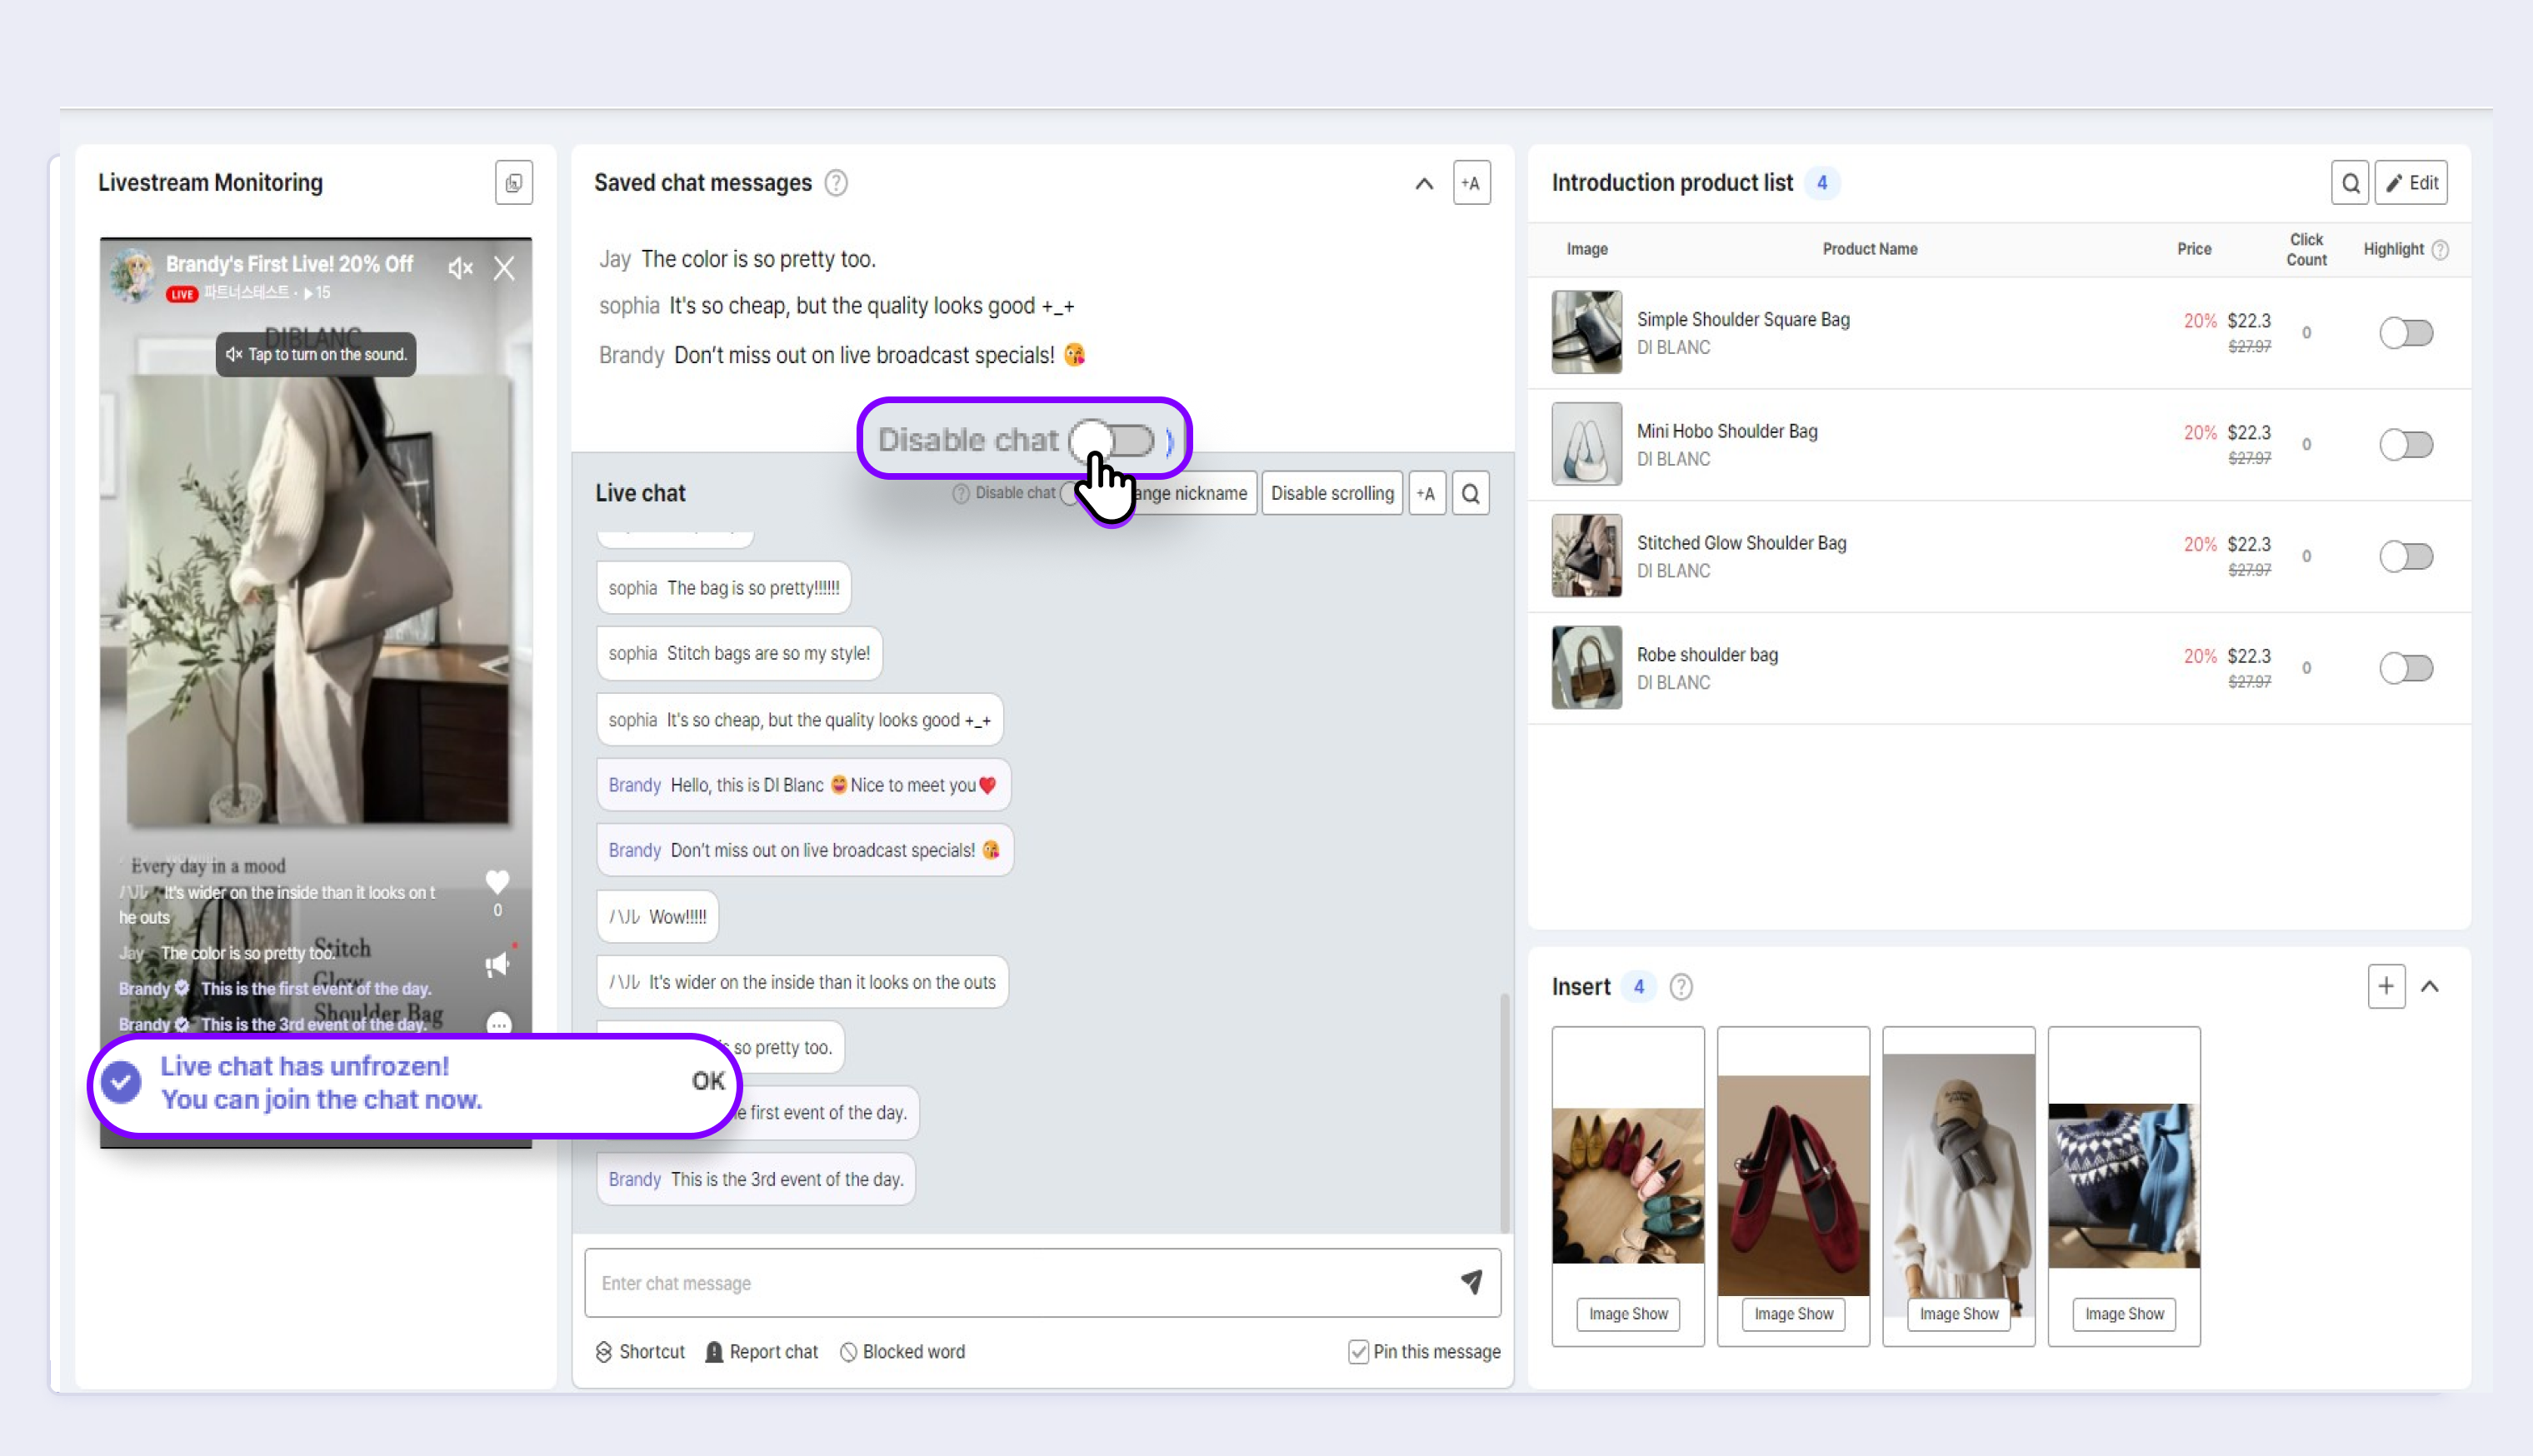
Disabling Chat
You can disable chat to prevent all viewers in the livestream from using the chat function.
While the chat is disabled, only the administrator can join the chat.
Disabling Chat
Toggle the Disable chat ON to prevent all viewers from joining the chat. The message saying "The administrator disabled the chat. Only administrator can join the chat." is shown on the player.
Enabling Chat
Toggle the Disable chat OFF to allow all viewers to join the chat. The message saying "The administrator enabled the chat. You can join the chat." is shown on the player.
Stopping Chat Scrolling
When the chat is moving too quickly in the chat window, use the Stop Scrolling function to pause the chat. The chat is continuously updated for viewers, but the chat screen is paused for the administrator to view the chat.
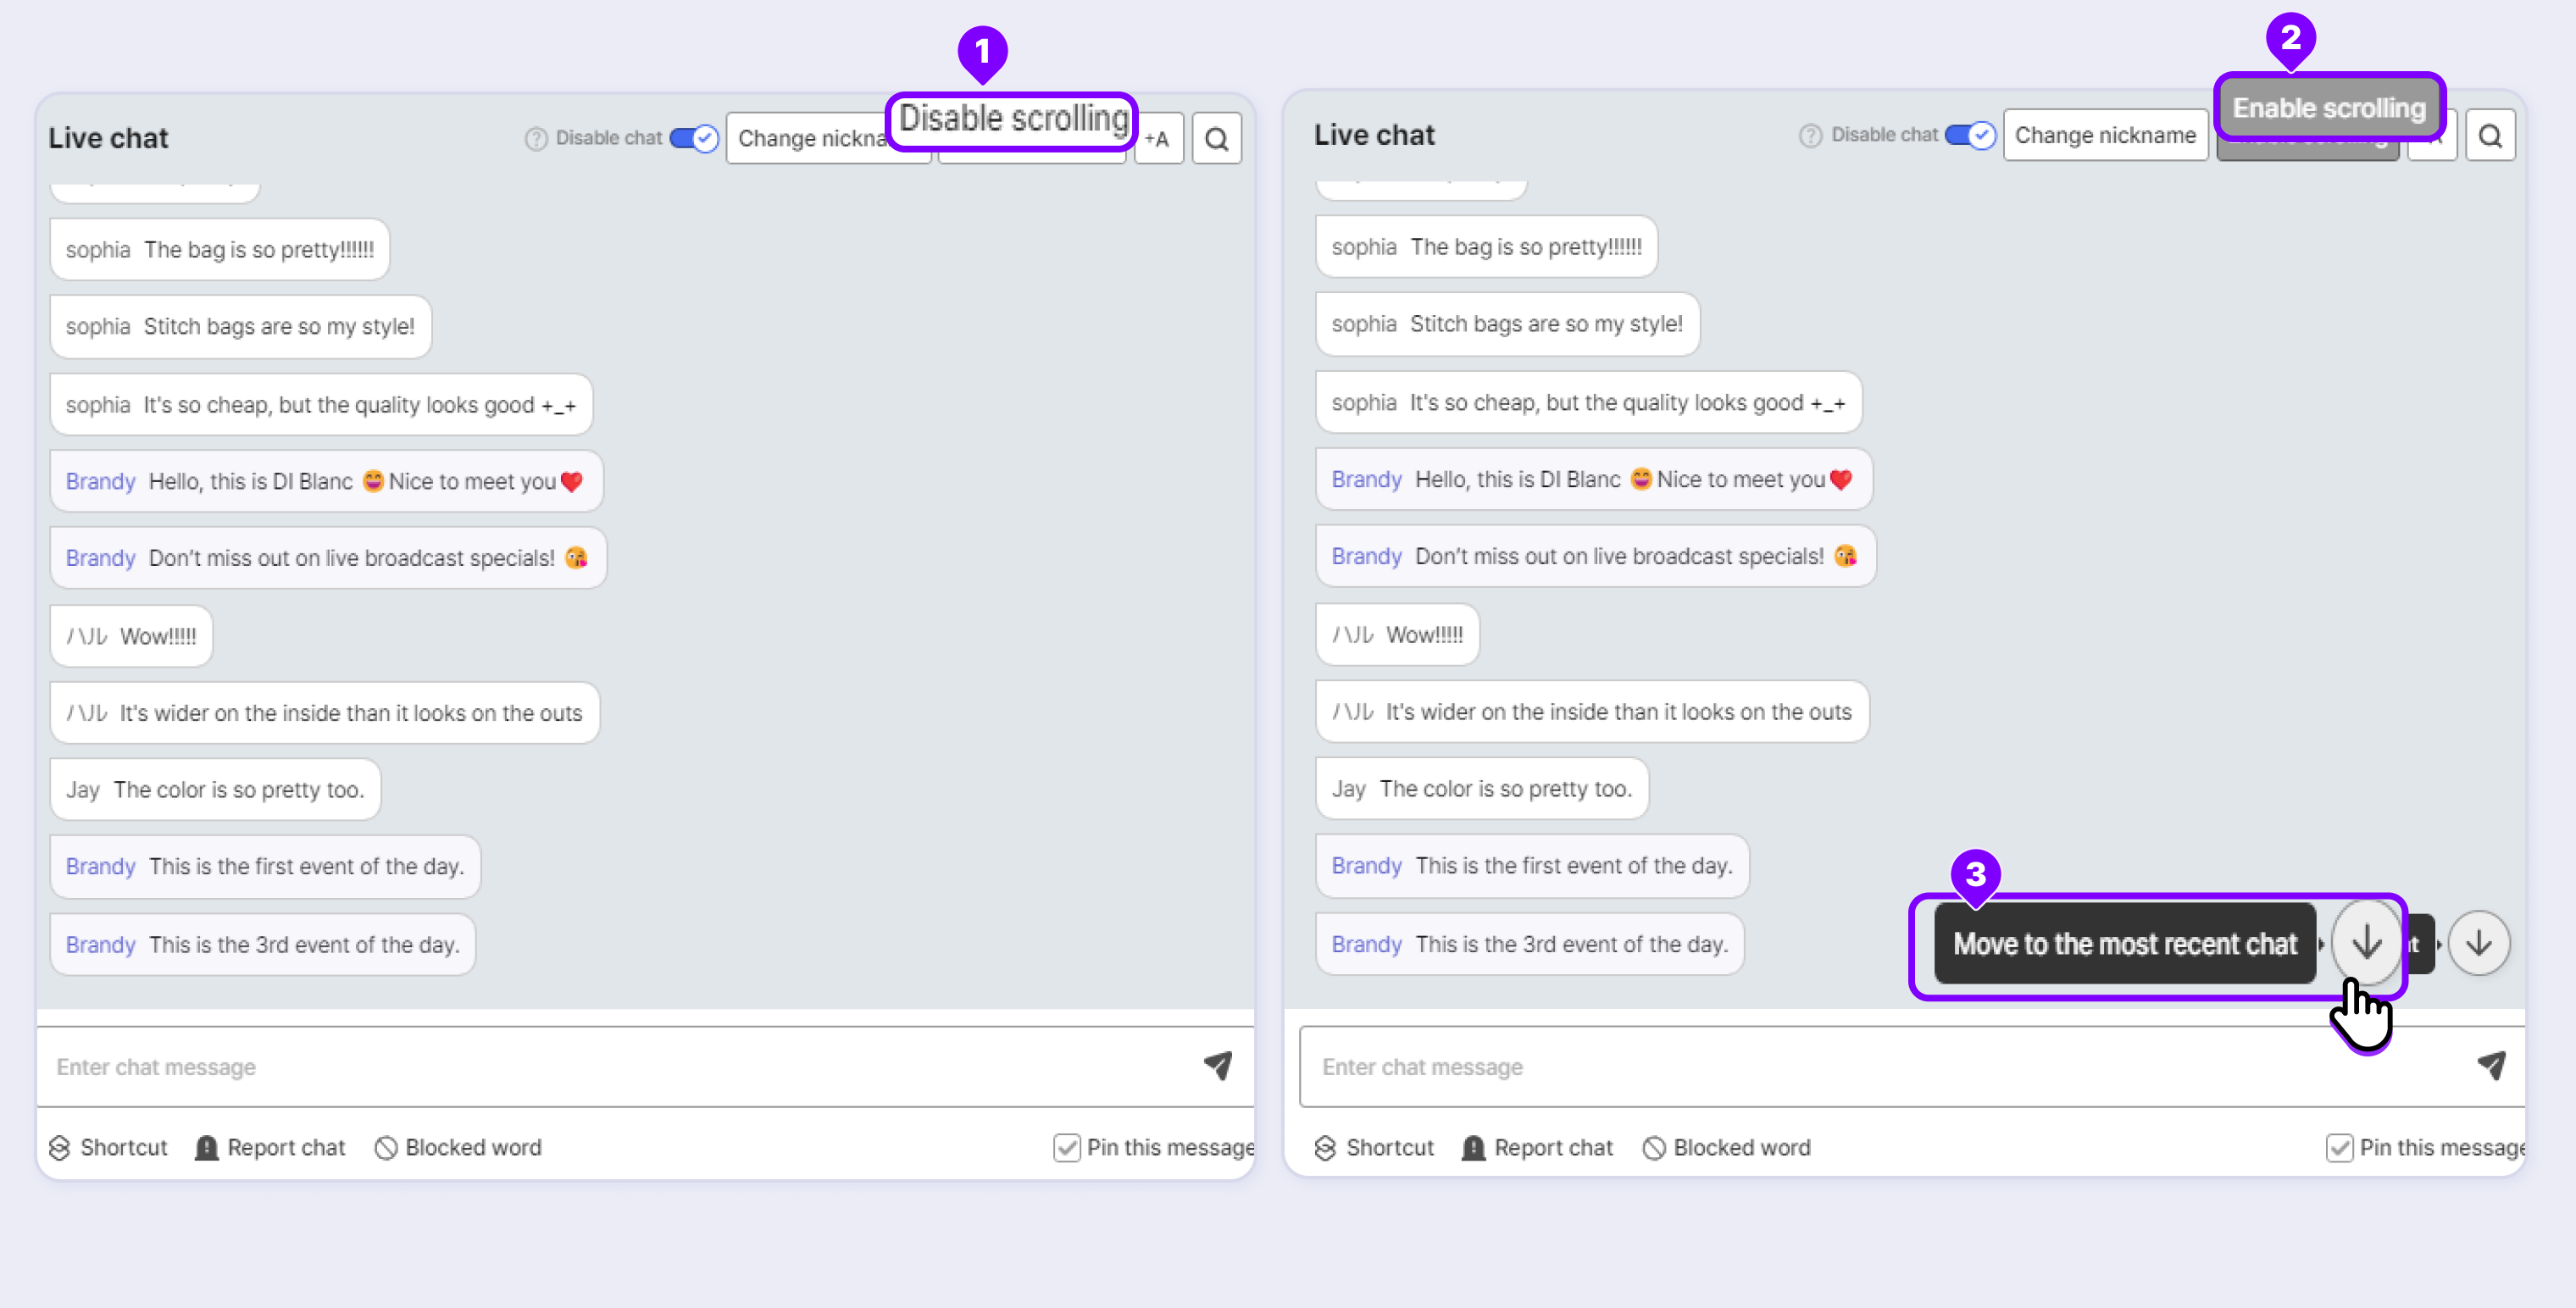
- Click Disable Scrolling to stop the chat content from moving.
- Click Enable Scrolling to start automatic scrolling of the chat content.
- When a new chat is updated while scrolling is stopped, the Move Scroll icon is shown. Clicking the ↓ icon moves you to the most recent chat area and resumes scrolling.
Adding Blocked Words
When a specific word is set as a blocked word, it is replaced with * in the chat window so you can prevent the blocked words from being shown in the chat window.
Blocked words are also applied to nicknames. If a nickname includes the blocked word, you cannot log in to the chat.
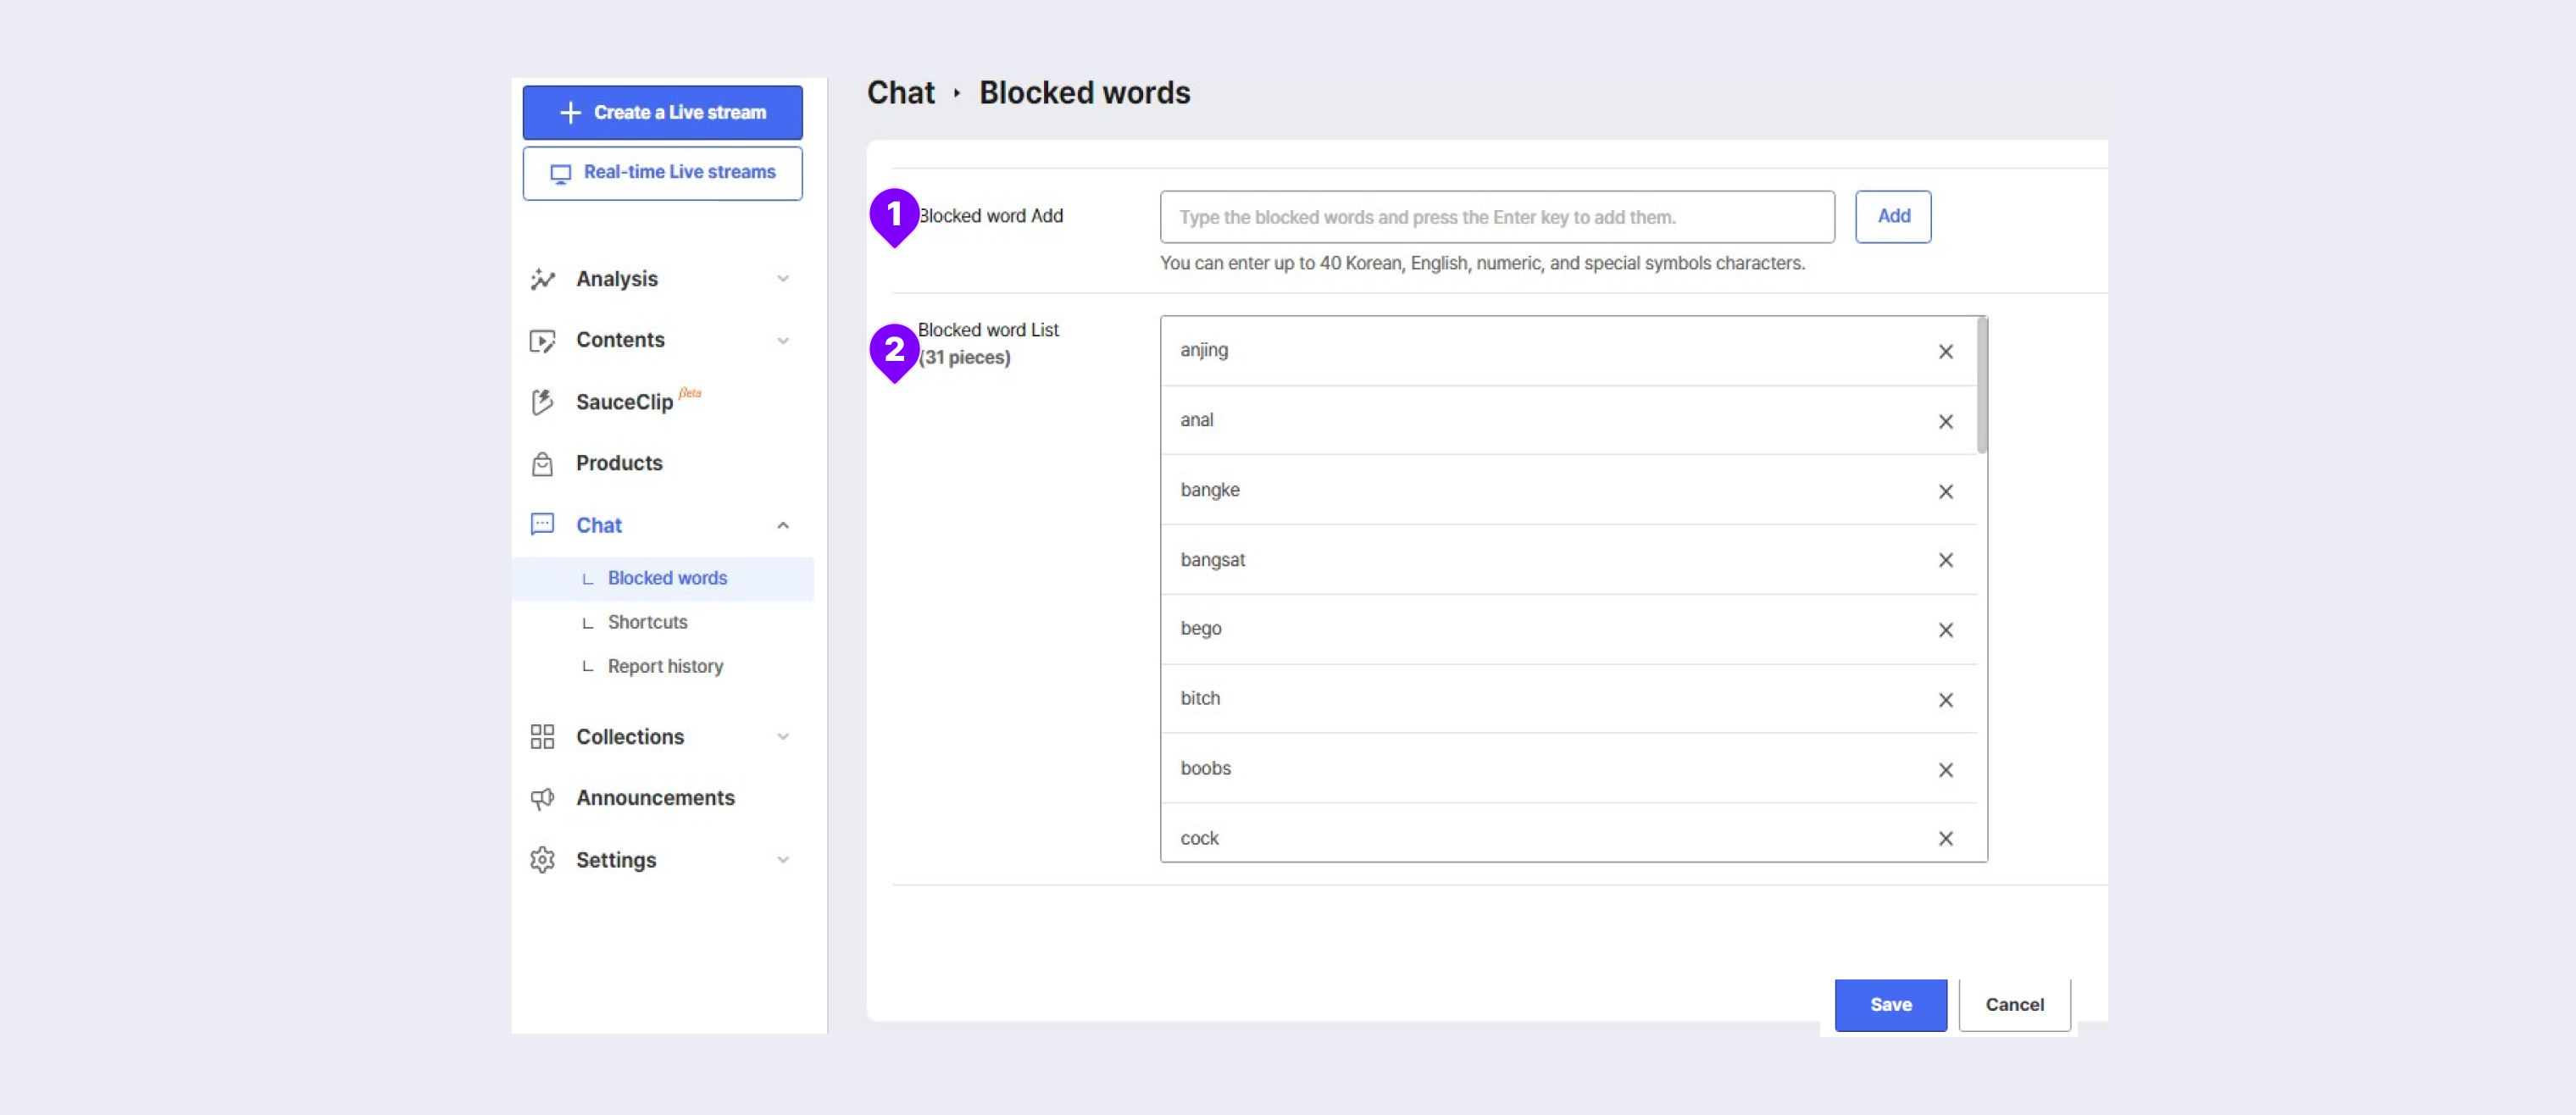
You can register a blocked word that applies to all livestreams in the Saucelive Admin site.
Click Saucelive Admin > Chat Management > Blocked Words Management (①) to register a blocked word. Then you can view the word in the list (②).
The Service Administrator and Service Manager can add or delete blocked words. The Service Operator can view the registered blocked words.
STEP 1. Click the Blocked Words icon on the bottom of the chat input area to view the Blocked Words Management screen.
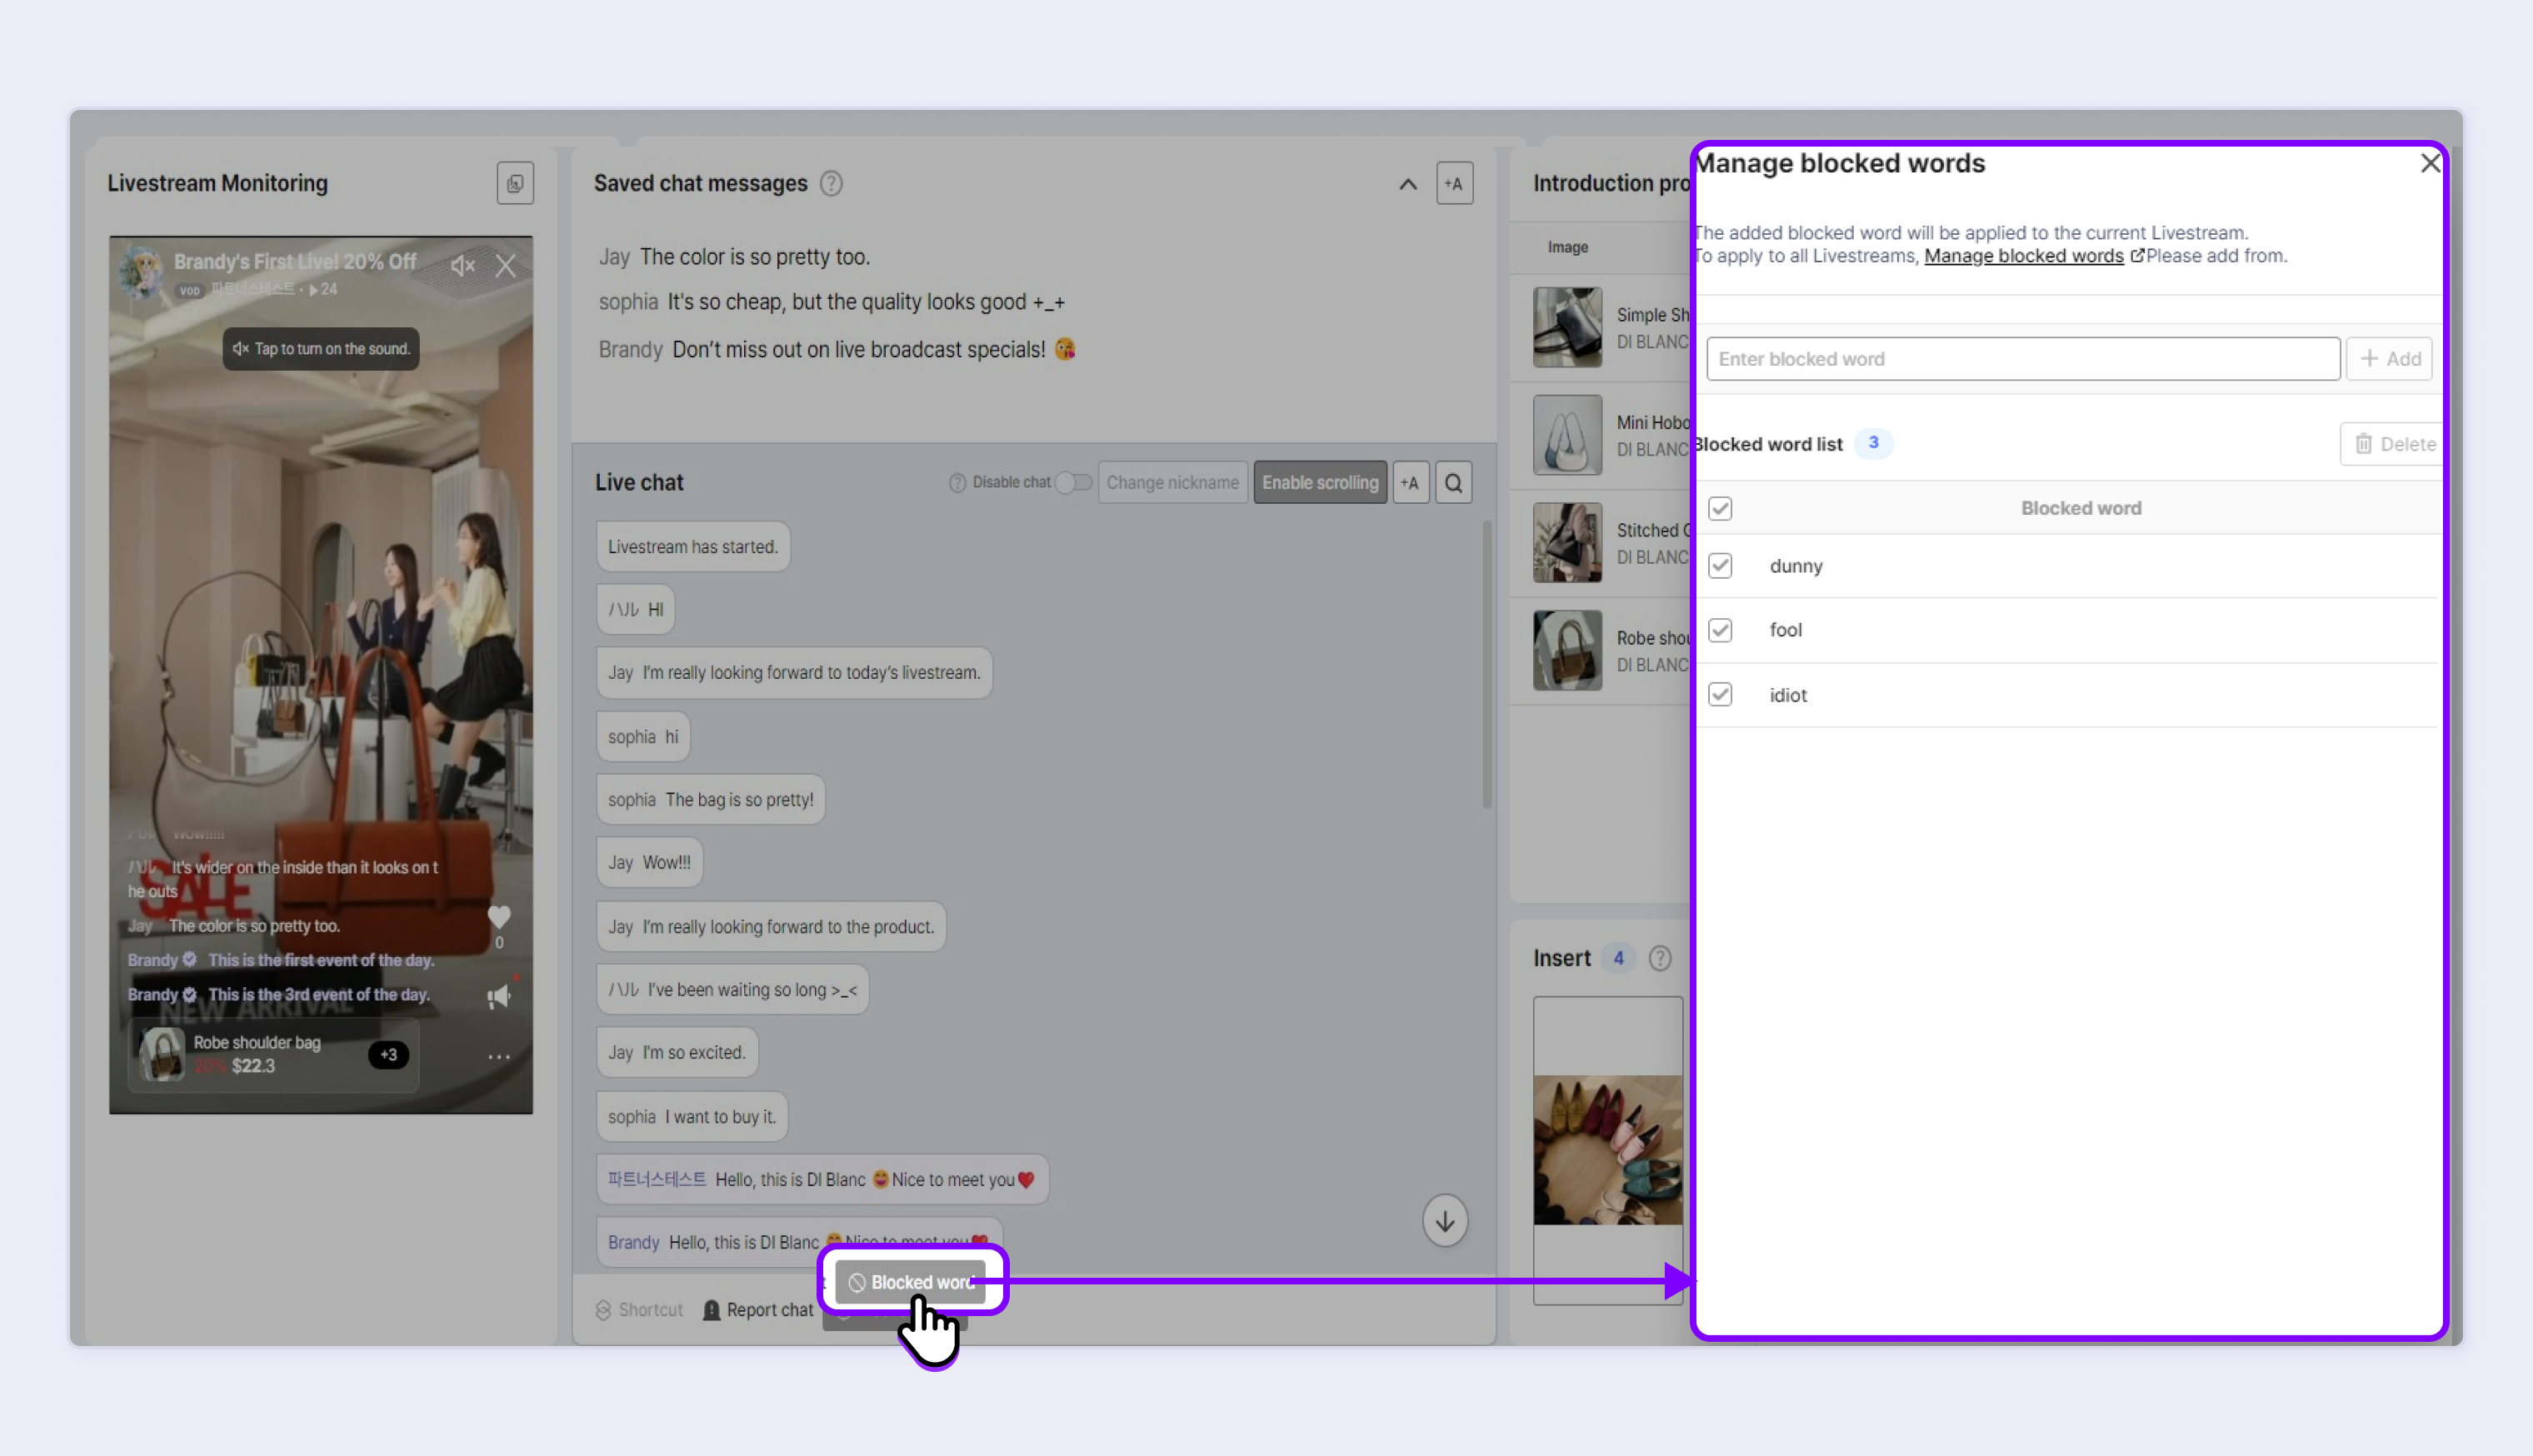
STEP 2. After entering the keyword, click + Add to add the keyword as a blocked word. The layout of the Blocked Words Management window is shown in the image below.
You can enter up to 40 characters for blocked words.
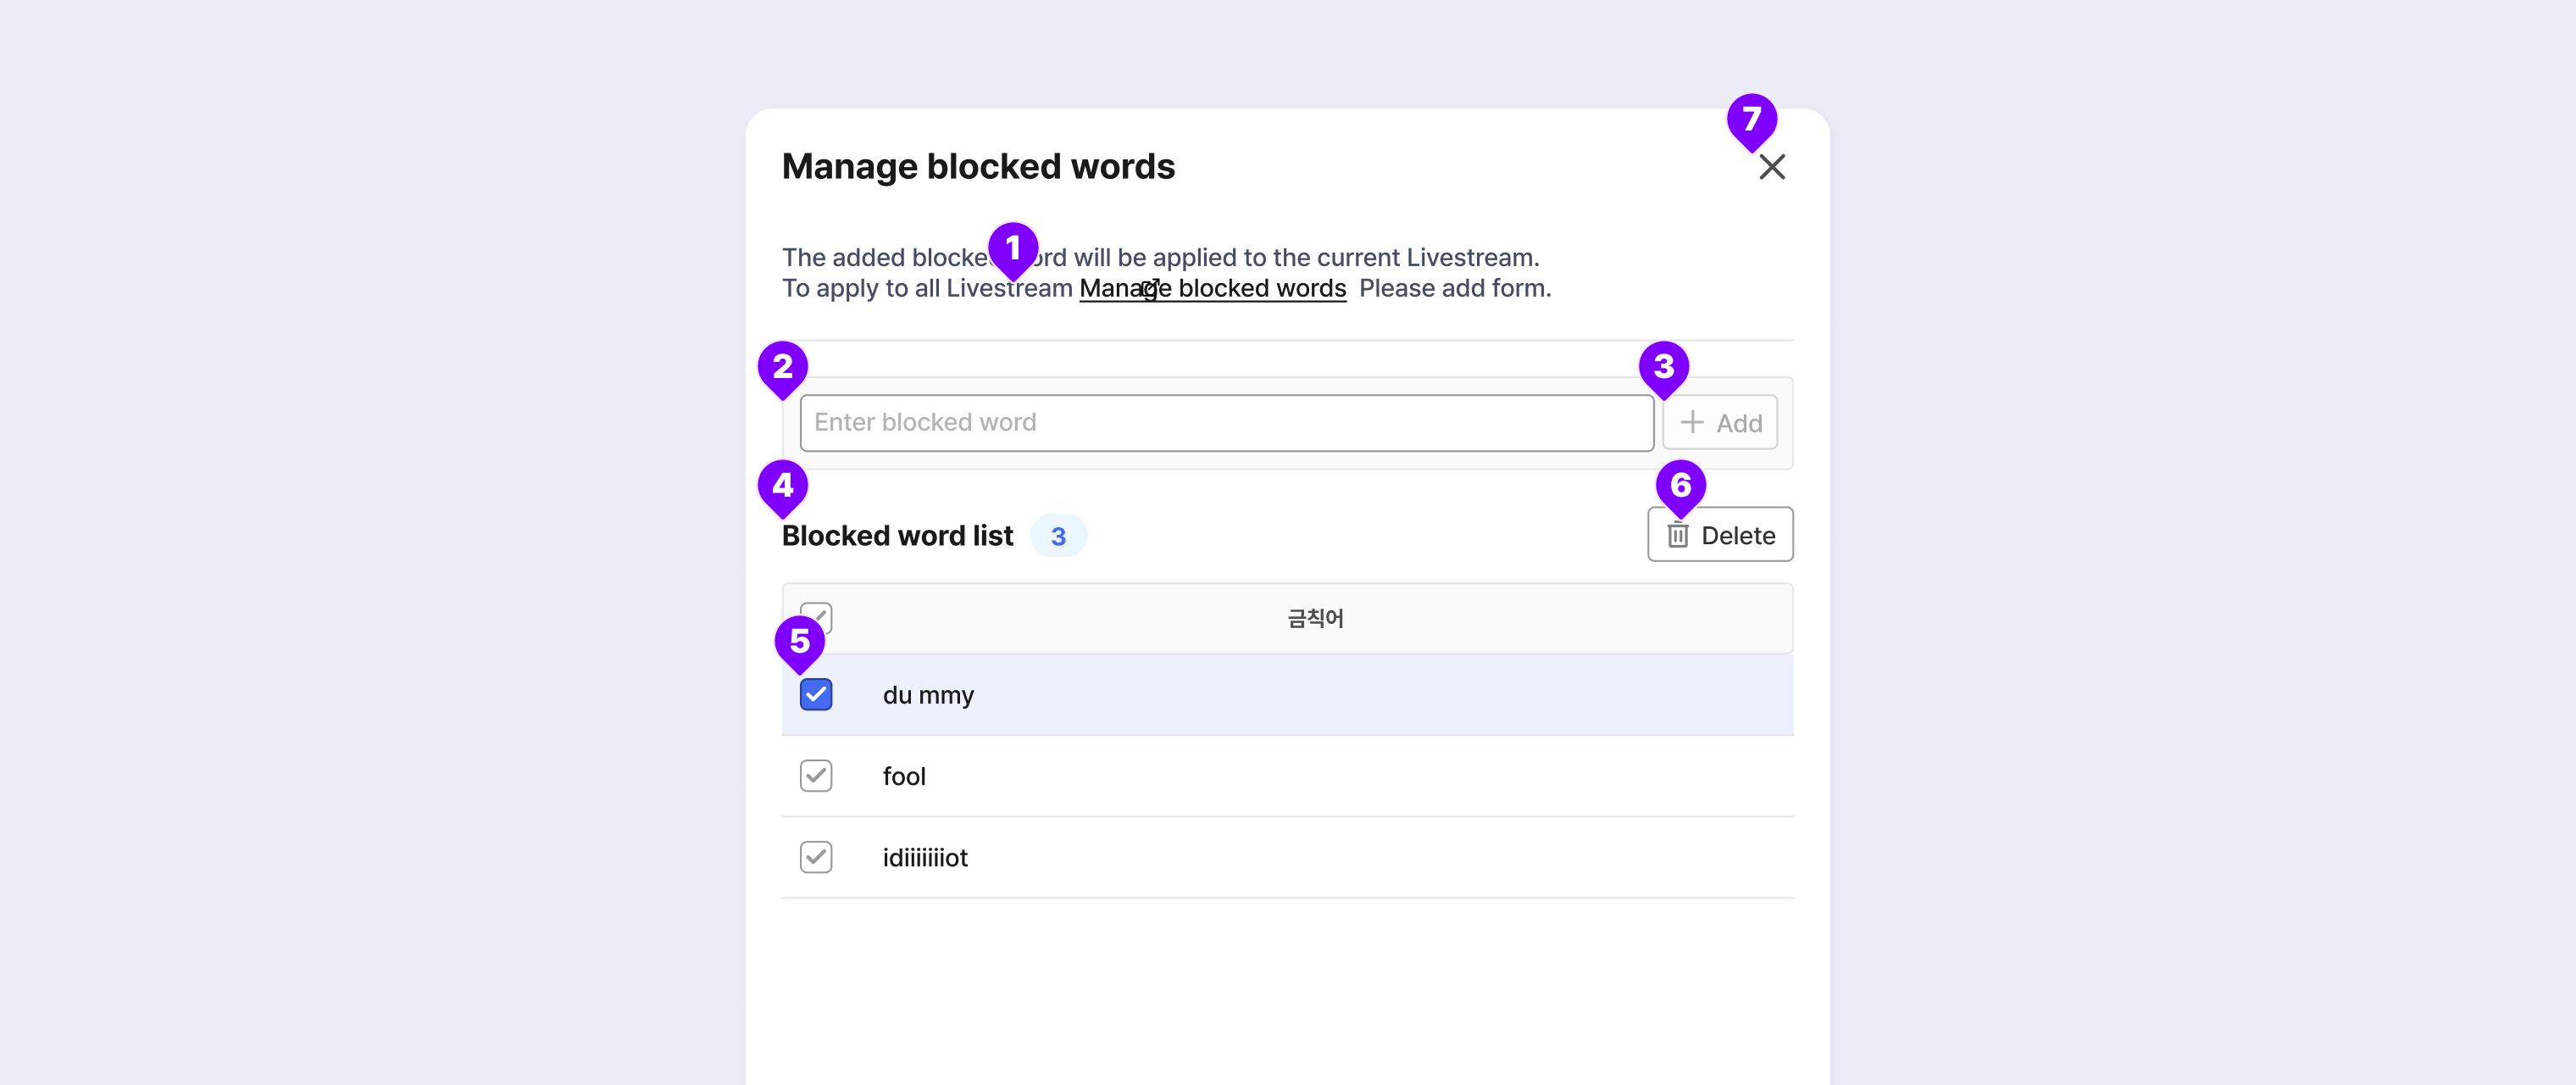
① Blocked Words Management: Click the Manage Blocked Words button to register blocked words you can apply to all livestreams. You will be redirected to the Blocked Words Management menu in the Saucelive Admin site.
② Enter Blocked Word: Enter a blocked word you want to register.
③ + Add: Click the button to add the word to the blocked words list.
④ Blocked Words List: The list shows the registered blocked words. The number next to the list is the number of registered blocked words.
⑤ Item: You can select individual blocked words.
⑥ Delete: You can delete the selected item from among the registered blocked words.
⑦ X: Close the Blocked Words Management window.
When the livestream ends, the blocked words are also disabled.
Managing Report and Block Chats
If needed, you can report the viewer who entered a specific chat or block the viewer to prevent them from entering chats while on air.
Reporting and Blocking Chats
STEP 1.
- To block chat, move your mouse over the end of the viewer's chat and click the displayed Block Chat icon to prohibit the viewer from entering chats.
- To report chat, move your mouse over the end of the viewer's chat and click the displayed Report icon to report the chat. The message saying **"You have been reported."** is shown on the top of the viewer's player. The viewer can still enter chats after the report.

STEP 2. To manage the chat report history, click the Report Chat icon. The Chat Report Management screen is displayed.
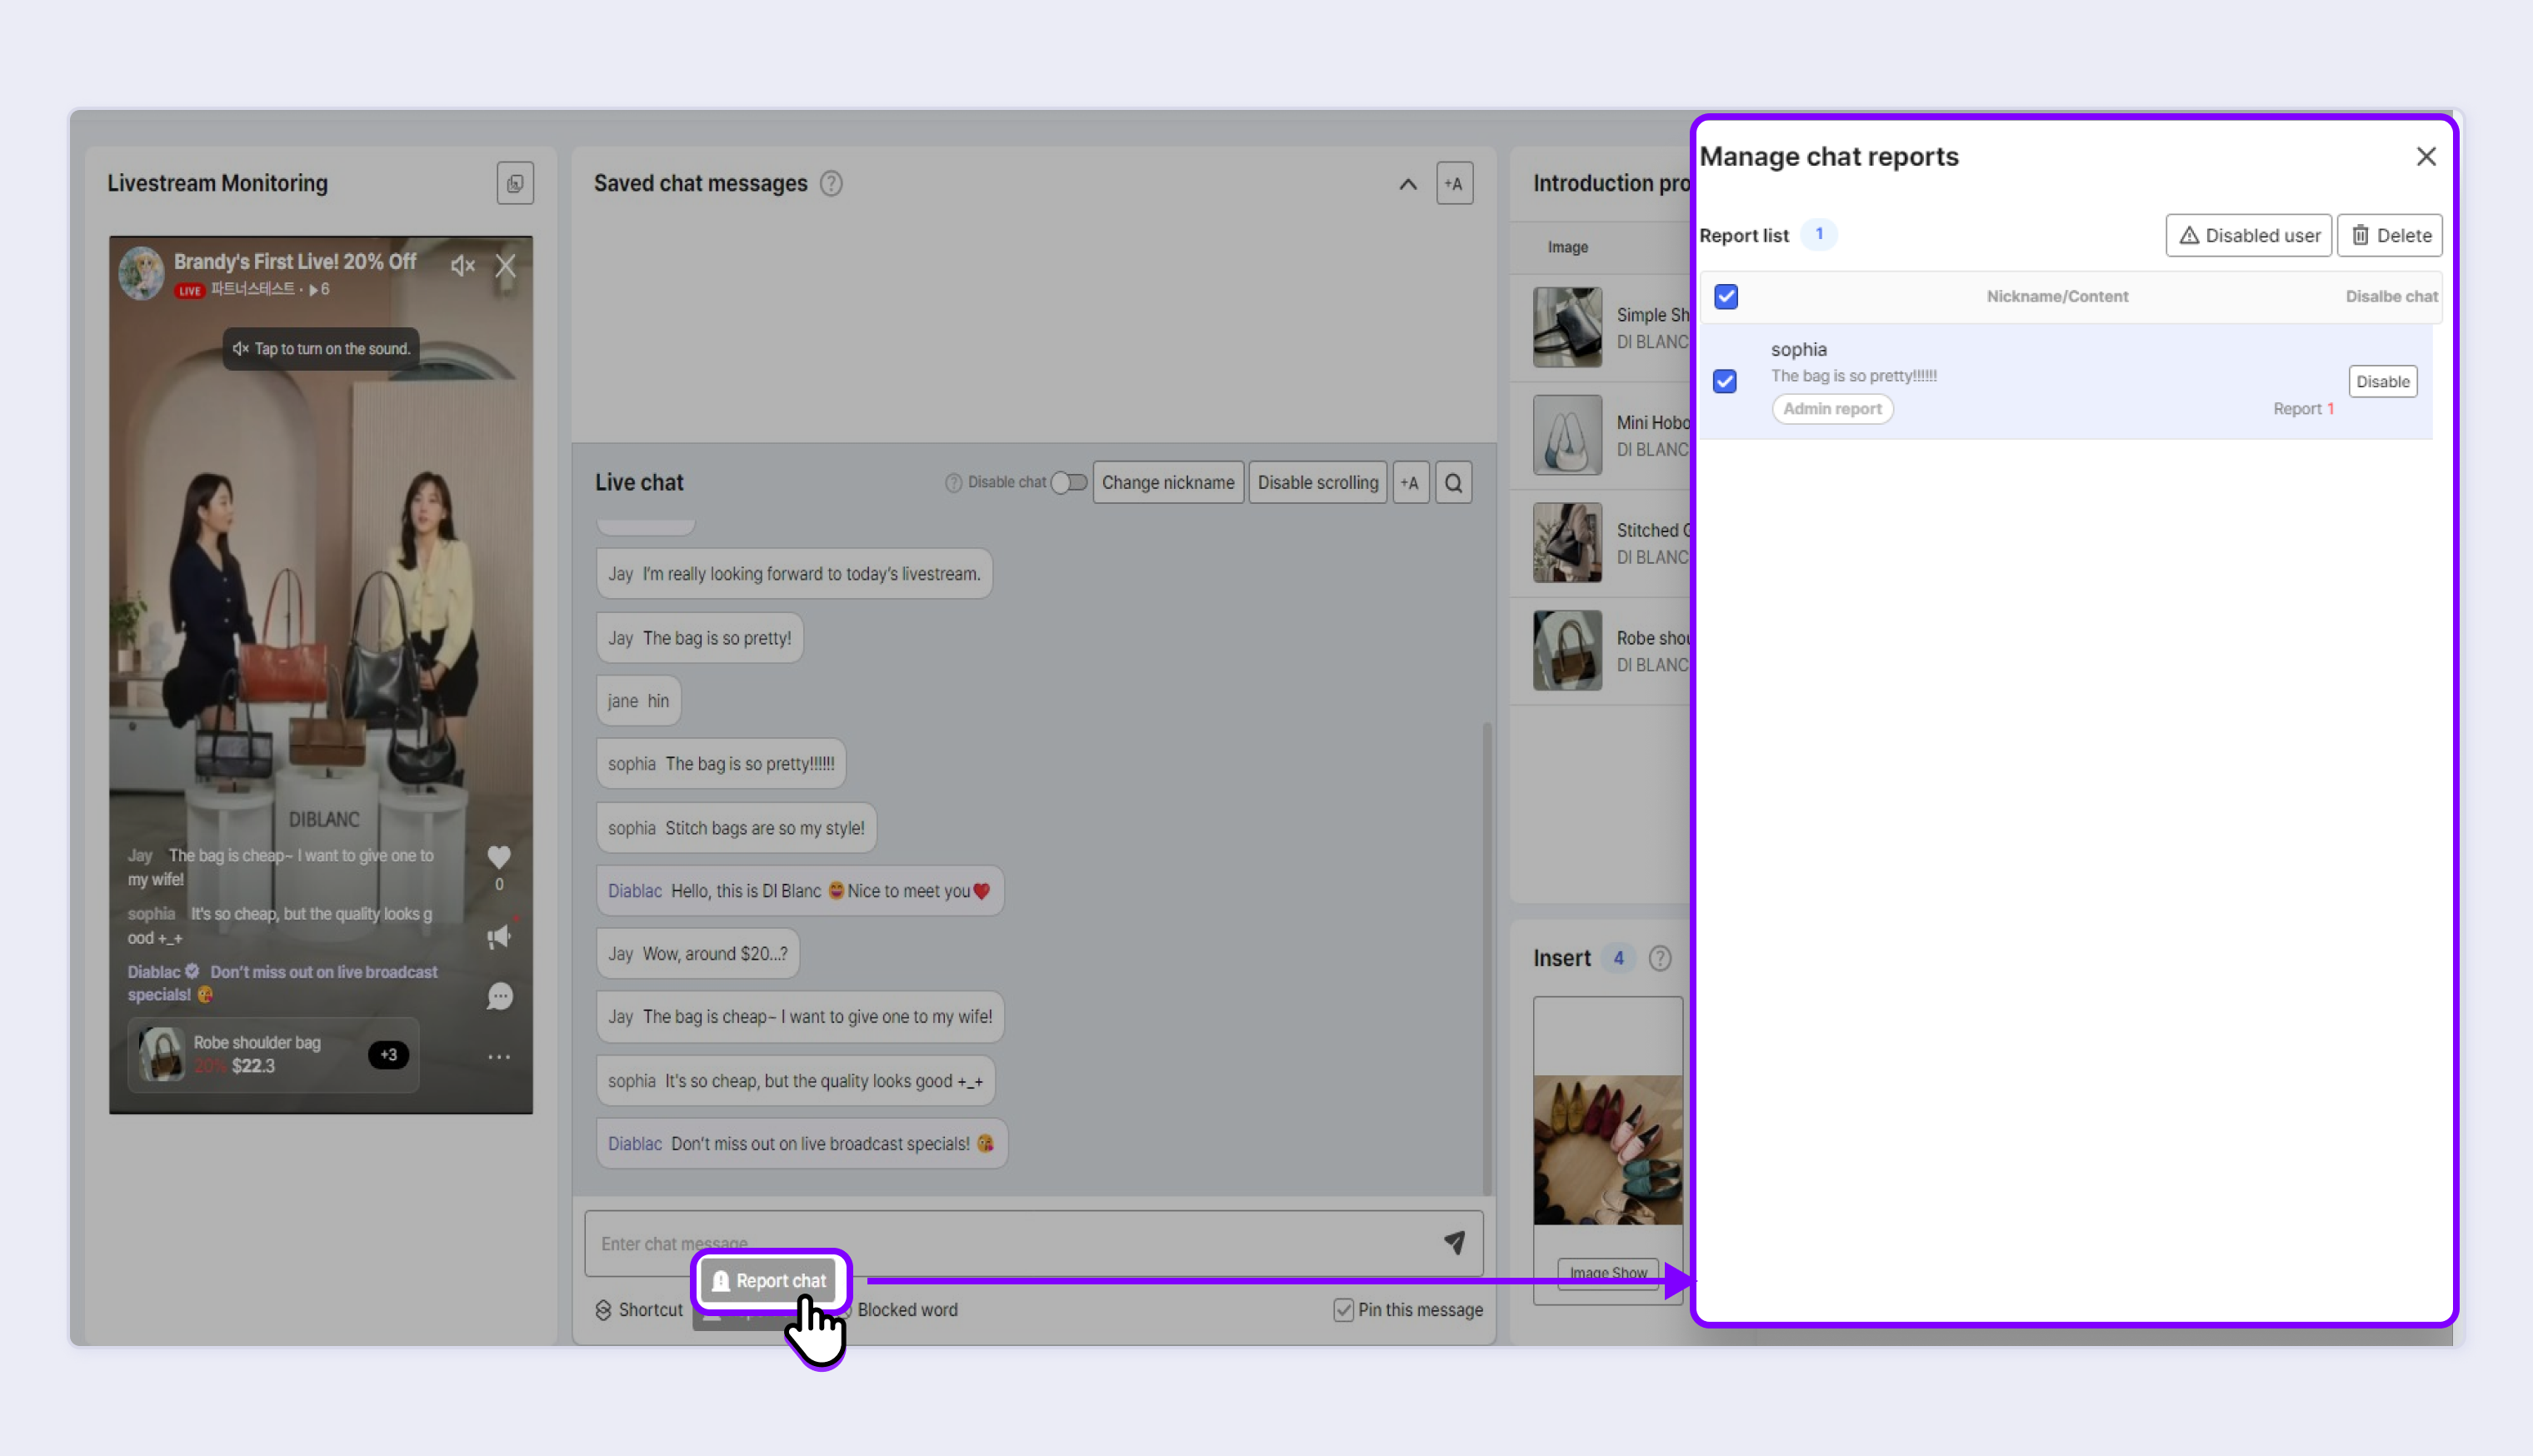
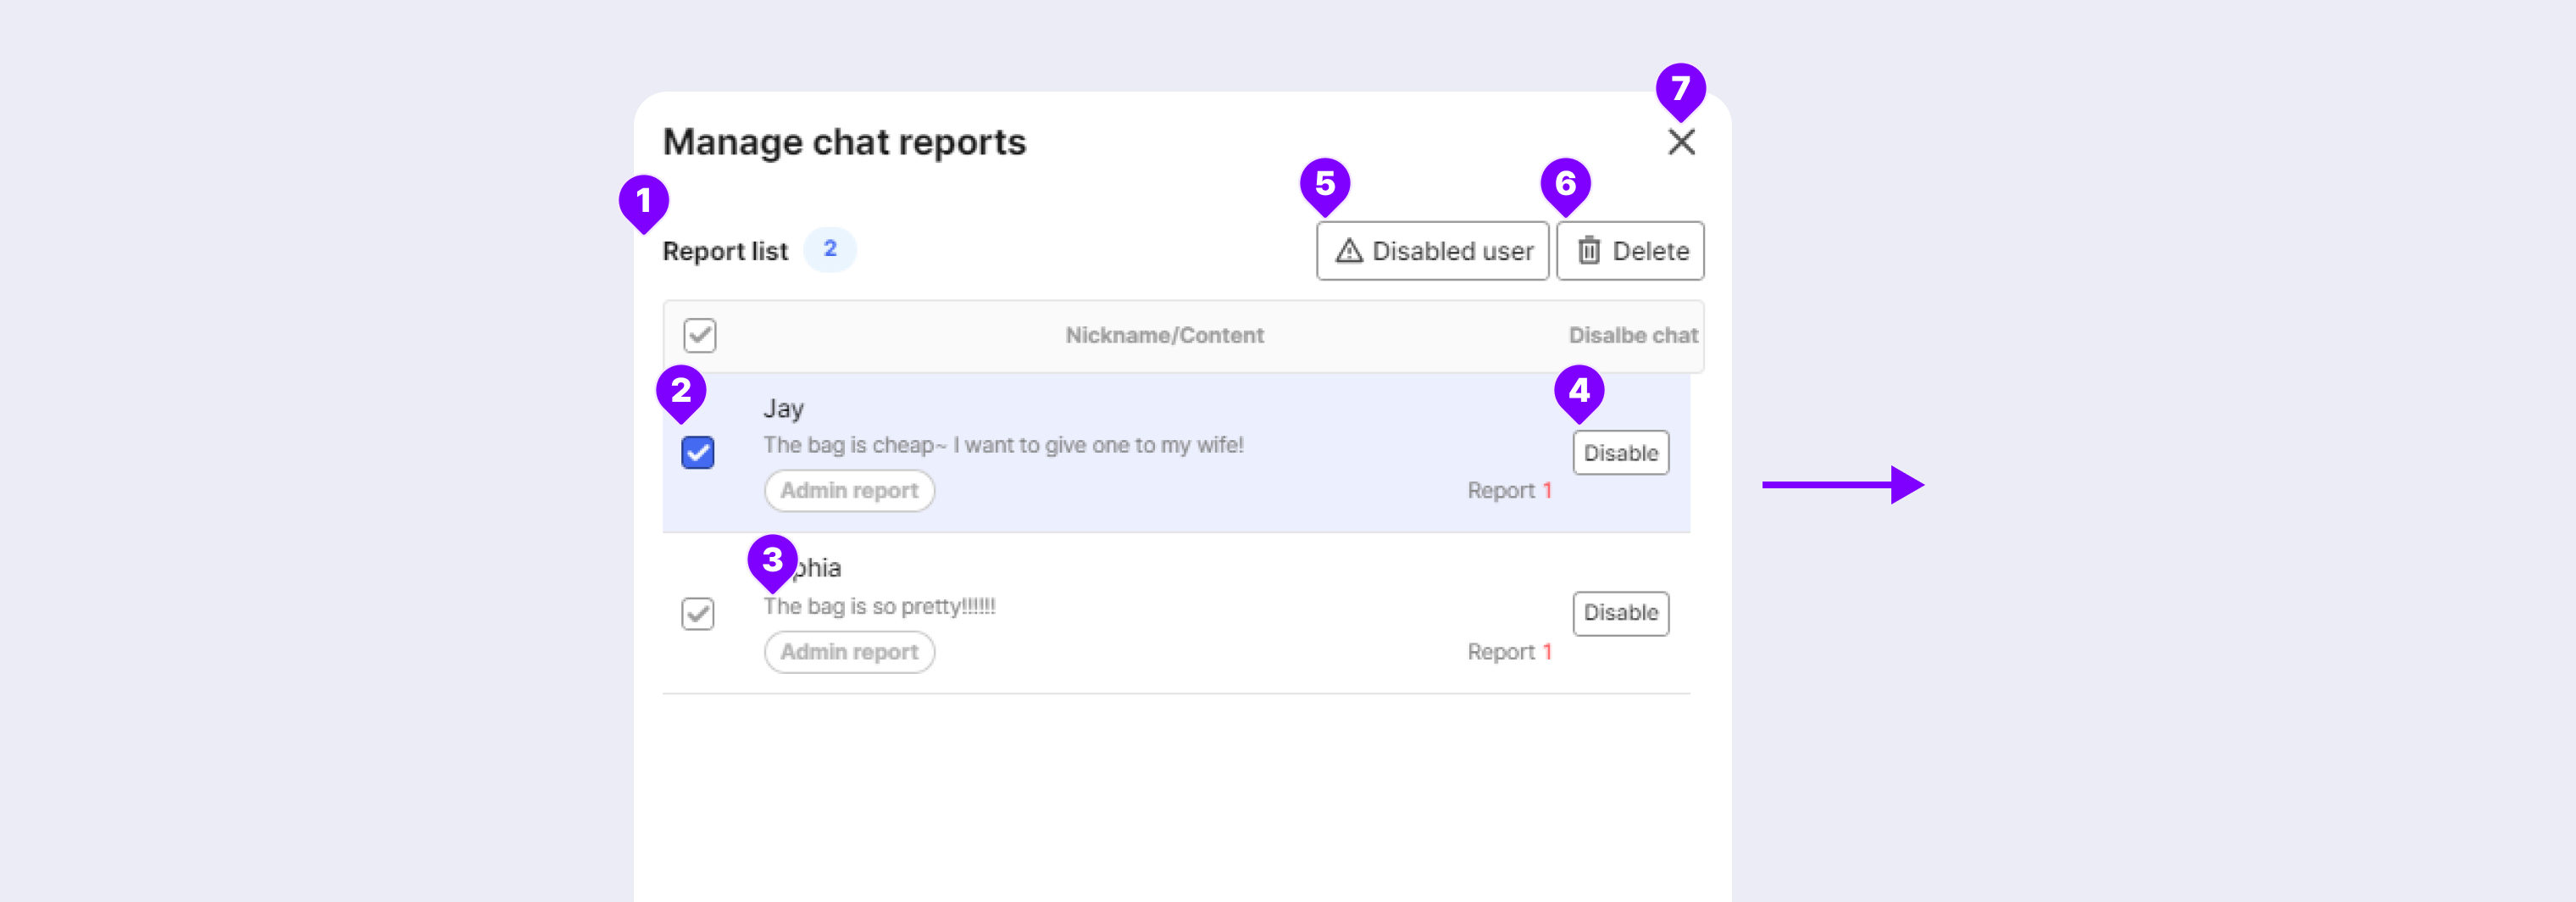
① Report List: Displays the number and list of reported viewers.
② Item: Click to select the report items.
③ Report Details: You can see the reported chat history. You can view ID or nickname, report details, report type, and number of report cases.
If there are duplicate reports, only the reason for the first report is displayed. If more than 99 reports have been made, it is displayed as 99+.
④ Disable: If you want to block chat as well, use the Block function.
The viewer can still join the chat even after being reported. You must block the viewer to prevent them from joining the chat.
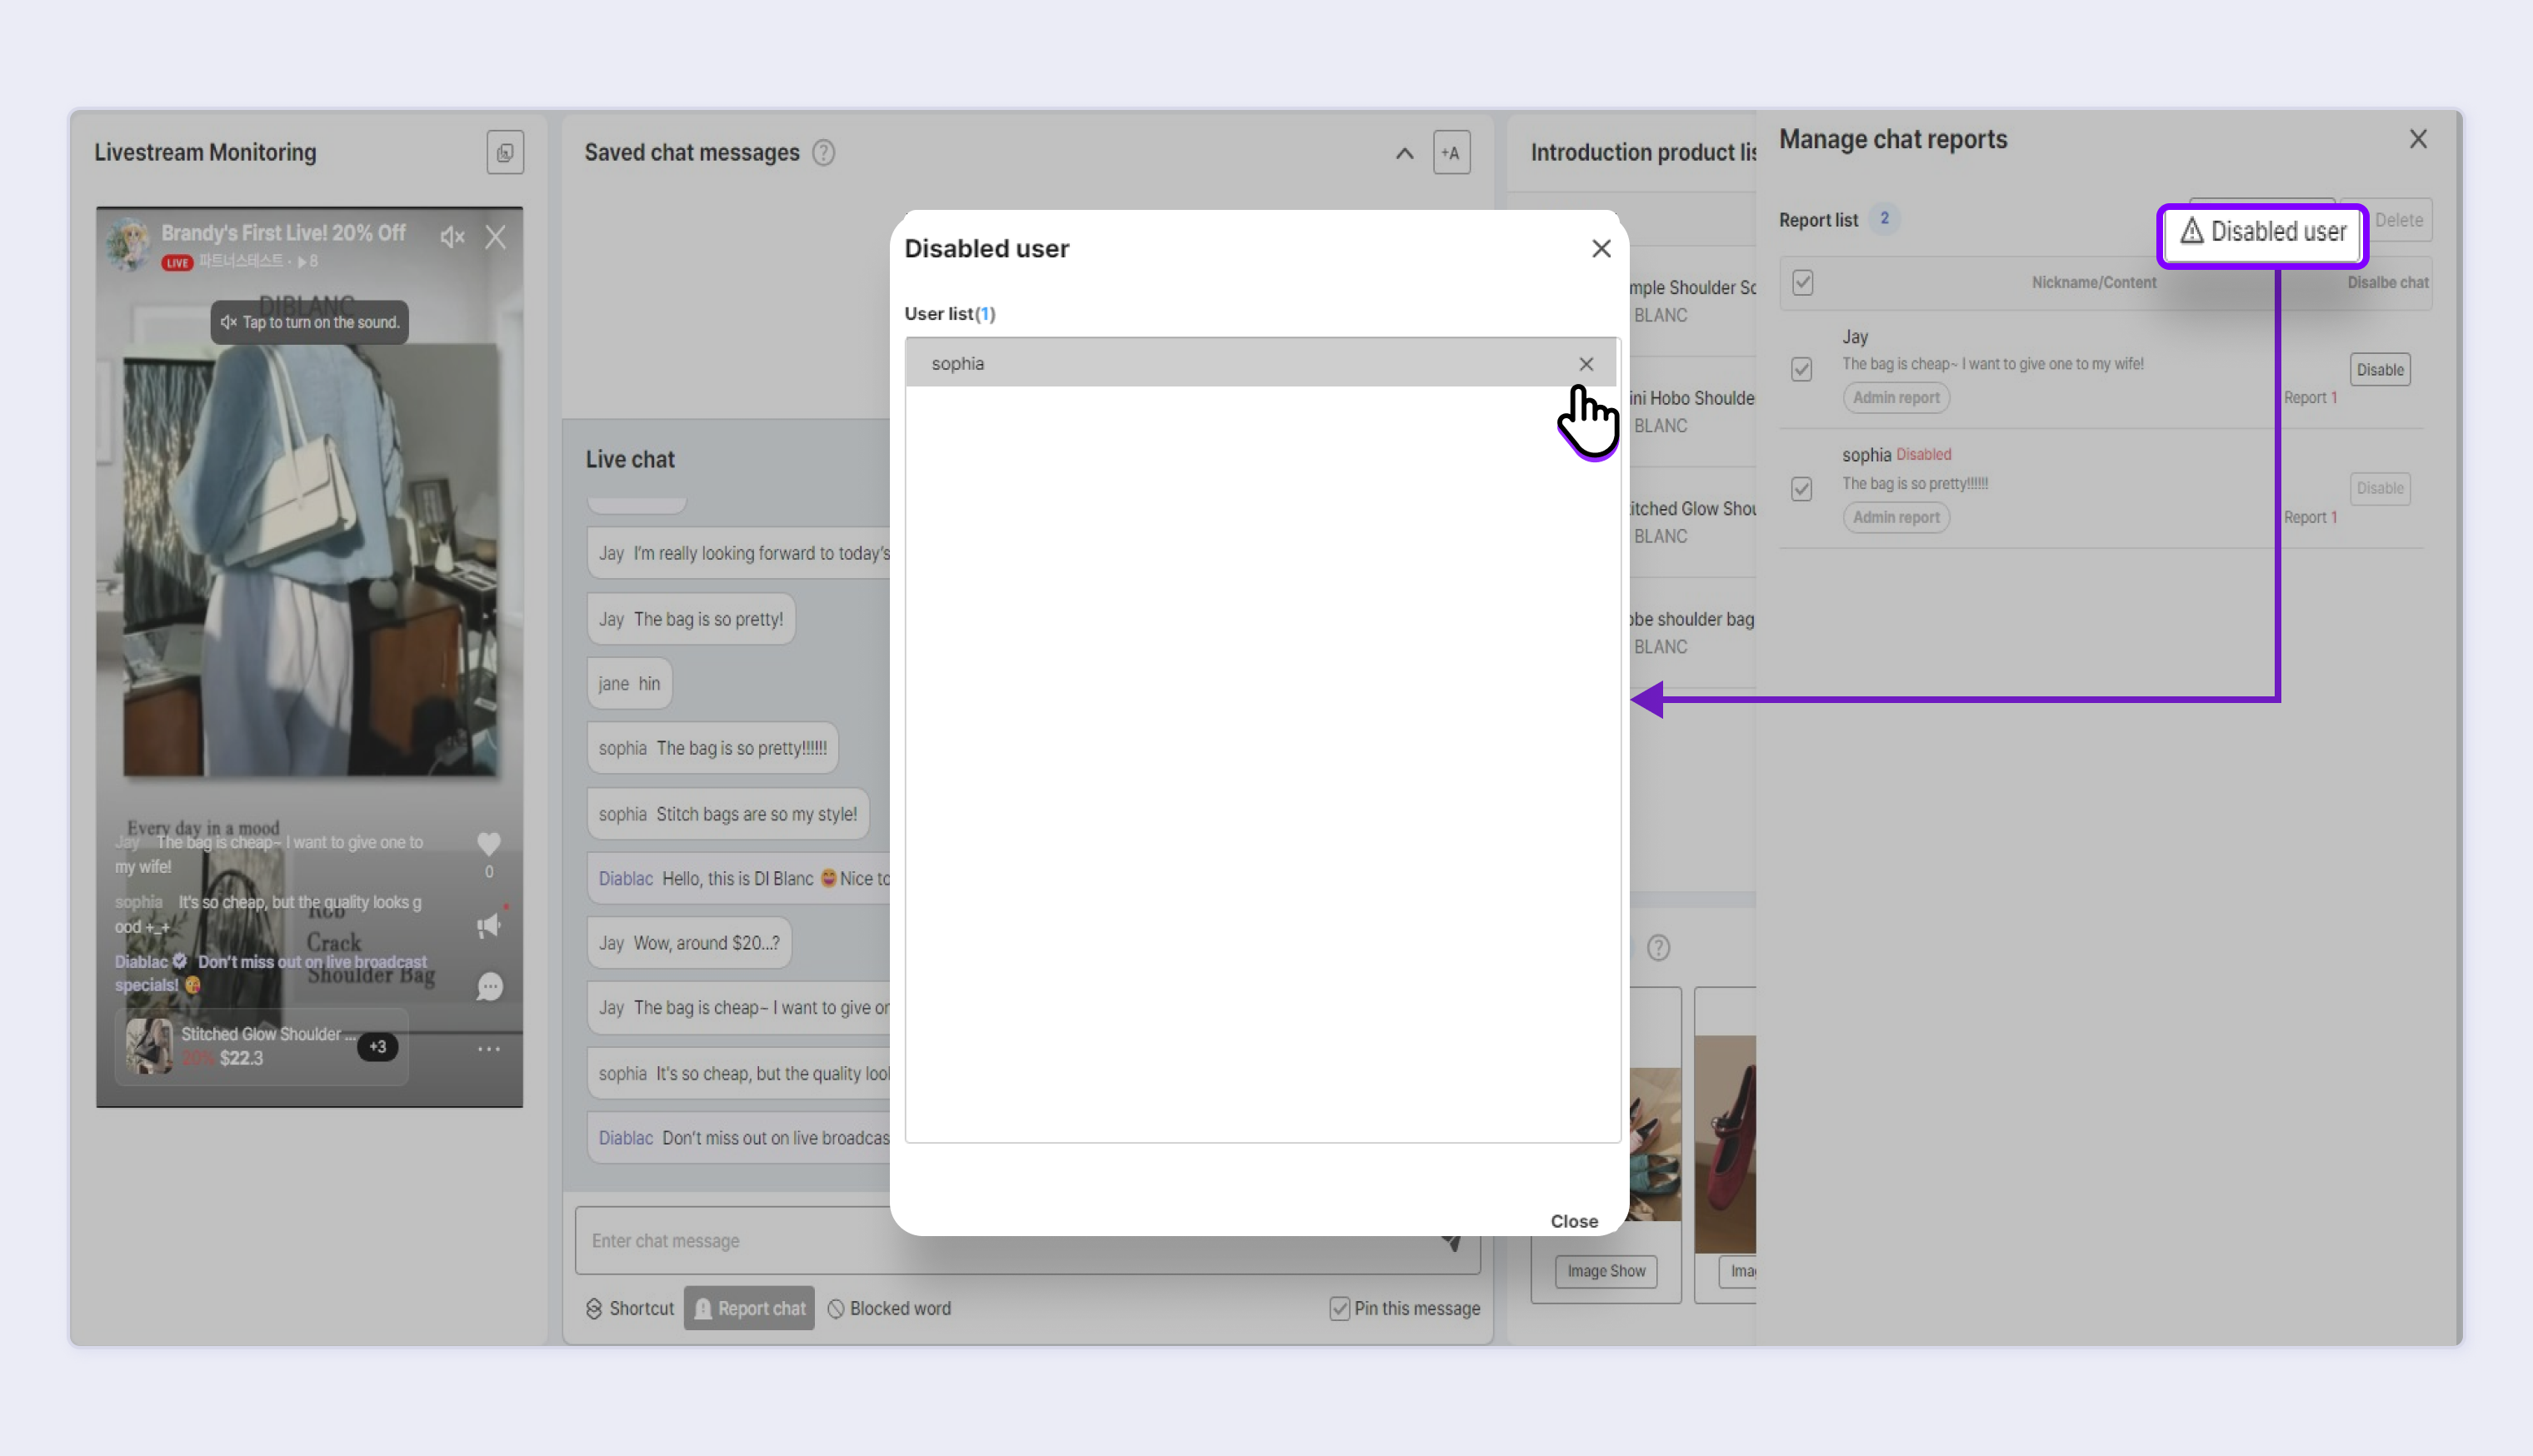
⑤ Disabled User: When clicked, you can view the list of users who cannot chat because they are blocked.
⑥ Delete: Delete the report history.
Since the block information is not deleted, the blocked user still cannot join the chat.
⑦ X: Click to close the window.
Enabling Chat
Clicking the Blocked Users icon shows the list of blocked users.
STEP 1. Move your mouse over the user to enable chat in the list and click x .
STEP 2. When clicked, the change is reflected right away and the blocked chat is enabled again immediately.
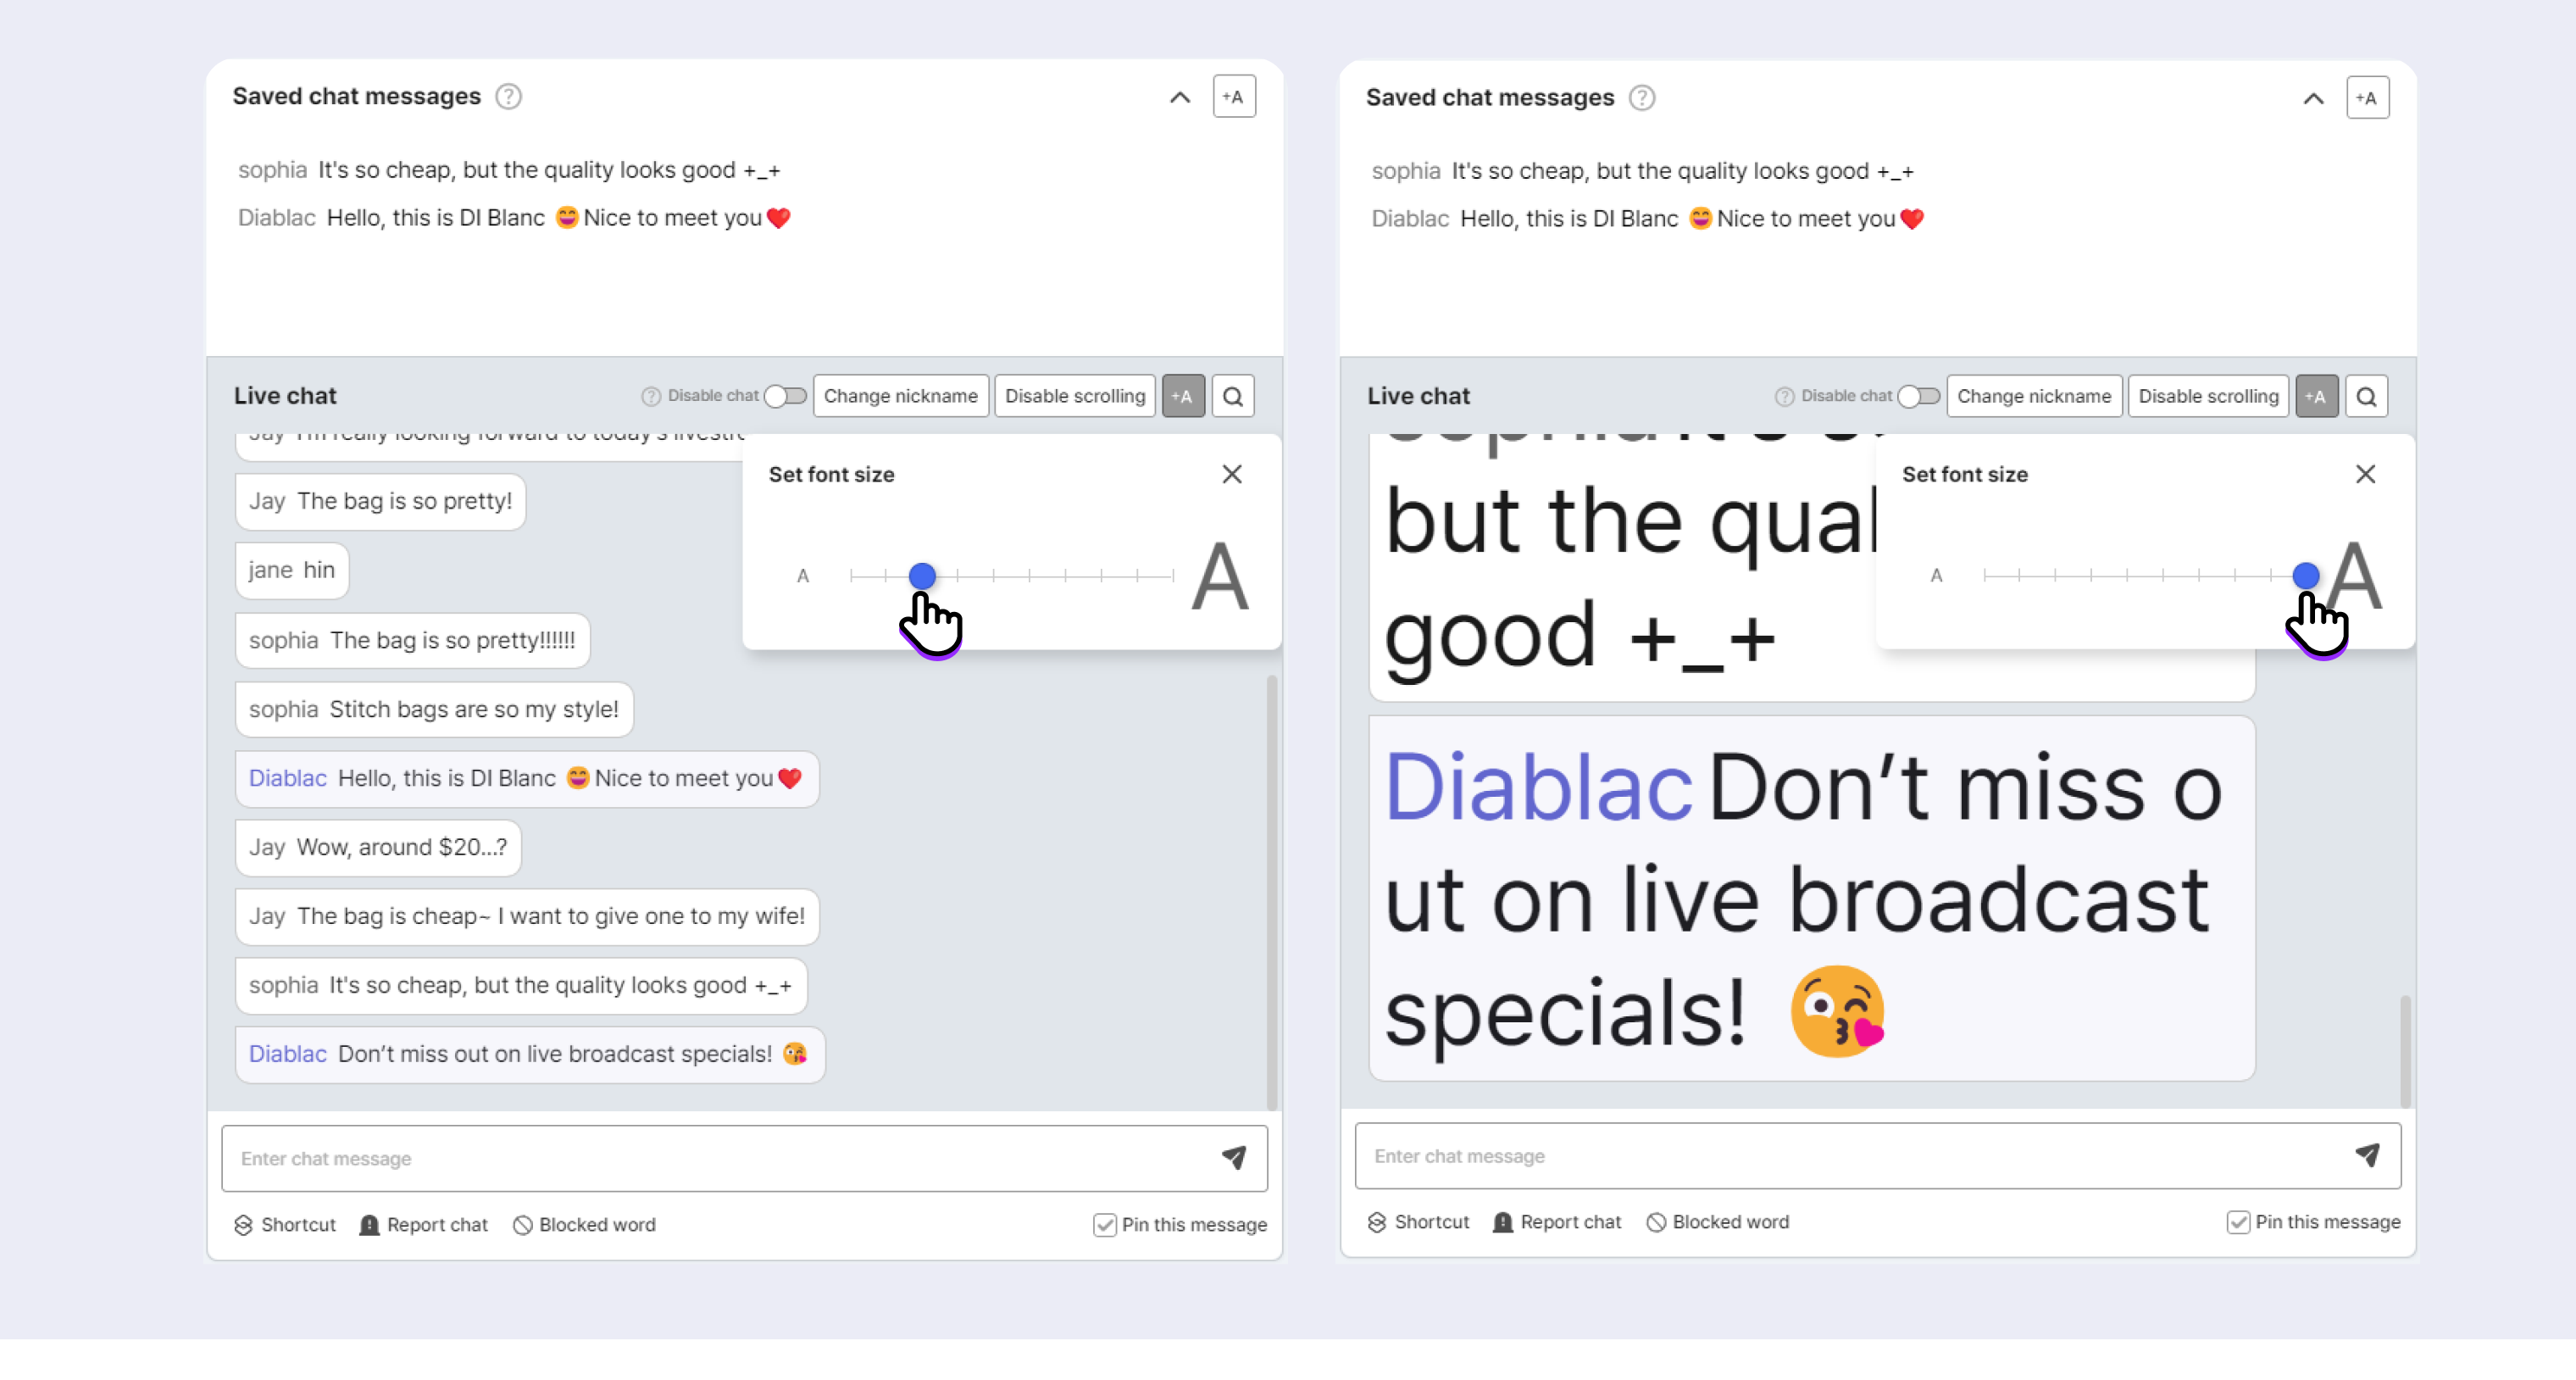
Changing Chat Font Size
You can change the font size of messages in the Chat Archive and real-time chat window.
STEP 1. Click the Set Font Size icon (+A) and move the pointer to select the enlargement scale.
STEP 2. You can set the font size from 110% up to 500%. After setting, click x.
Searching Chat
This function is used to search the chat content.
STEP 1. Click the Search icon.
STEP 2. After entering the search keyword, press Enter or click the magnifier icon to show the list of chats containing the keyword.
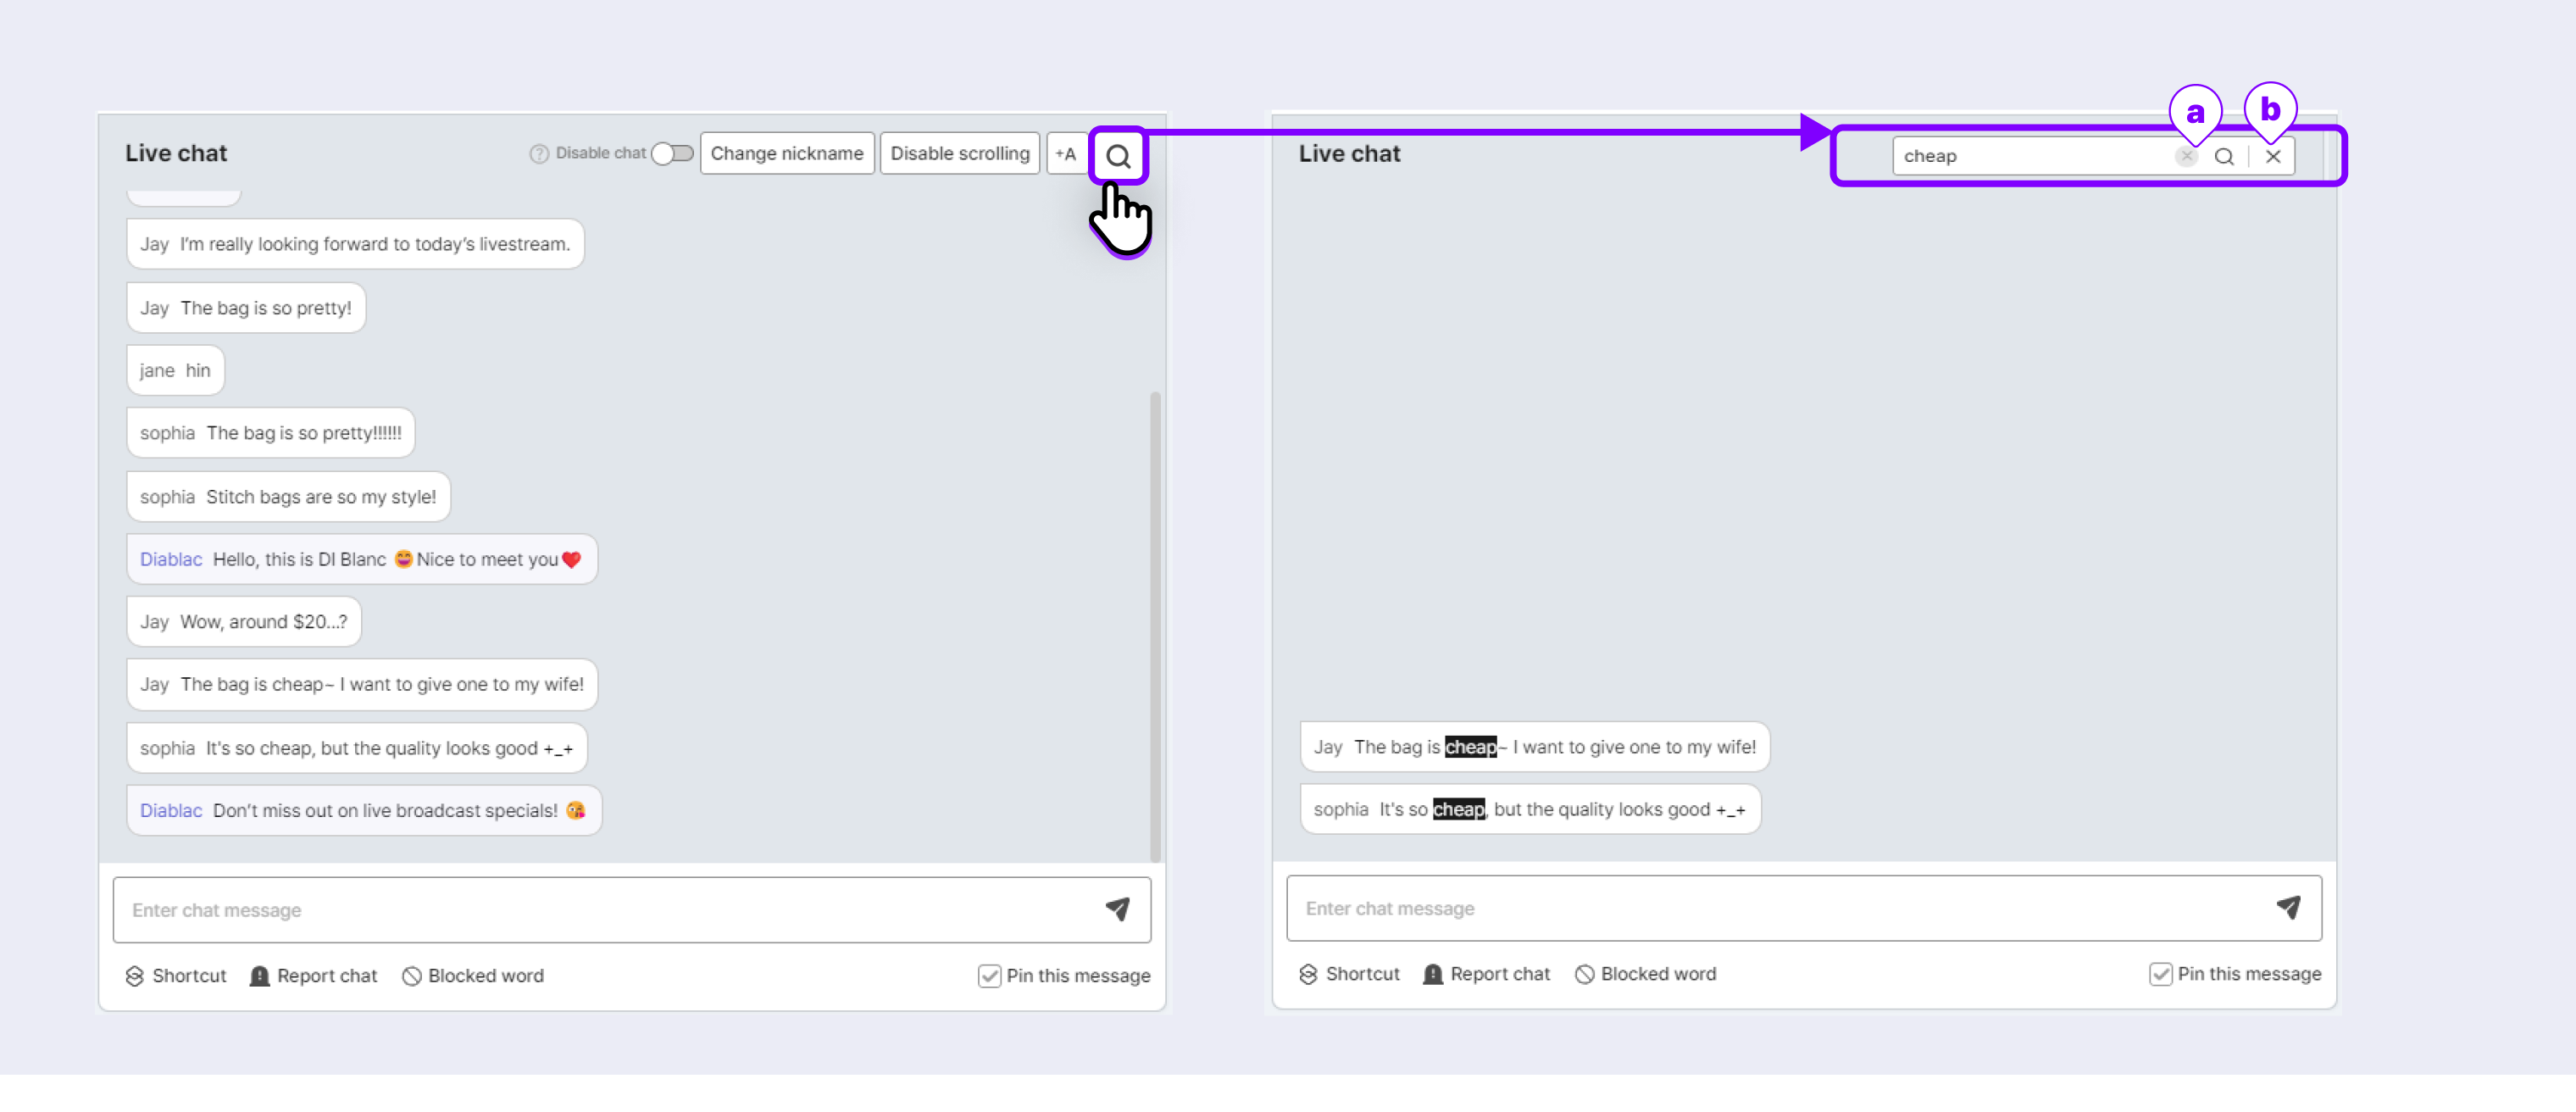
- Delete keyword (a): Clicking it deletes the entered keyword.
- Close search window (b): Clicking it closes the search window and returns to the product list.
You can still search the chat after the livestream has ended.